1. Welcome to Wiichee
1.1 What is Wiichee
Wiichee is a revolutionary smart measuring device that integrates inertial navigation sensors to deliver precise, efficient measurement solutions for outdoor landscape designers, interior space designers, and anyone with professional measurement needs.
1.2 Core Value Proposition
- Move to Measure, Measure to Model
Measure on the go while simultaneously generating 3D models and CAD files.
No manual sketching or secondary modeling required. - Complex Spaces, Captured in One Pass
Accurately captures heights, angles, curves, slopes, and irregular terrains.
Handles complex structures with ease. - Smooth and Intuitive Annotation
Supports fluid freehand drawing and flexible editing.
More natural expression, more intuitive annotation. - AI-Powered Data Processing
Automatically analyzes voice notes and other recorded information to generate professional reports.
Reduces manual organization and repetitive tasks. - T3X High-Precision Sensing Chip
Equipped with the proprietary T3X motion sensing chip.
Built on aerospace-grade 9-axis high-precision sensors and the proprietary TracemartLM algorithm.
Ensures precise and stable measurement results. - Engineering-Grade Measurement Accuracy
Accuracy up to 99.8%, with an error margin of ±0.2%.
Meets professional measurement standards. - Multi-Device Sync (Anytime, Anywhere, Any Device)
View and manage project data across phones, tablets, and computers.
Real-time sync, accessible at any time. - Seamless Integration with Major Design Software
Efficiently export measurement results and interoperate with design tools.
Compatible with design, modeling, and project management workflows. - Open API and Plugin Ecosystem
Supports third-party system integration and industry-specific custom development.
Build scalable application capabilities. - Full Coverage: Indoor and Outdoor
Suitable for indoor spaces, landscape design, architectural engineering, and more.
One device, multiple scenarios.
1.3 Who Is It For
- Outdoor Landscape Designers: Landscape surveying, terrain mapping, vegetation distribution recording
- Interior Space Designers: Room measurement, MEP positioning, interior design planning
- Architects & Engineers: Building surveys, construction supervision, quality inspection
- Real Estate Agents: Floor area measurement, space visualization
- DIY Enthusiasts: Home renovation, space remodeling
- Other Professionals: Any work requiring precise measurements
2. Getting Started
2.1 Before You Begin
Device Check
- Ensure Wiichee has sufficient battery — recommended ≥50%
- Verify the laser aperture is clean and unobstructed
- Fully charge before first use with the included USB cable (approx. 1.5 hours)
- During charging: indicator flashes yellow; solid green indicates fully charged
Environment Preparation
- Clear obstacles (clutter, plants, large furniture, etc.) from key measurement points along the path.
- Choose an environment with no direct strong sunlight to ensure measurement accuracy.
App Setup
- System requirements:
iPhone: iOS 13.0 or later
Android: Android 6.0 or later
- Download instructions:
iOS users: Open the App Store, search for "Wiichee", and tap "Install".
Android users: Open your device's app store (e.g., Tencent MyApp, Huawei AppGallery), search for "Wiichee", and tap "Install".
- After installation, open the app and ensure your phone's Bluetooth version is 5.0 or later.
2.2 Device Connection and Basic Setup
Registration and Login
- Open the Wiichee app and tap the "Avatar" icon in the top-left corner.
- Choose a registration method (phone number recommended; email is also supported)
- Enter your phone number or email and tap "Get Verification Code"
- Enter the verification code and check "I agree to the User Agreement and Privacy Policy"

5) Complete registration and log in automatically.
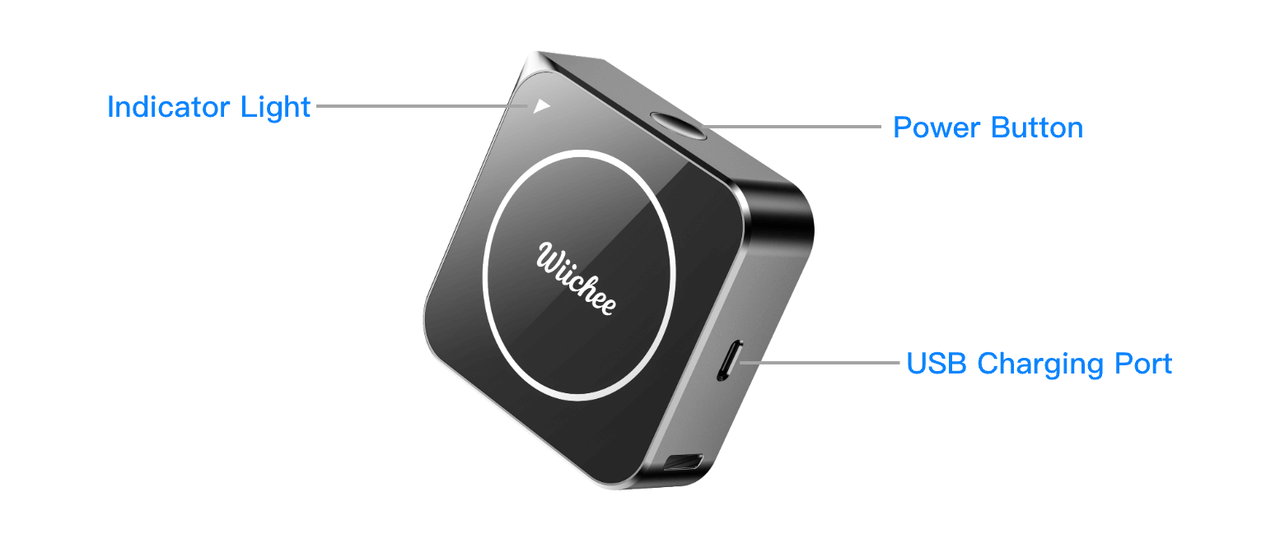
Bluetooth Pairing
- Press the "Power" button on the side of the device and wait 1–2 seconds to power on. A flashing blue indicator means the device is waiting for a connection.
- On the app's home screen, tap "Connect Device", find your WIICHEE device name, and select it.
- Once connected, the indicator turns solid blue and the app button displays "Device Connected".

Basic Settings
Tap the "Avatar" icon in the top-left corner and go to "System Settings".
Select "Measurement Unit" to switch between metric (meters, millimeters, etc.) or imperial (feet) as needed.
Adjust "Measurement Precision" (default values are recommended; no changes needed for new users).

2.3 Measurement Precautions and LED Indicator Guide
Measurement Precautions
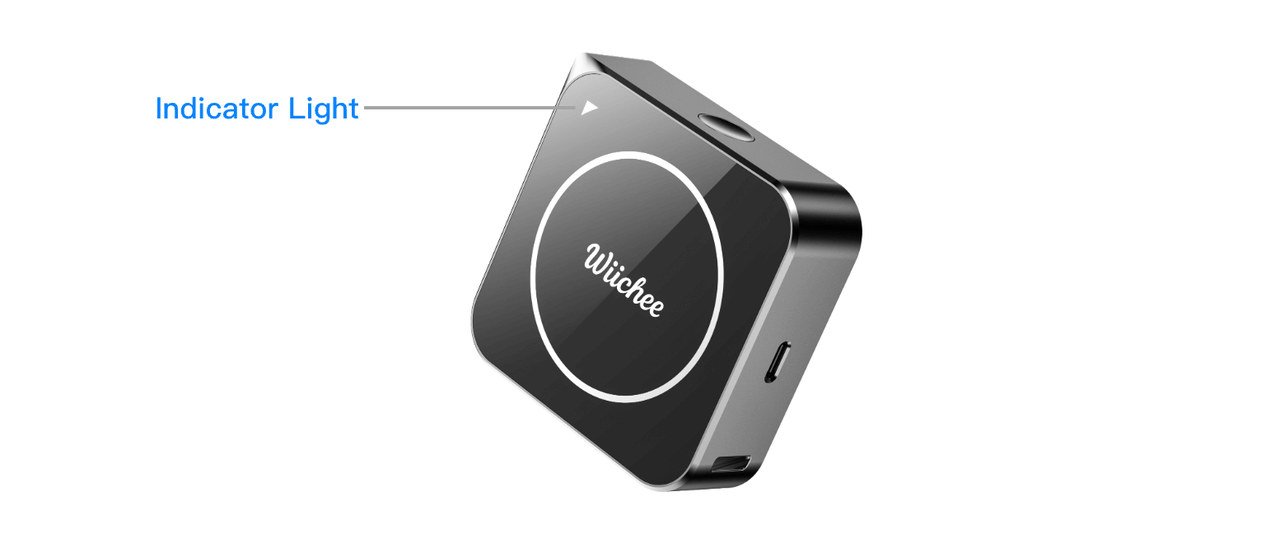
- The corner facing the indicator light is the measurement reference point. Always align it precisely with the target position; misalignment will affect accuracy.
- Keep the device movement speed under ≤1 m/s during measurement. Pause briefly at corners to ensure accurate point capture.
- Hold the device firmly and steadily. Do not flip the device or subject it to sudden impacts or shaking, as this will cause measurement errors.
- Avoid measuring in environments with intense direct sunlight or heavy signal obstruction, as these affect data accuracy.
- When not in use for extended periods, press the "Power" button to shut down. Periodically clean the laser aperture and contact points with a soft, dry cloth.
- For complex paths, measure in segments. After each segment, confirm data is saved. The app automatically backs up to the cloud — no data loss to worry about.
Measurement Status Indicators
| Indicator Status | Meaning |
|---|---|
| Off | Device is off |
| Blue flashing | Device on, waiting for Bluetooth connection |
| Solid blue | Bluetooth connected |
| Solid red | Ready to measure — place device at starting point |
| Green flashing | Measurement in progress (normal) |
| Solid green | Measurement point captured successfully |
| Yellow flashing | Approaching timeout — place device promptly |
| Red flashing | Measurement timeout or error |
Charging Status Indicators
| Indicator Status | Meaning |
|---|---|
| Red flashing | Charging |
| Red rapid flashing | Charging error |
| Solid green | Fully charged |
3. Account Management
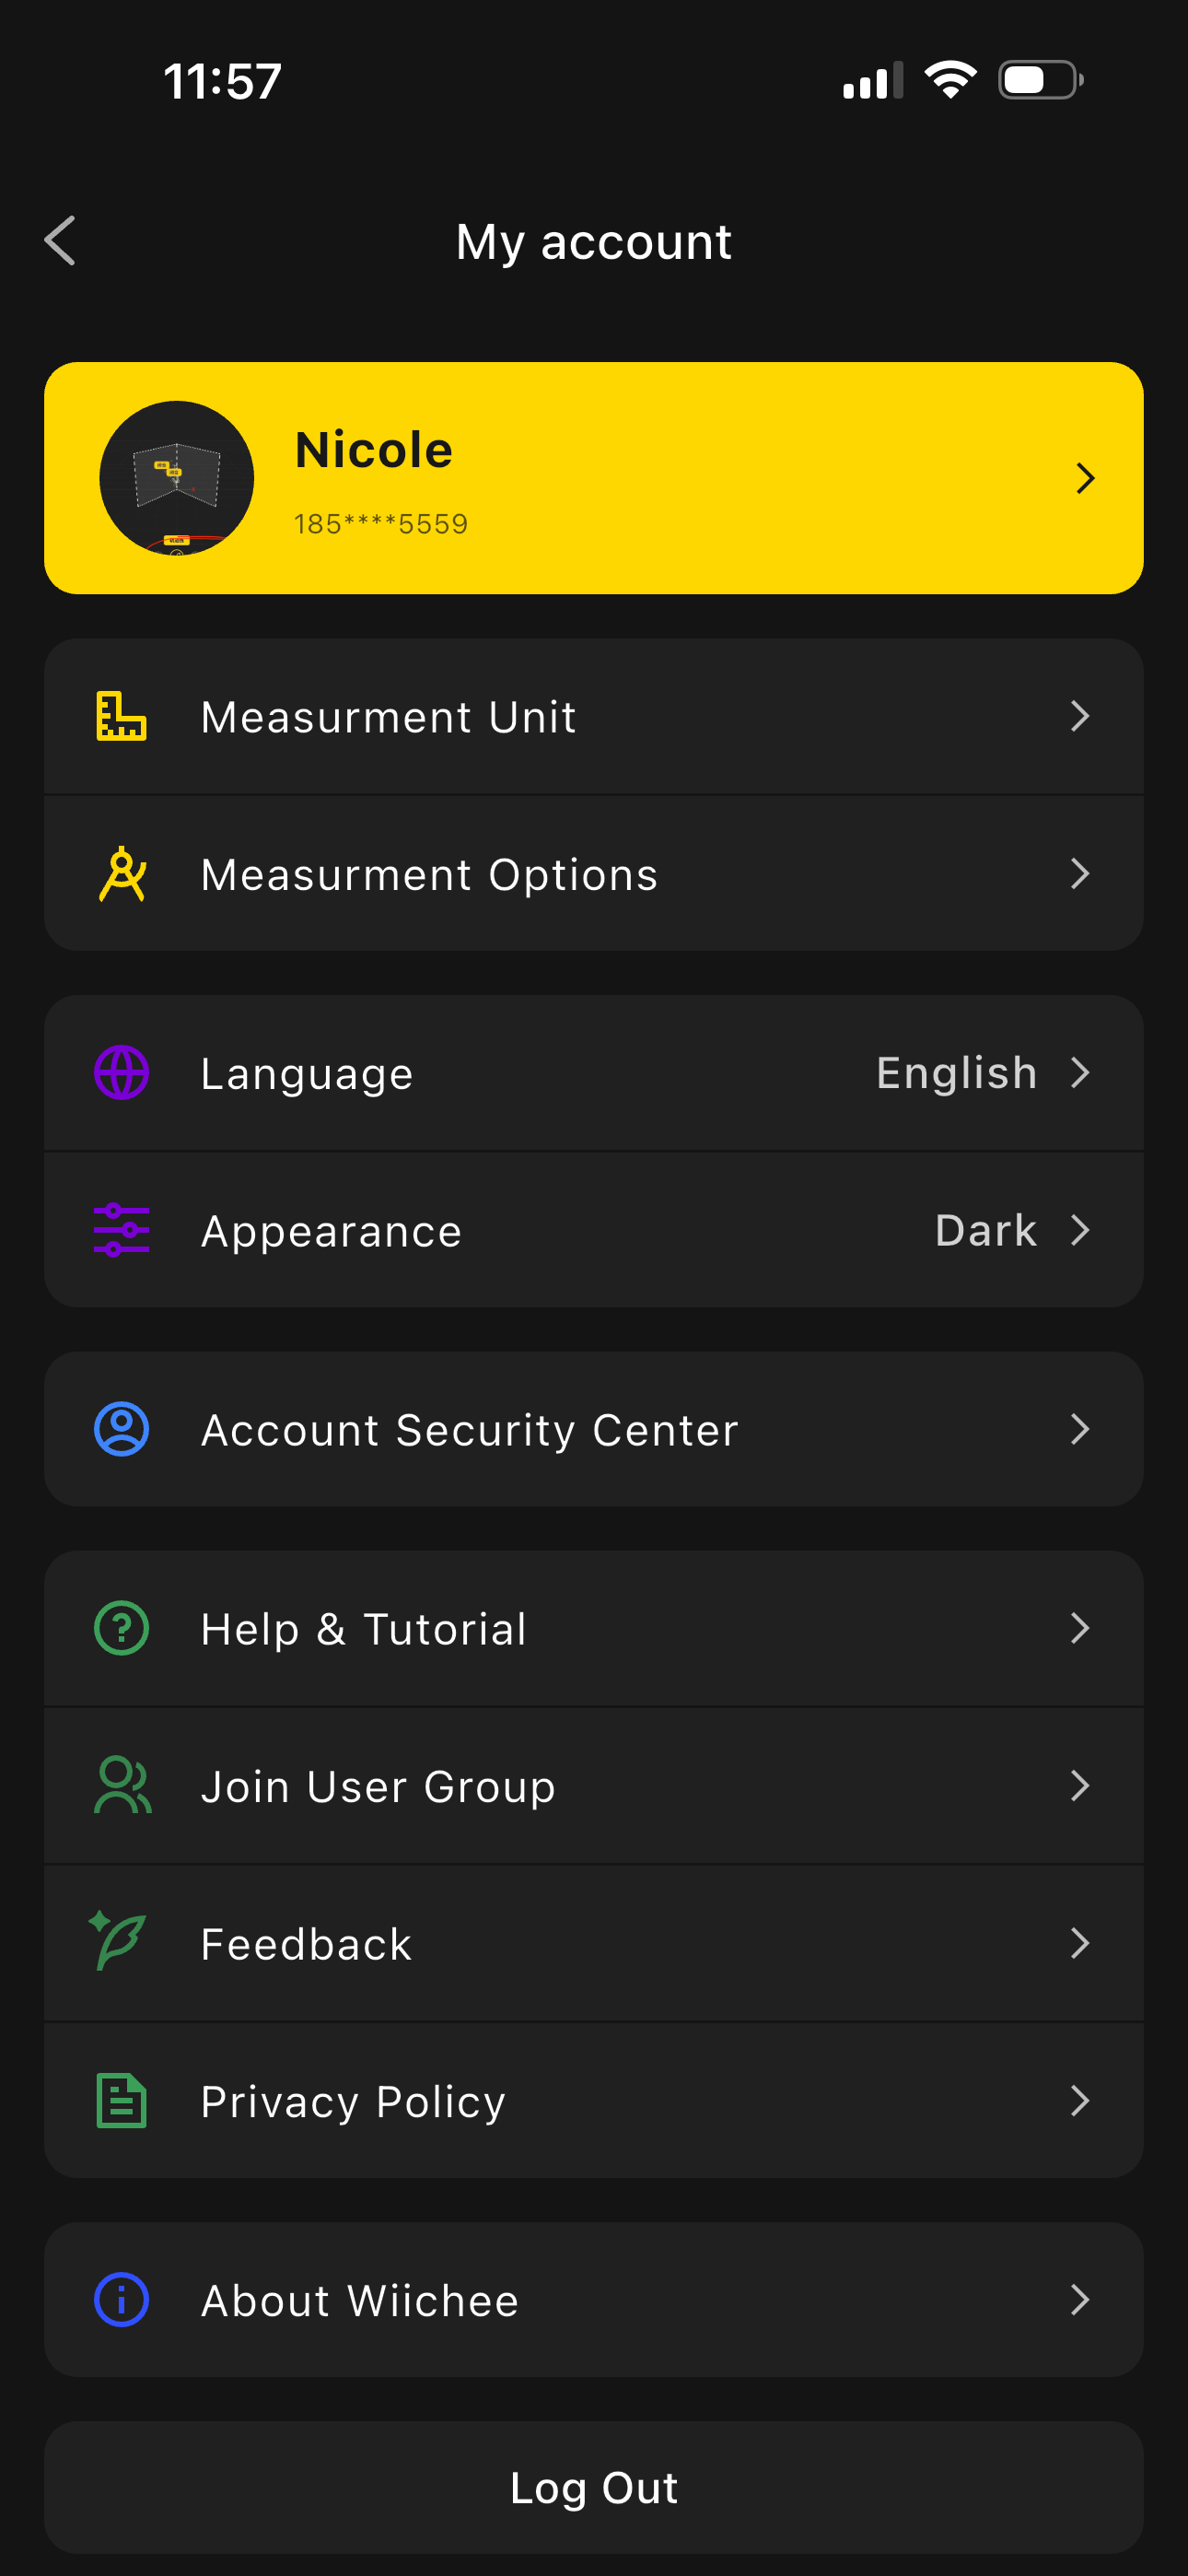
3.1 Account Settings
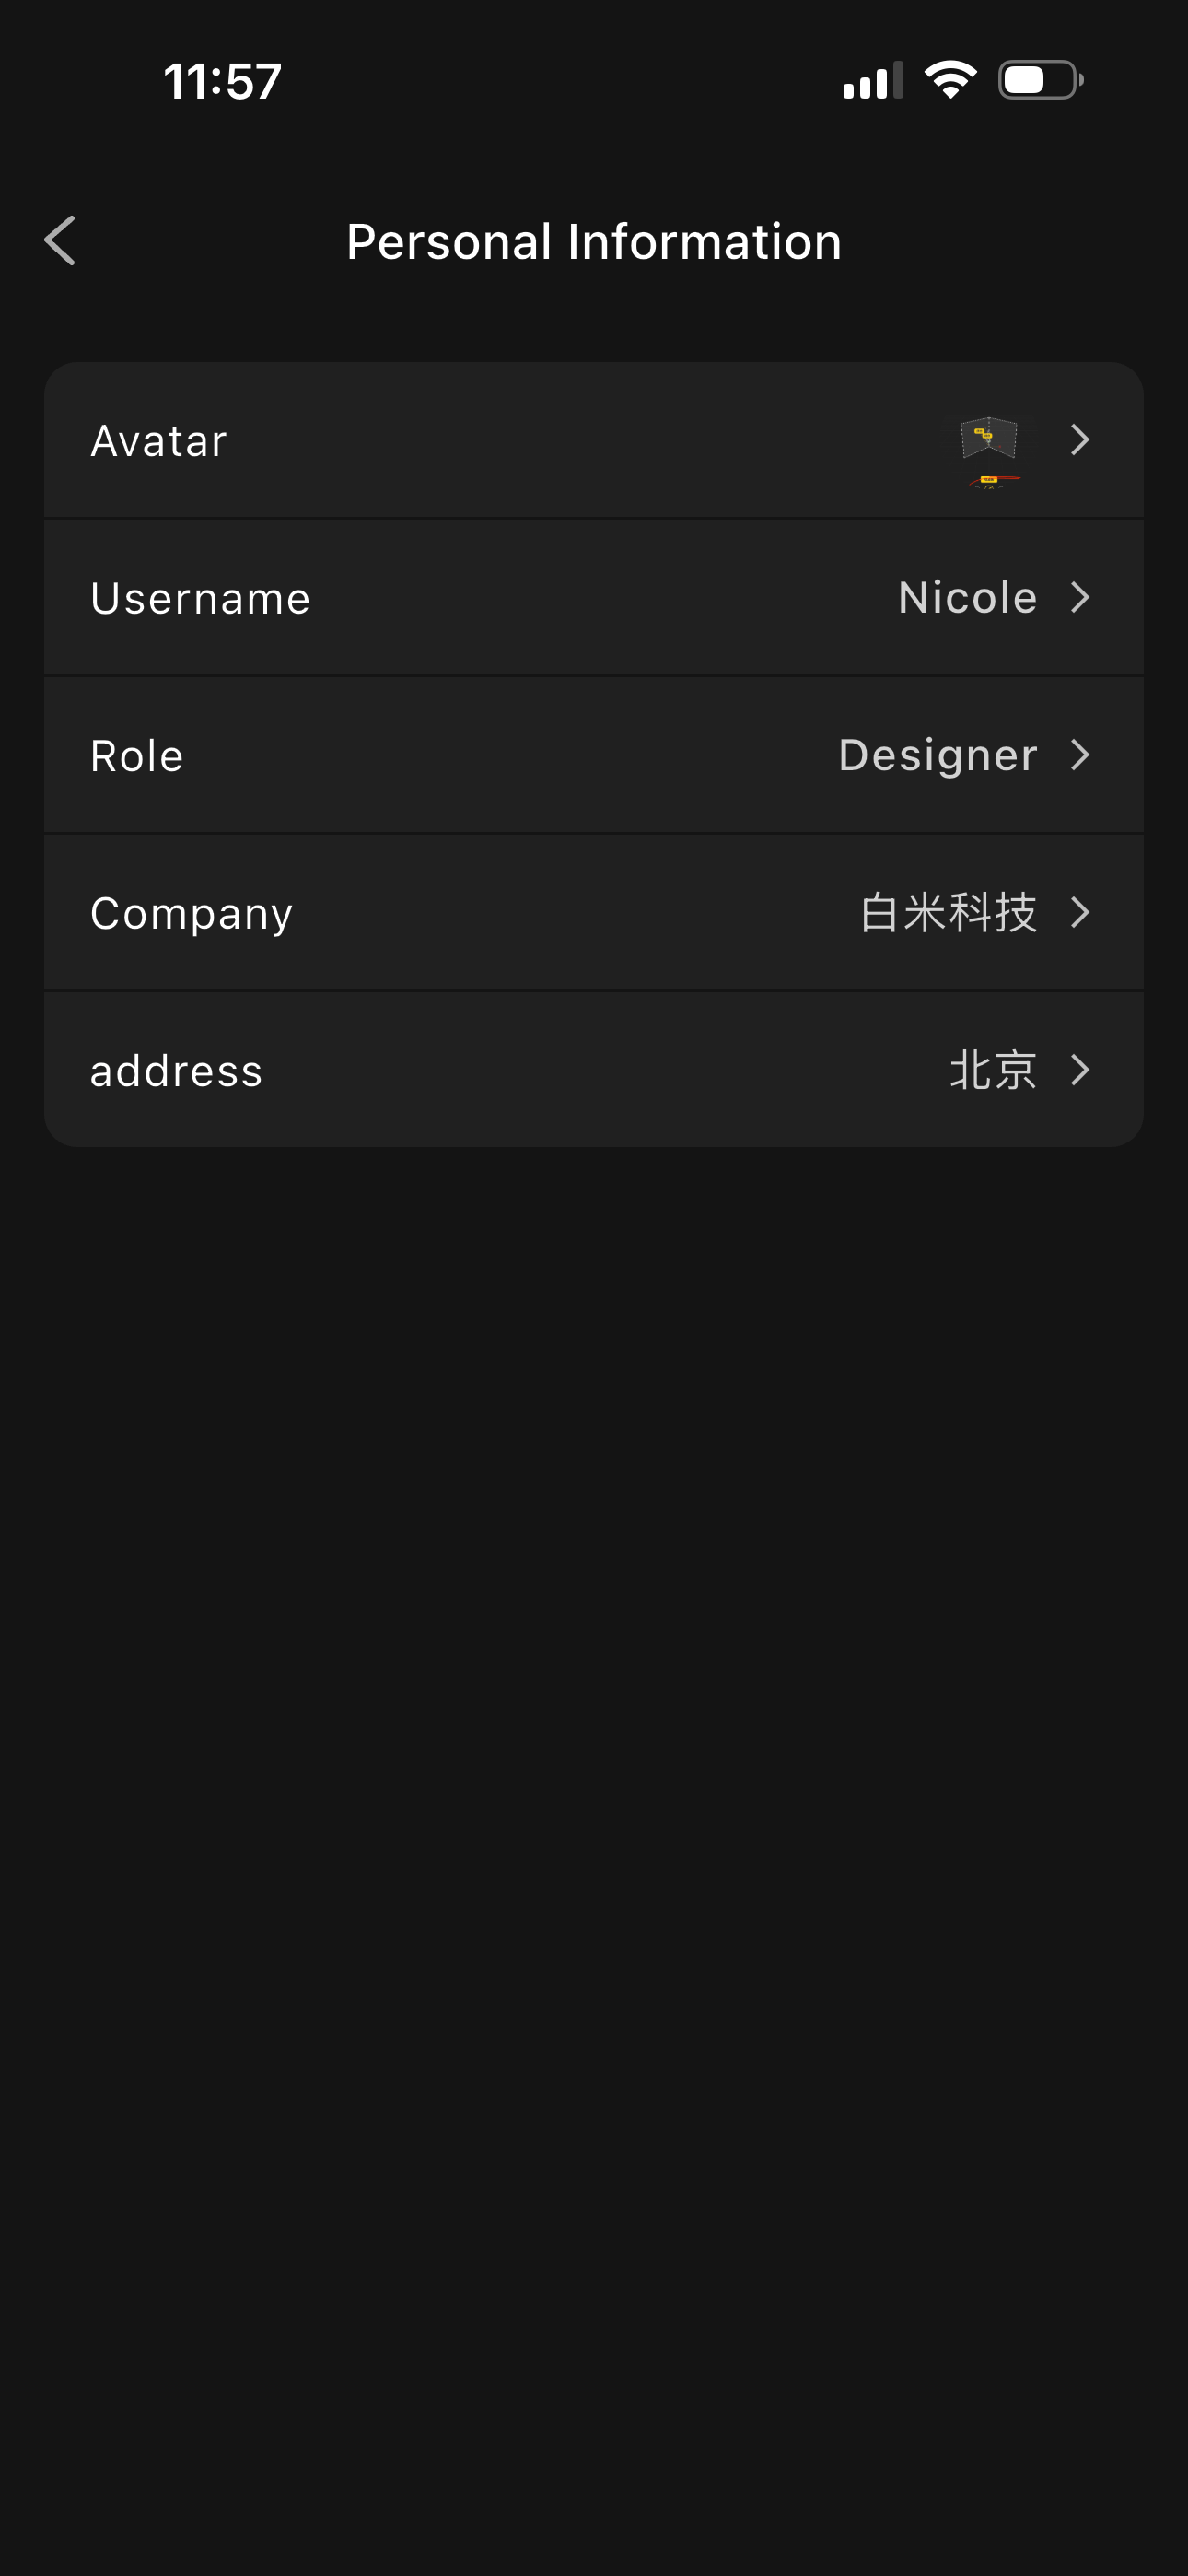
Personal Information:
Tap "Avatar" in the top-left corner of the app → Personal Info
 |
 |
|---|
- Avatar: Tap to choose from the photo library or take a photo
- Username: Tap to enter a new username
- Role Setting: Select professional role (Designer, Manager, Surveyor, Foreman)
- Company Setting: Enter company name and department information
- Address Setting: Set your default work address
3.2 System Settings
Tap "Avatar" in the top-left corner → Measurement Unit
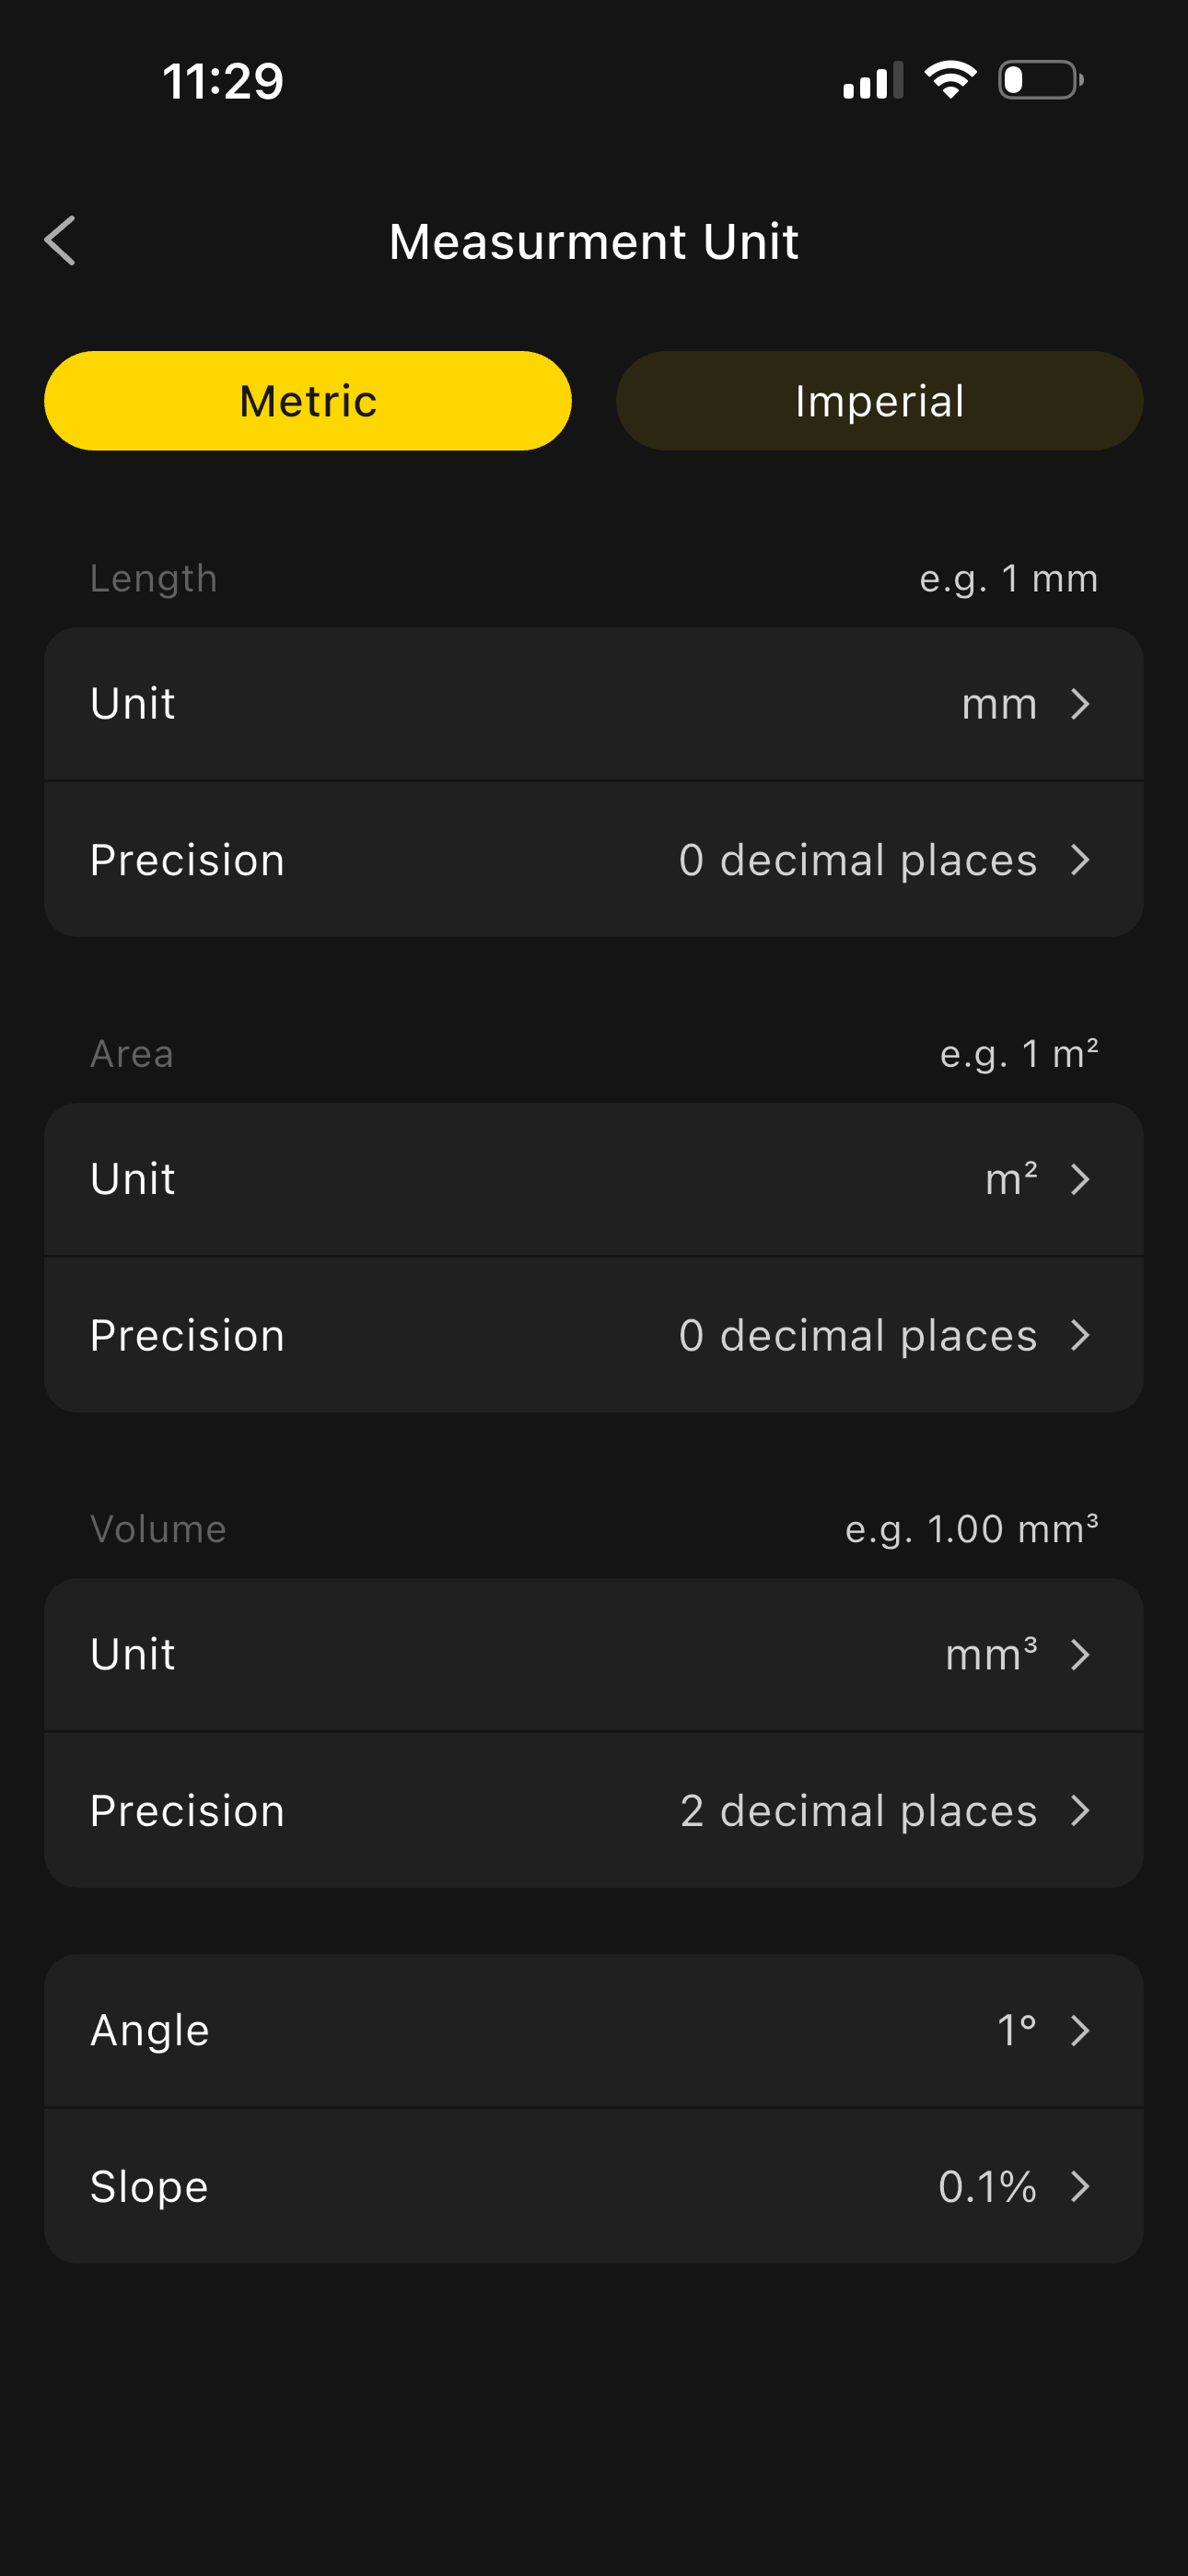
Measurement Unit Settings:
- Metric: Length, area, volume, angle, slope — select the unit and precision as needed
- Imperial: Length, area, volume, angle, slope — select the unit and precision as needed
Recommended Precision:
- Standard: ±2 mm (everyday use)
- High Precision: ±1 mm (precision measurement)
- Ultra-High Precision: ±0.5 mm (professional applications)
Language Settings:
- Simplified Chinese
- English
Appearance Theme:
- Light: Suitable for bright environments
- Dark: Suitable for low-light environments
- Auto: Follows system settings
3.4 Account Security
Account Deletion:
- Go to Account Security Center
- Tap "Delete Account"
- Confirm the reason for deletion
- Verify identity (SMS or email)
- Confirm deletion
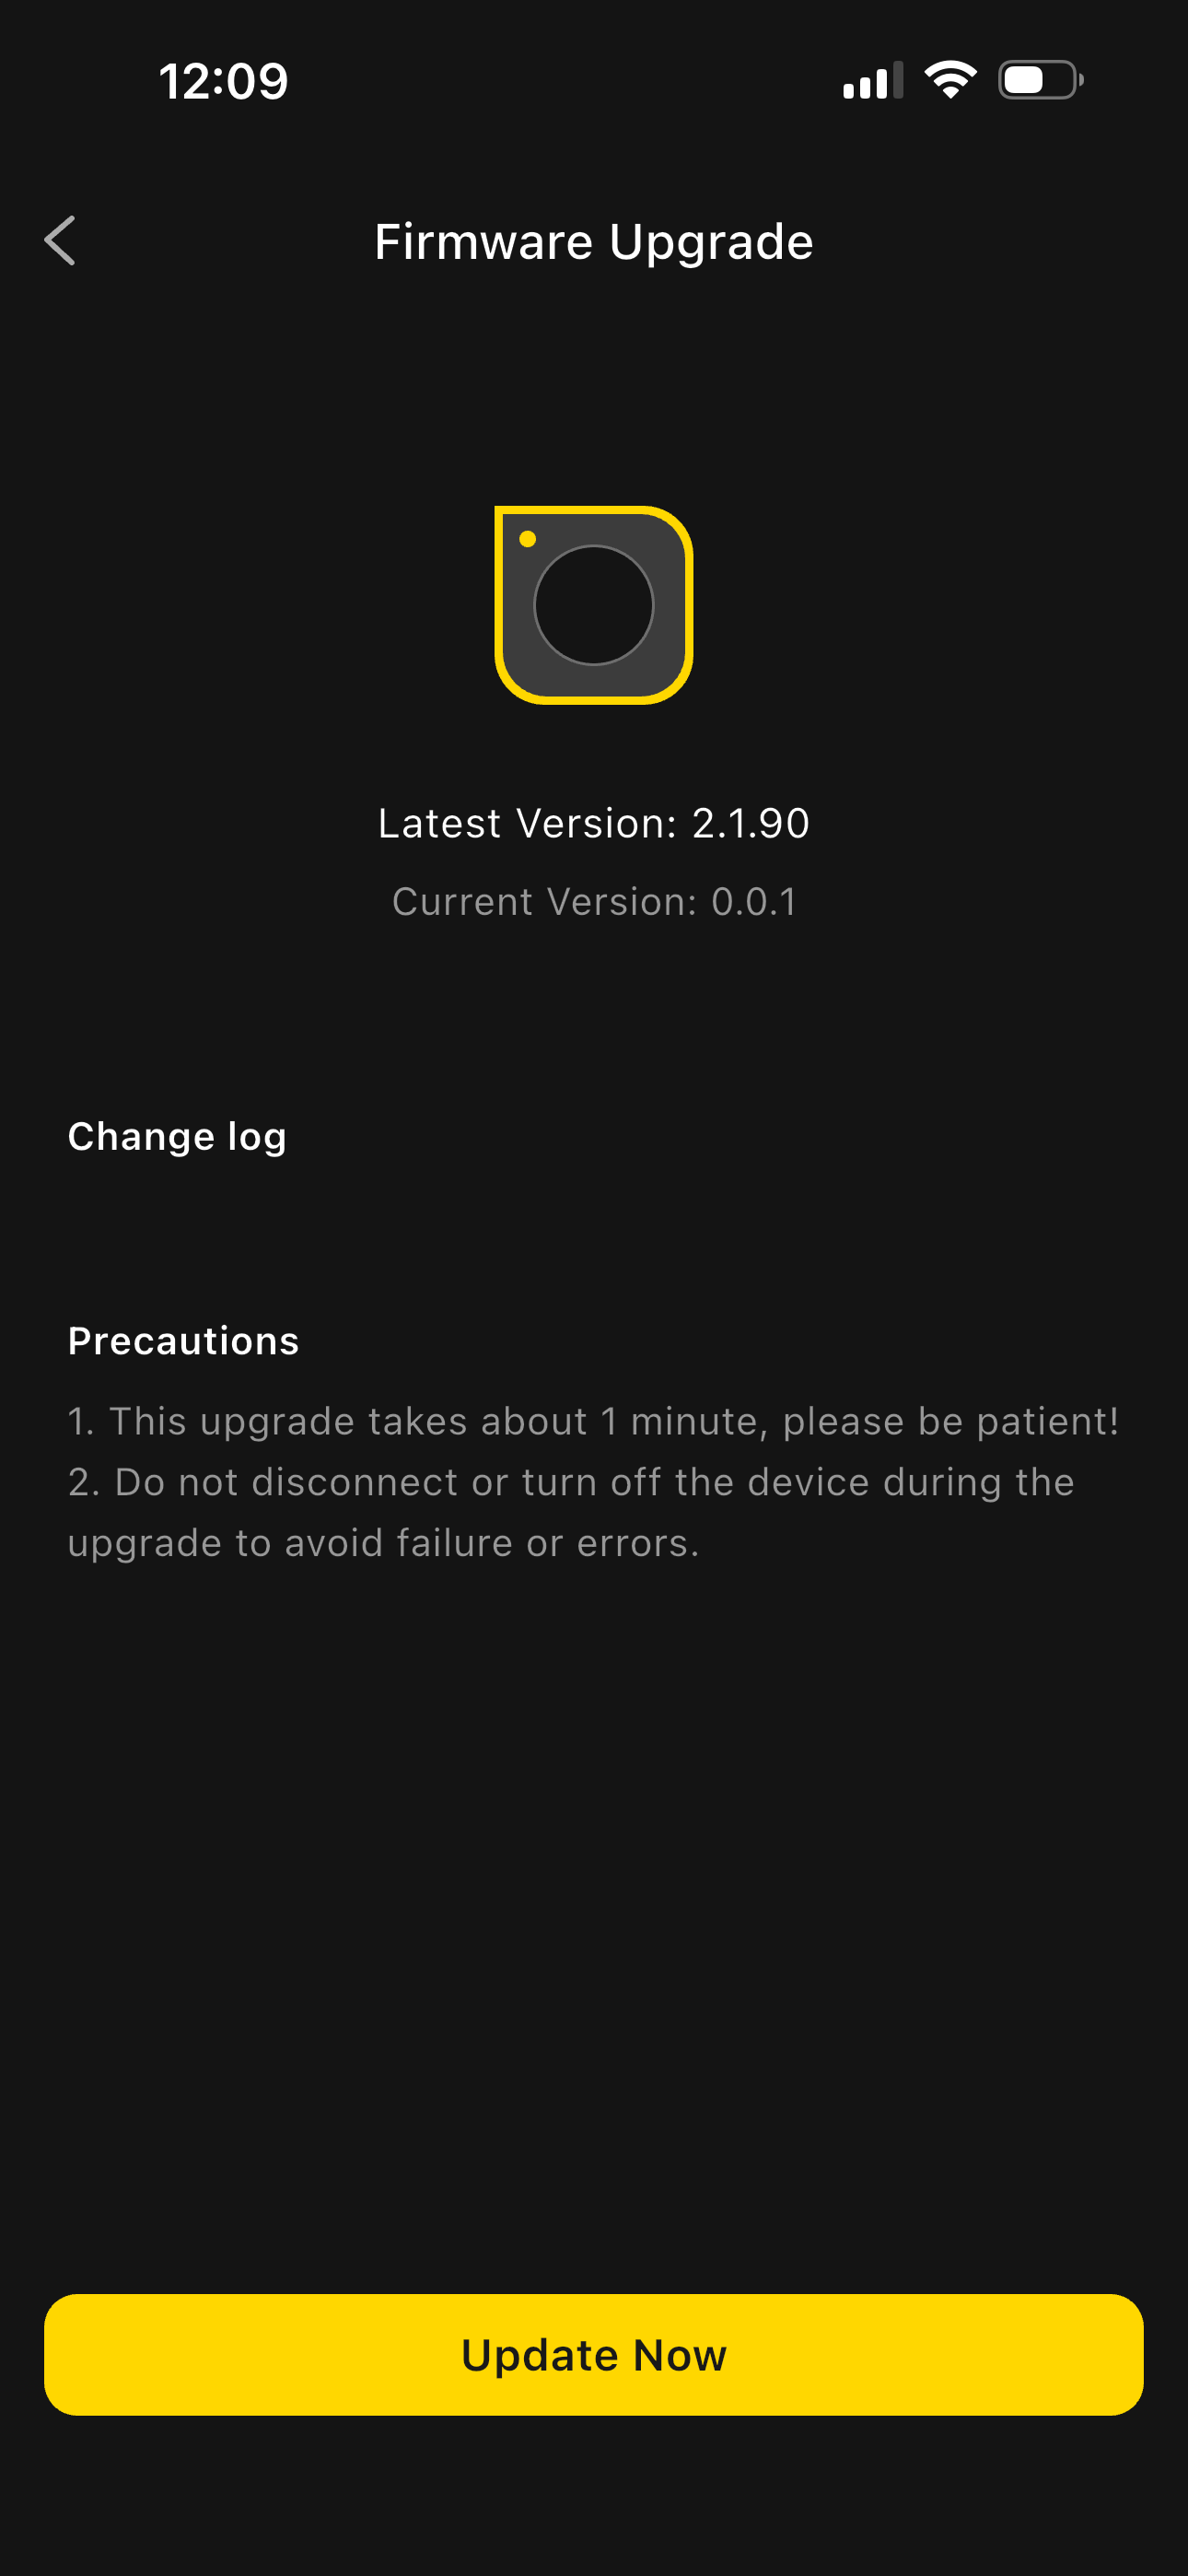
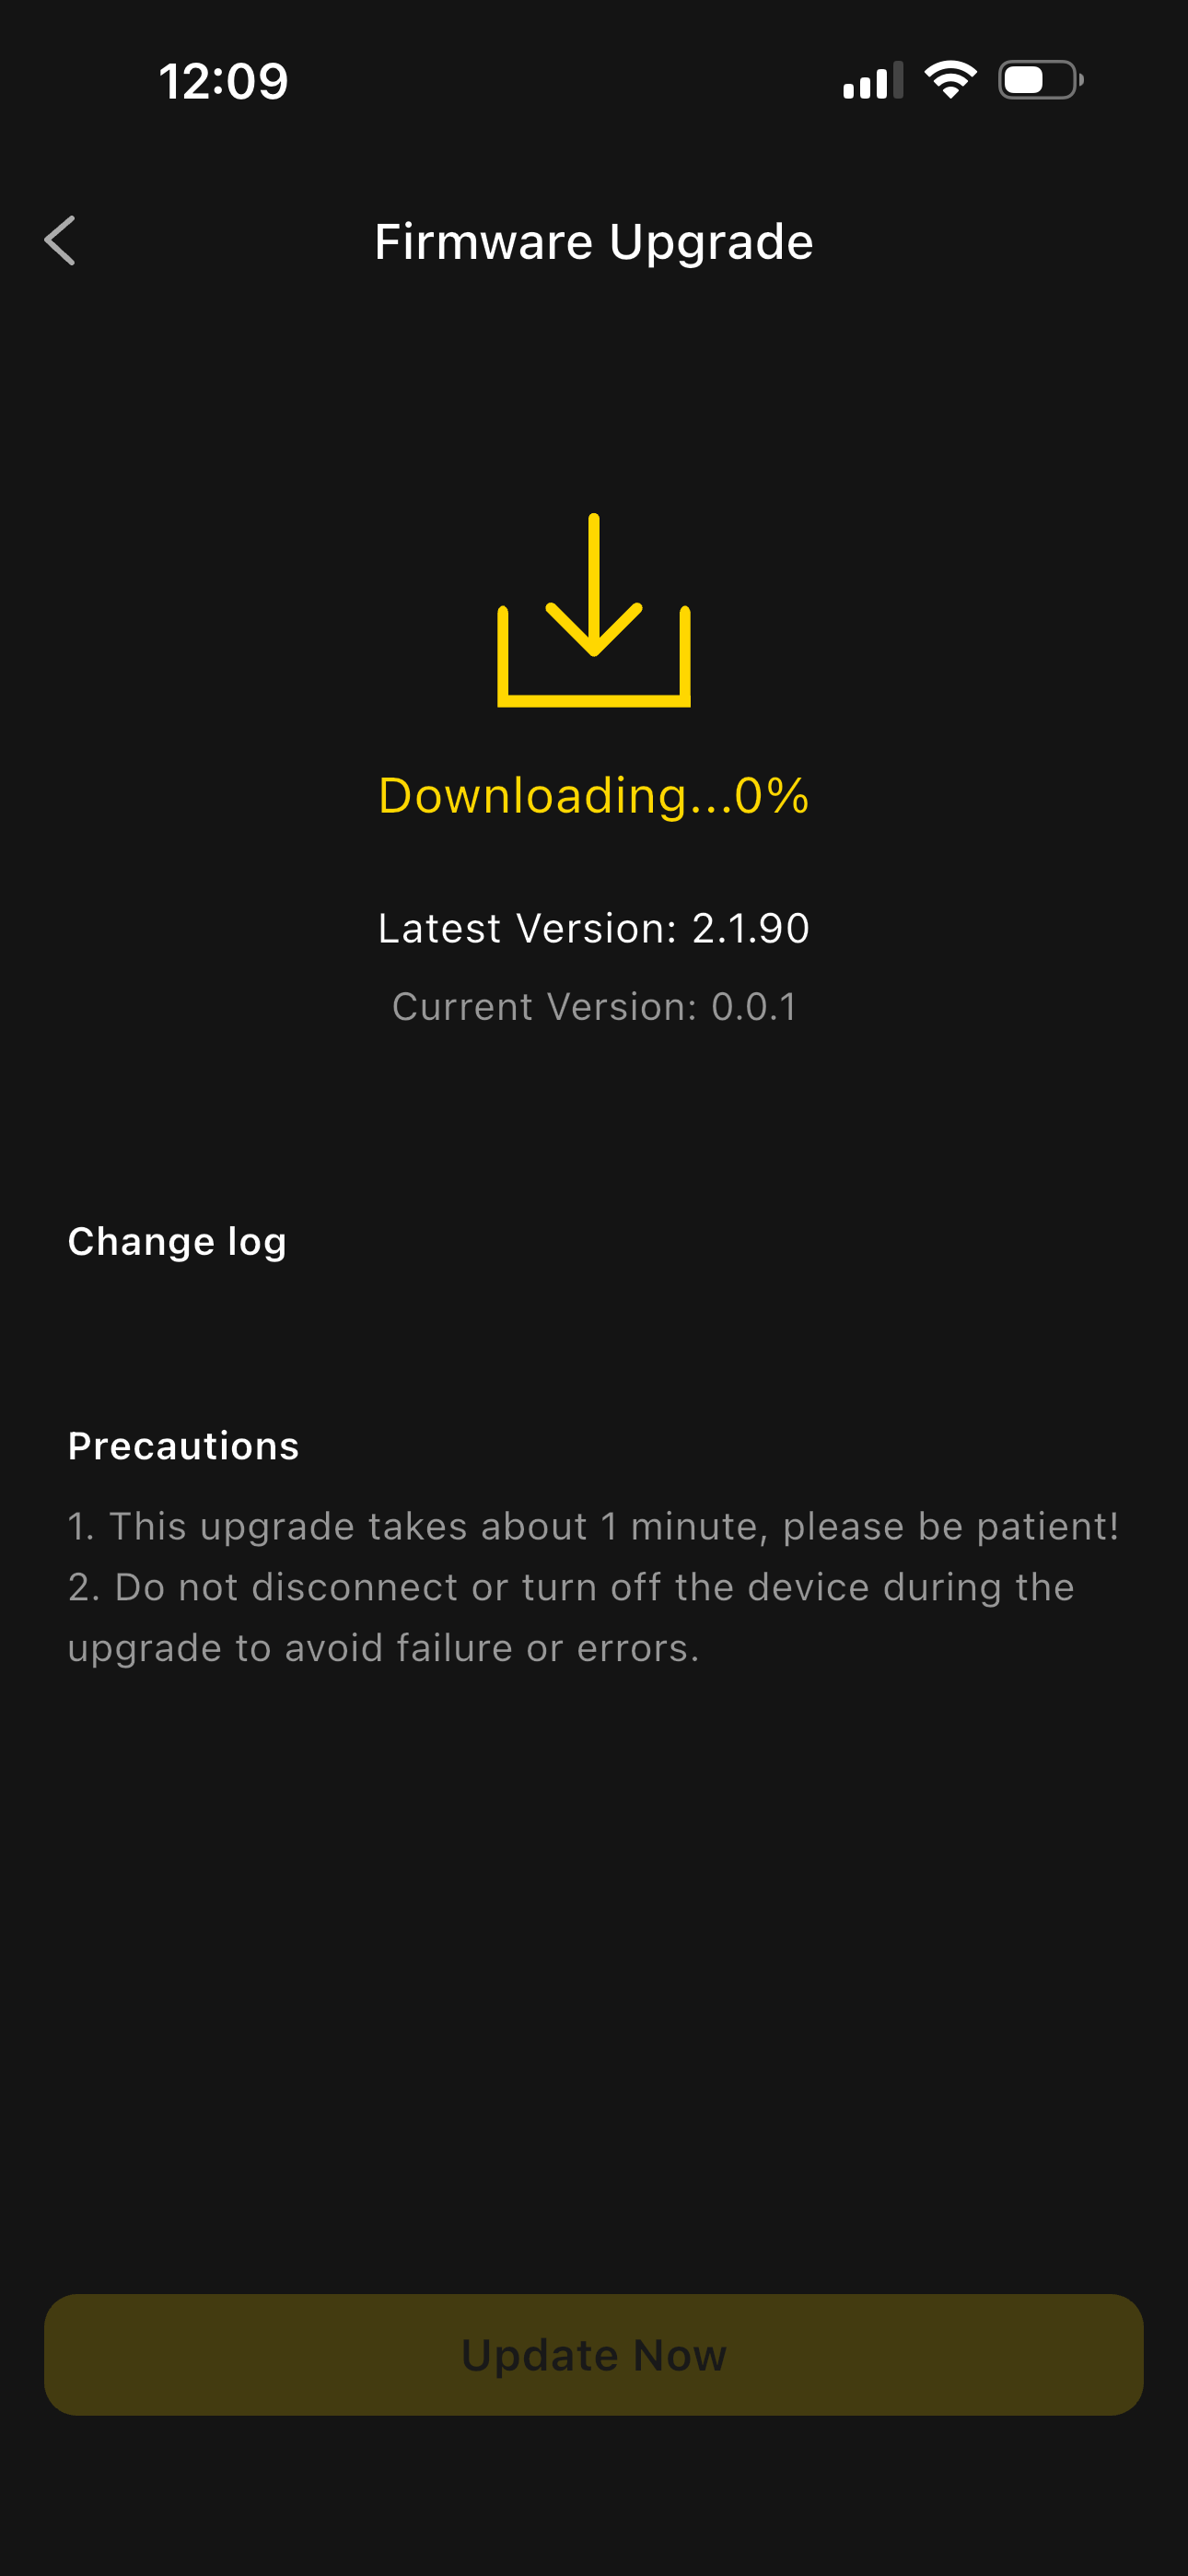
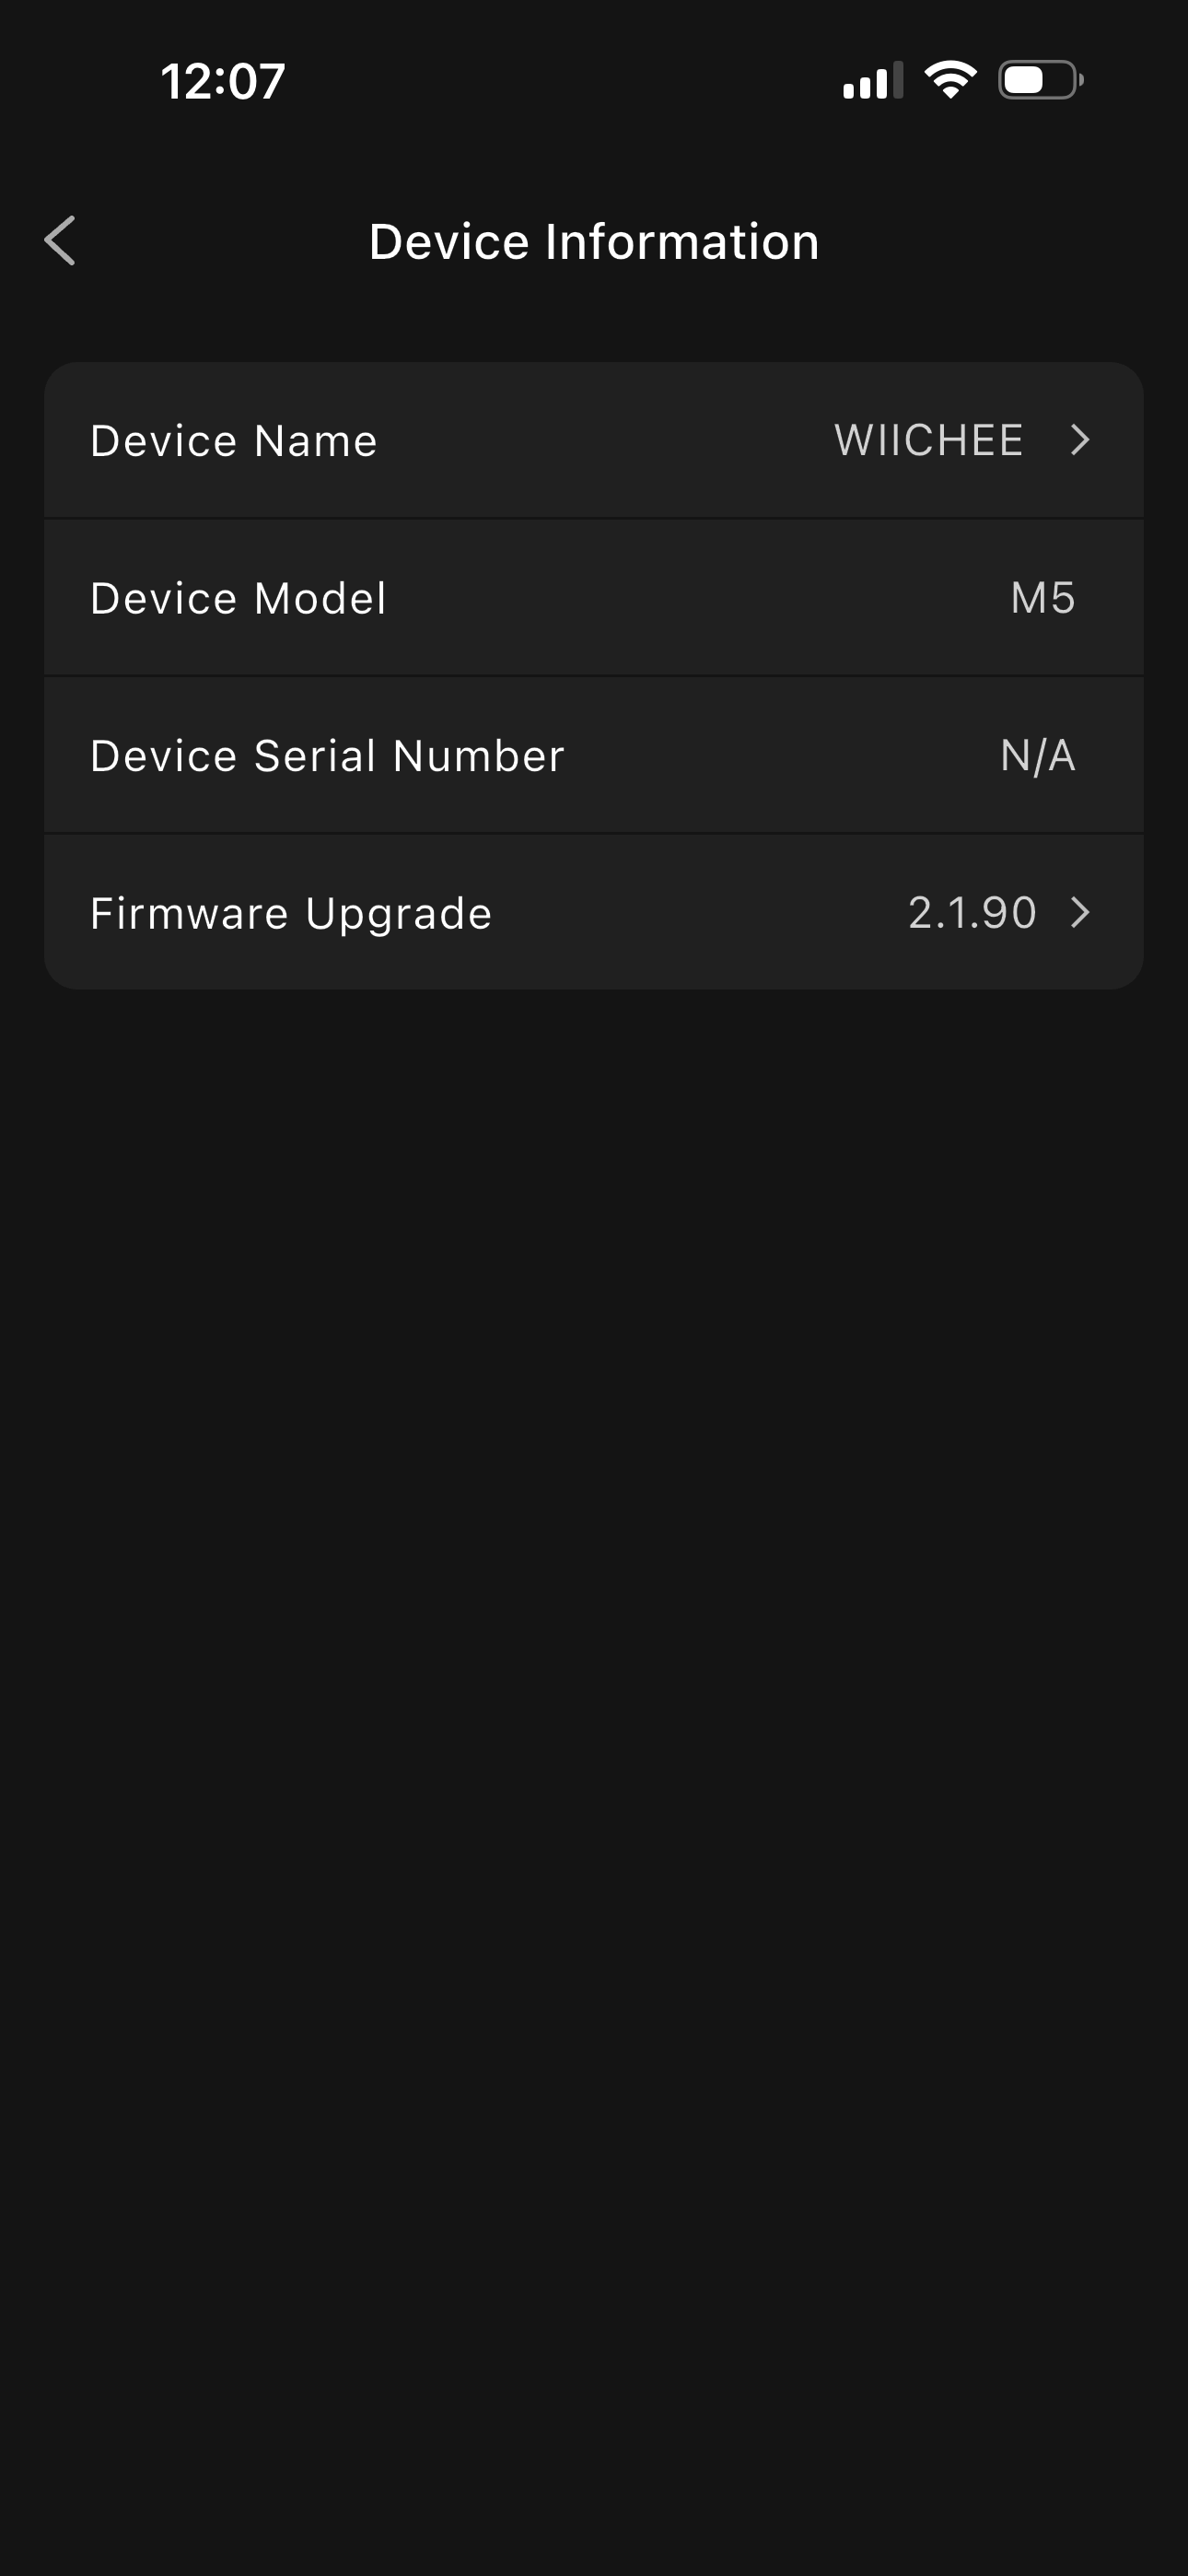
3.5 Firmware Upgrade
- Tap the avatar icon in the top-left corner of the main screen and go to "My Account"
- Scroll down and select "Device Info" (visible when device is connected)
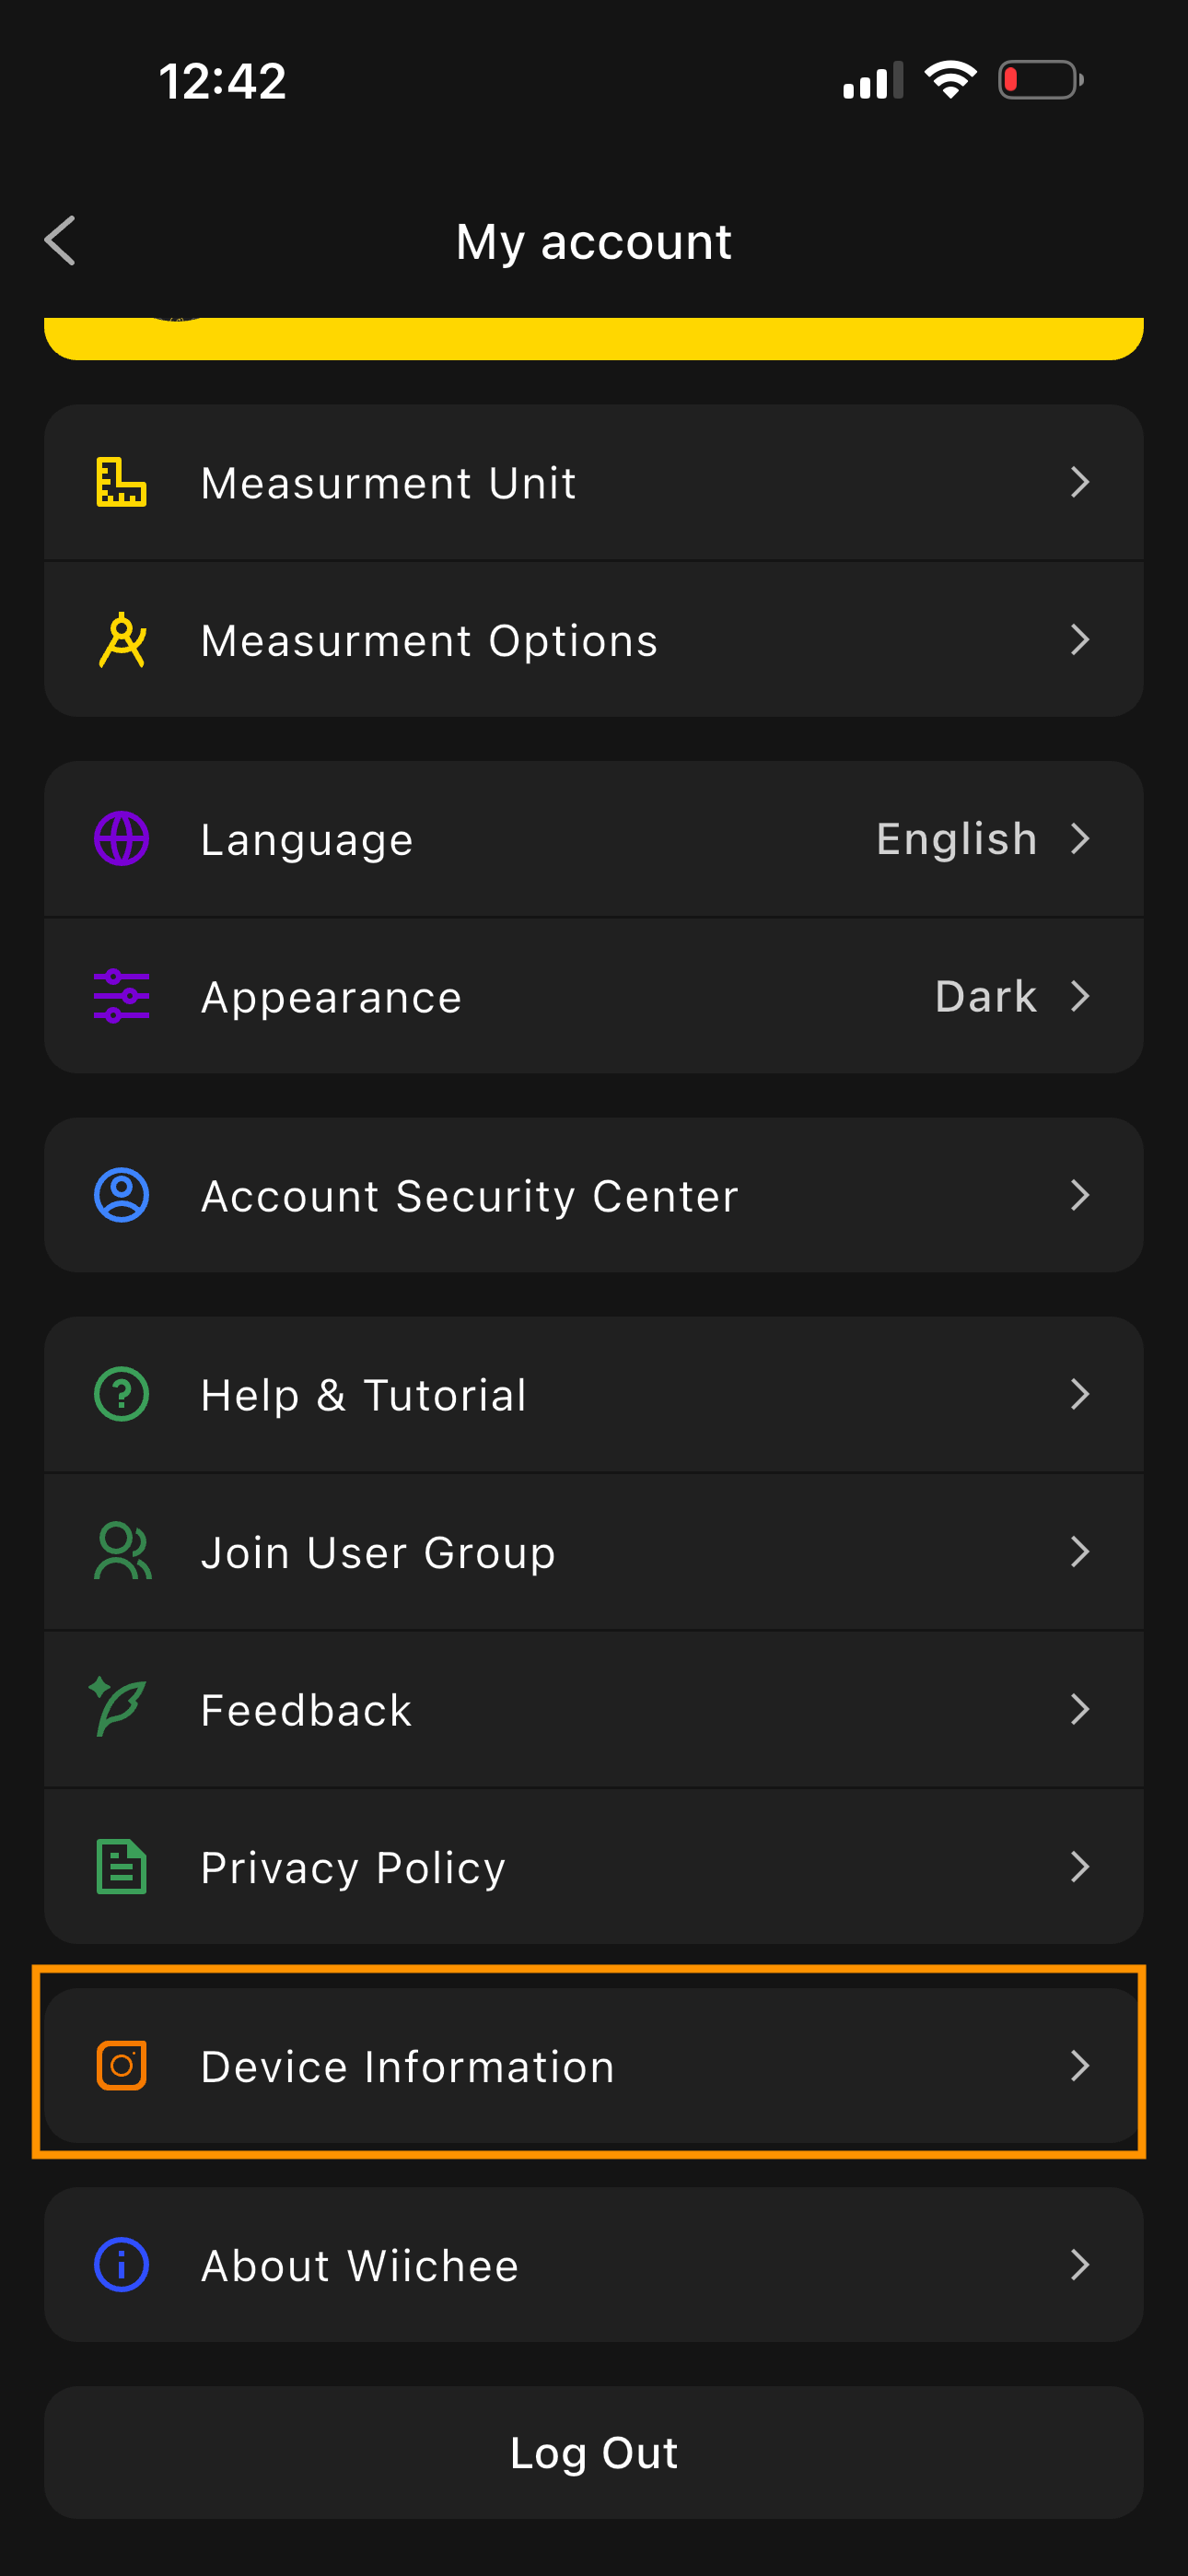
- Tap "Update Now" (the update button appears when a new version is available)
 |
 |
|---|
- Update complete
4. Device Connection and Management
4.1 Bluetooth Connection Settings

Auto Connect:
- Automatically searches for and connects to paired devices when the app is launched
- A green status indicator is displayed upon successful connection
Manual Connect:
- After opening the app, tap "Connect Device"
- The app enters "Searching for Devices" mode
- Select your device from the list
- Wait for the connection to complete — a ✅ indicates success
Connection Tips:
- Keep the device within 10 meters
- Avoid Wi-Fi and Bluetooth signal interference
4.2 Device Status Monitoring
Status Indicators:
Blue flashing — Bluetooth not connected
Solid blue — Device connected via Bluetooth
During Measurement:
Solid red — Device placed at starting point and ready
Solid green — Placement point captured successfully
Green flashing — Device moving within acceptable time window
Yellow flashing — Device moving, approaching timeout limit (place device promptly)
Red flashing — Device moving, timeout exceeded (stop immediately; data may be unusable)
Battery Status:
- Red flashing — Charging
- Solid green — Fully charged
- Rapid red flashing — Charging error
4.3 Connection Troubleshooting
Common Issues:
- Device not found during search:
- Confirm the device is powered on
- Check Bluetooth permissions
- Restart the device and app
- Frequent disconnections:
- Check device battery level
- Reduce physical obstructions
- Update the app to the latest version
- Slow data transfer:
- Reduce nearby Bluetooth devices
- Close unnecessary background apps on the phone
- Re-pair the device
4.4 Device Maintenance Recommendations
Routine Maintenance:
- Clean the device surface regularly
- Avoid extreme temperature environments
- Store properly; avoid impacts
Software Maintenance:
- Keep device firmware up to date
- Restart the device periodically
- Clear storage space as needed
5. Project Management
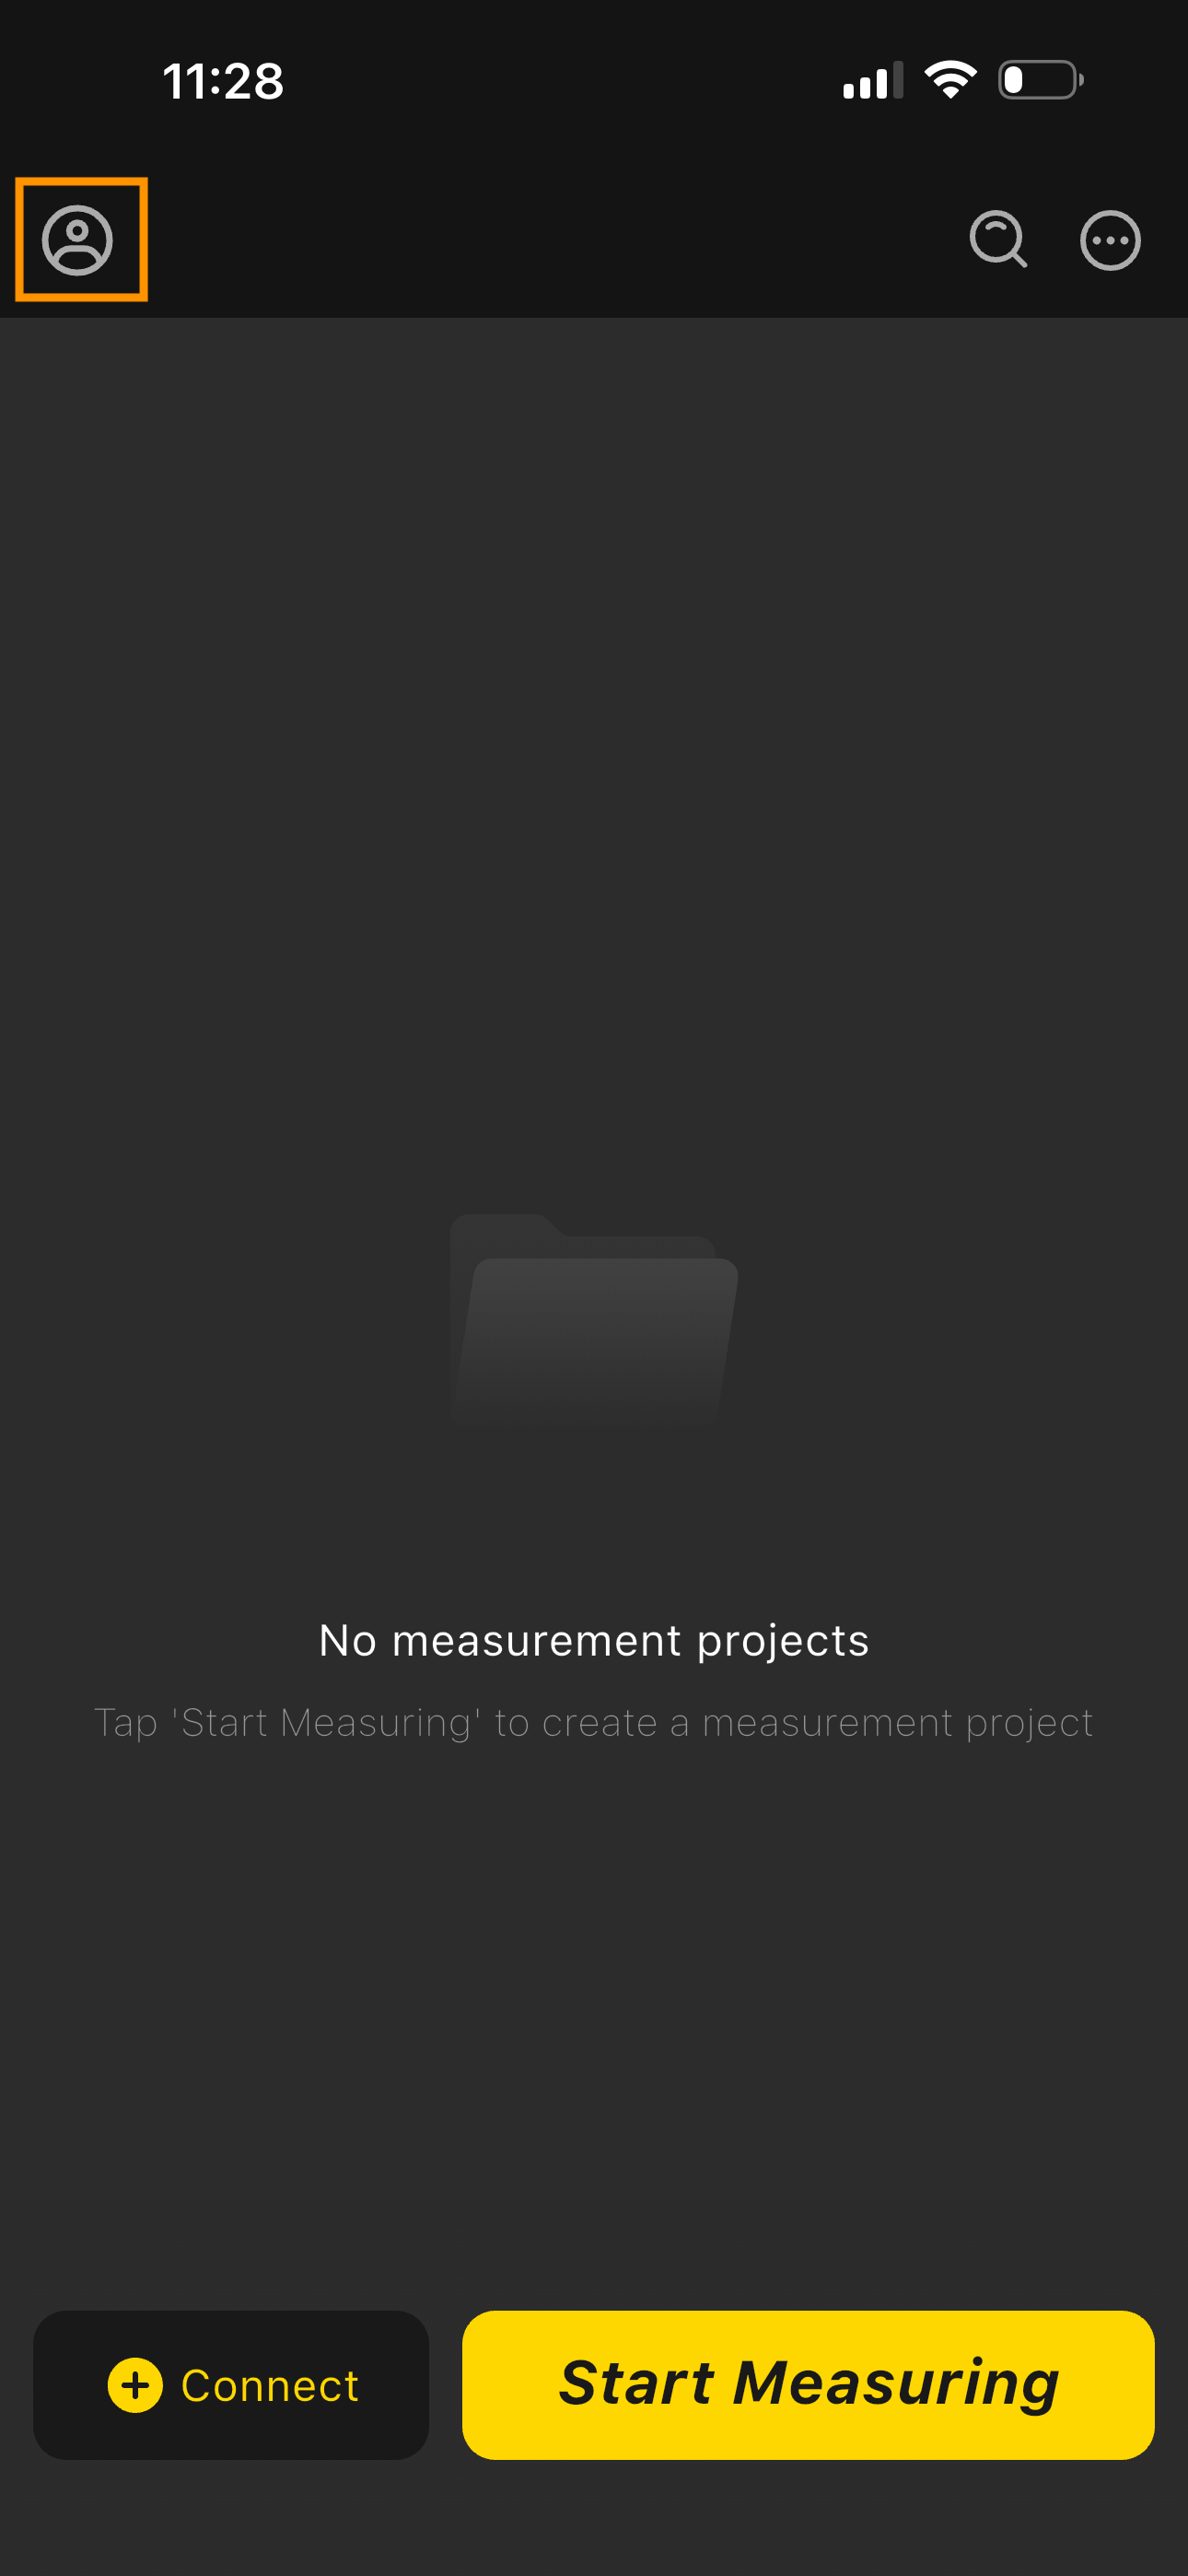
5.1 Creating a New Project
Steps:
- Tap "Start Measuring"
- Follow the on-screen prompts to begin measuring
5.2 Project List Management
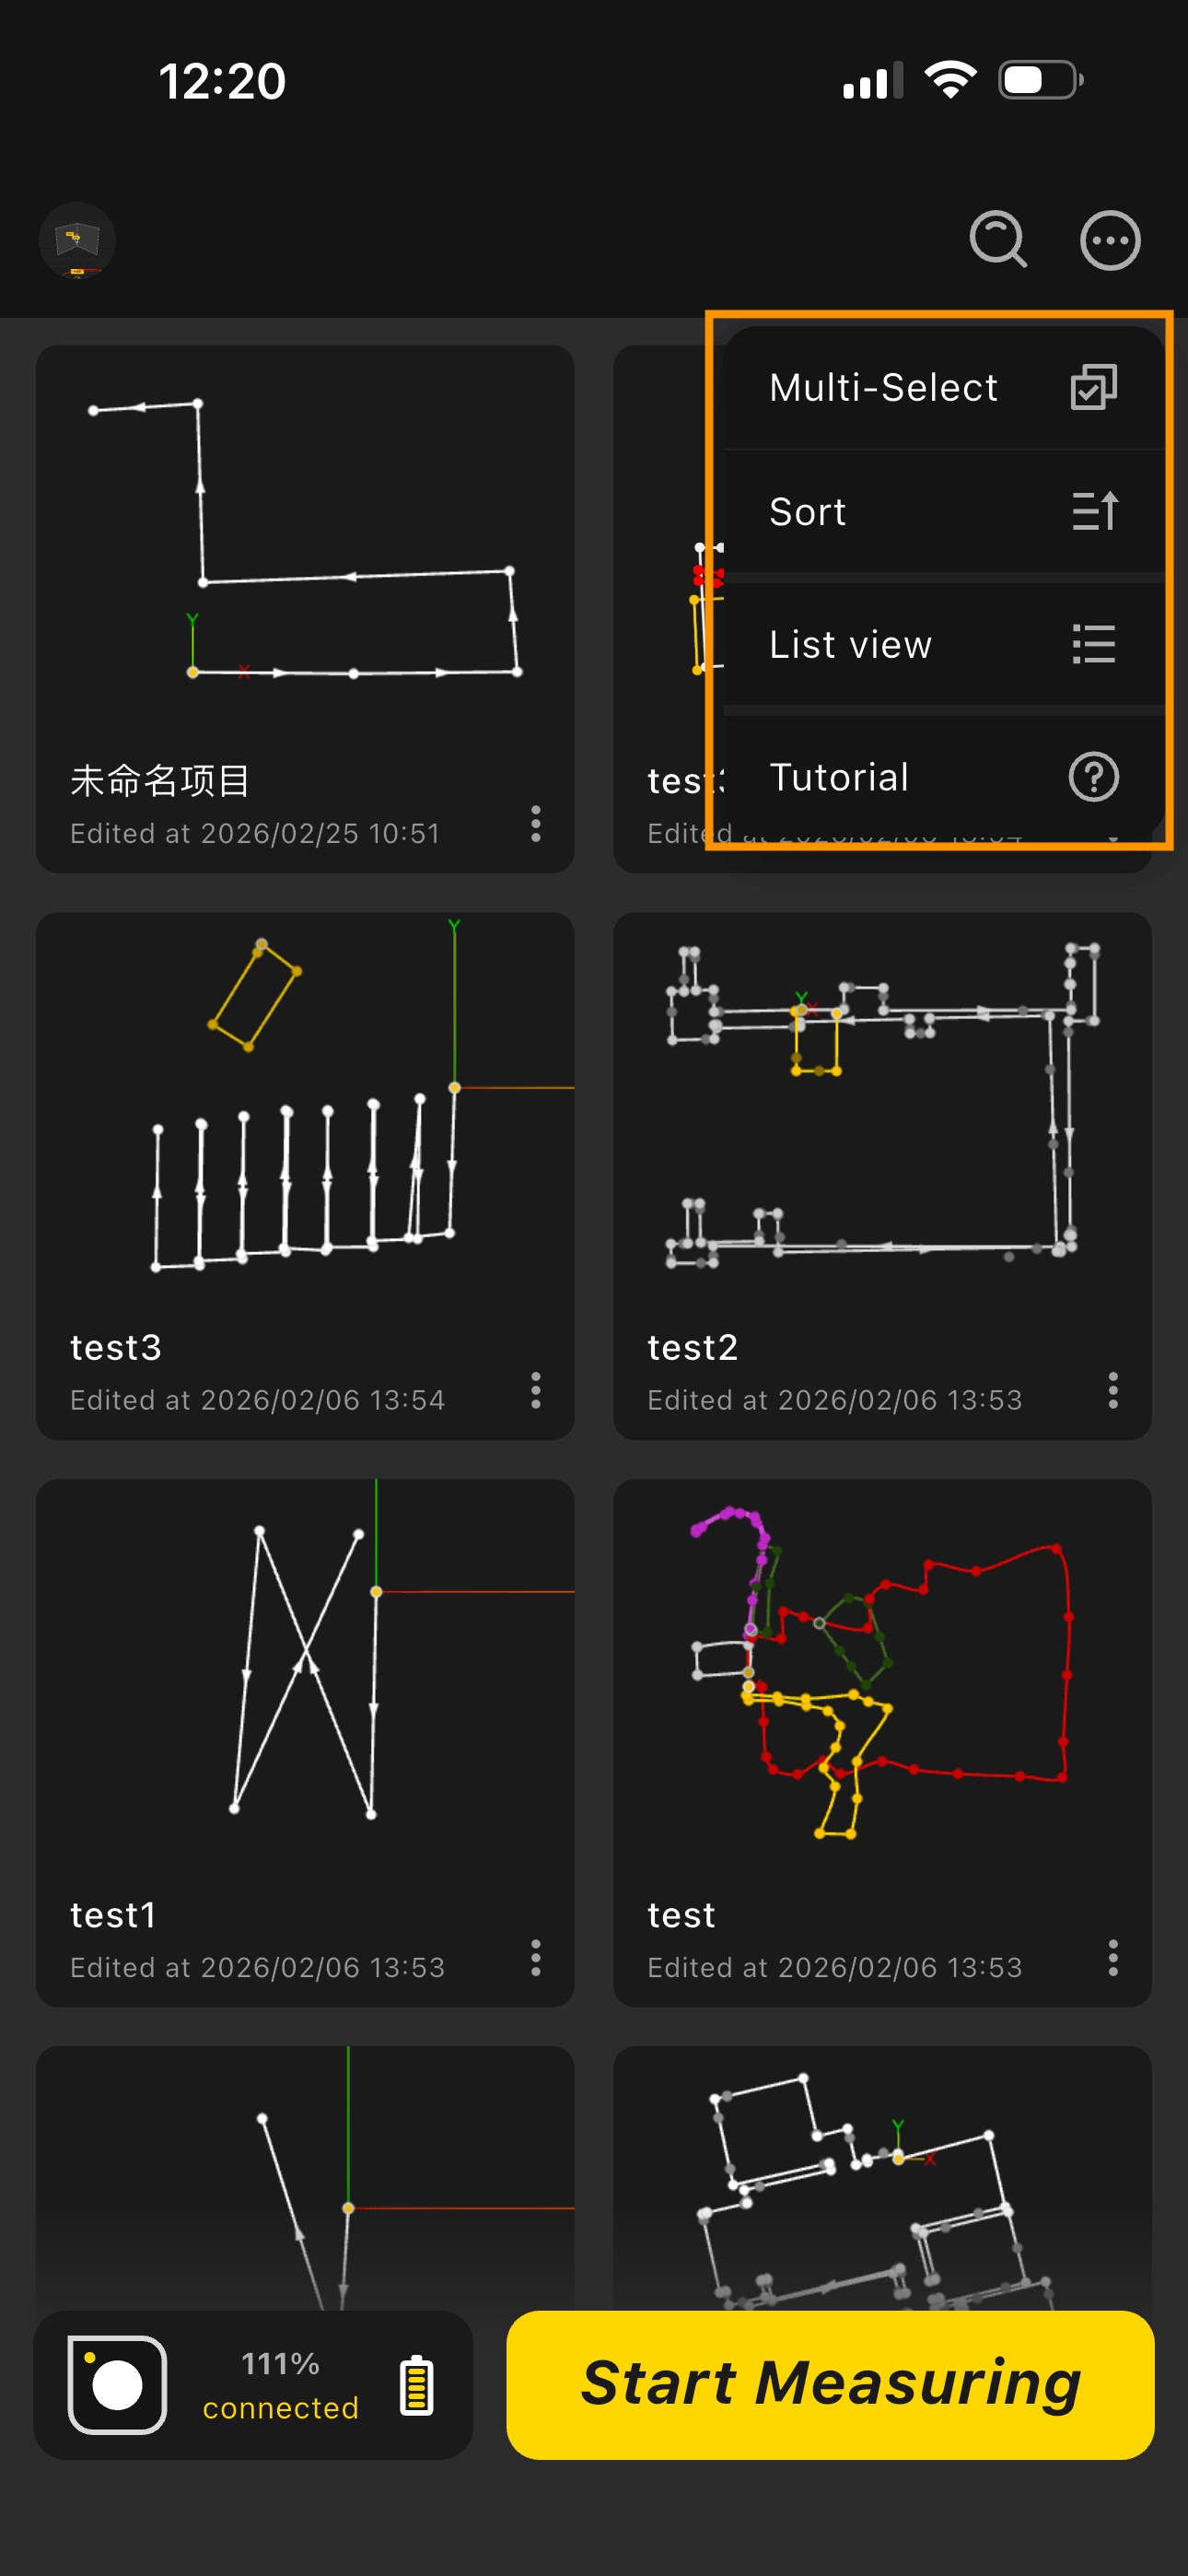
View Modes:
- List View: Horizontal information layout
- Card View: Vertical information layout
Sort Options:
- Sort by creation time
- Sort by last edited time
- Sort by name
5.3 Editing and Deleting Projects
Edit a Project:
- Tap the "ellipsis" icon at the bottom-right of the project card
- Select "Rename"
- Enter the new project name
- Tap "Save" to apply the changes
Delete a Project:
- Long-press to select the project, or tap the "ellipsis" icon at the bottom-right of the project card
- Tap the Delete button
- Confirm the deletion
- Project is deleted
6. Measurement Modes
6.1 Straight Line Mode
- Use Cases
Ideal for quickly measuring the straight-line distance between two points — e.g., room diagonal length, corridor span, short road segment measurement, furniture spacing confirmation, wall thickness inspection. Only two points are needed to generate precise linear data.
- Steps
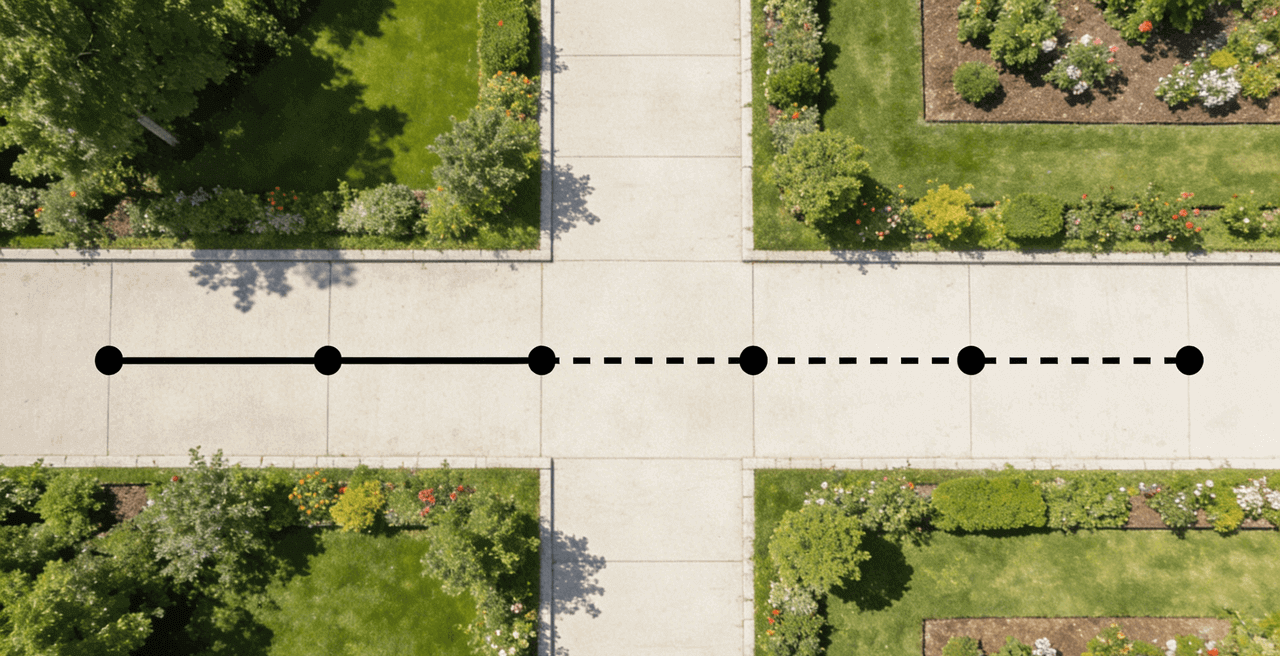
- In the app, tap "Start Measuring" → Line Mode (default)
- Place the device at the starting point. The corner facing the indicator light is the precise measurement point — align it with the target.
- Wait for the app to show "Starting Point Captured" with a beep, confirming the start point is recorded.
- Move the device steadily to the endpoint. Align the indicator corner with the precise target point, hold still, and wait for the app to show "Point Captured".
- Continue measuring or tap "End Measurement" at the bottom — the system automatically generates the segment length.
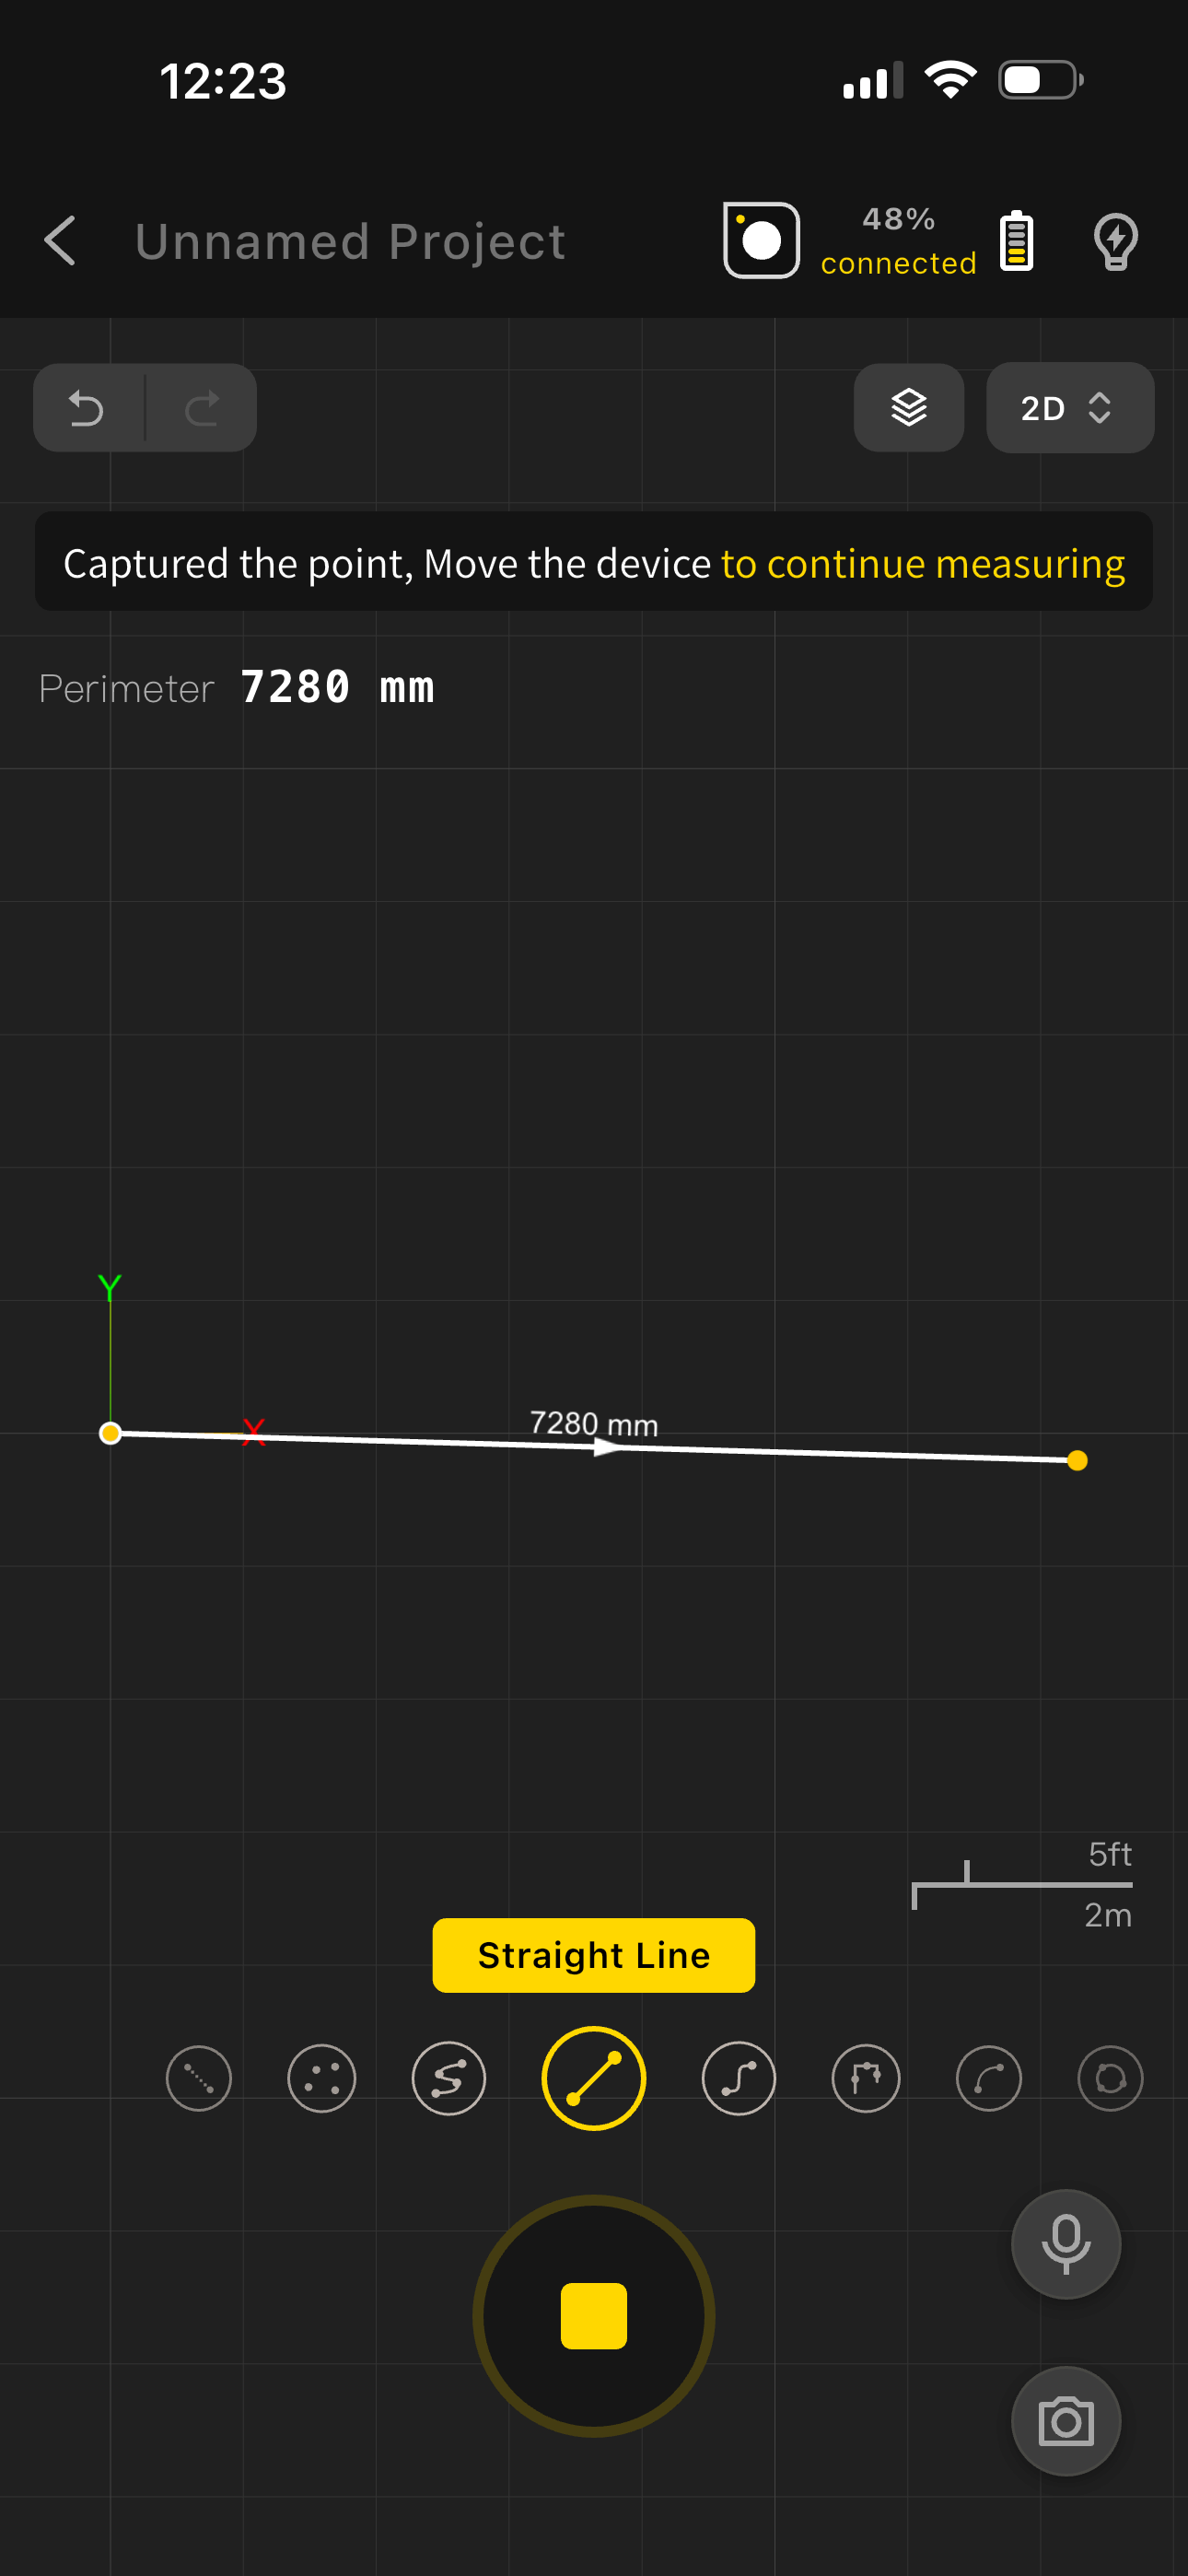
6.2 Trace Line Mode
- Use Cases
Ideal for tracing the actual path of a target in real time — e.g., mapping the outline of irregular terrains (shaped gardens, polygonal lots), recording routes (walking paths, equipment movement paths), or capturing the full outline of irregular indoor spaces (shaped living rooms, curved corridors). Simply follow the path steadily to generate a continuous, complete path map.
- Steps
- Tap "Start Measuring" → switch to "Trajectory Mode"
- Place the device at the starting point. Align the indicator corner with the precise position and wait for the app to show "Starting Point Captured".
- Slowly pick up the device, keep it level, and move smoothly and steadily along the target path (no shaking or deviation; speed ≤1 m/s)
- At the endpoint, place the device on the measurement surface with the indicator corner aligned, and wait for the app to show "Point Captured".
- Continue measuring or tap "End Measurement" to generate the complete path map.
6.3 Point Mode
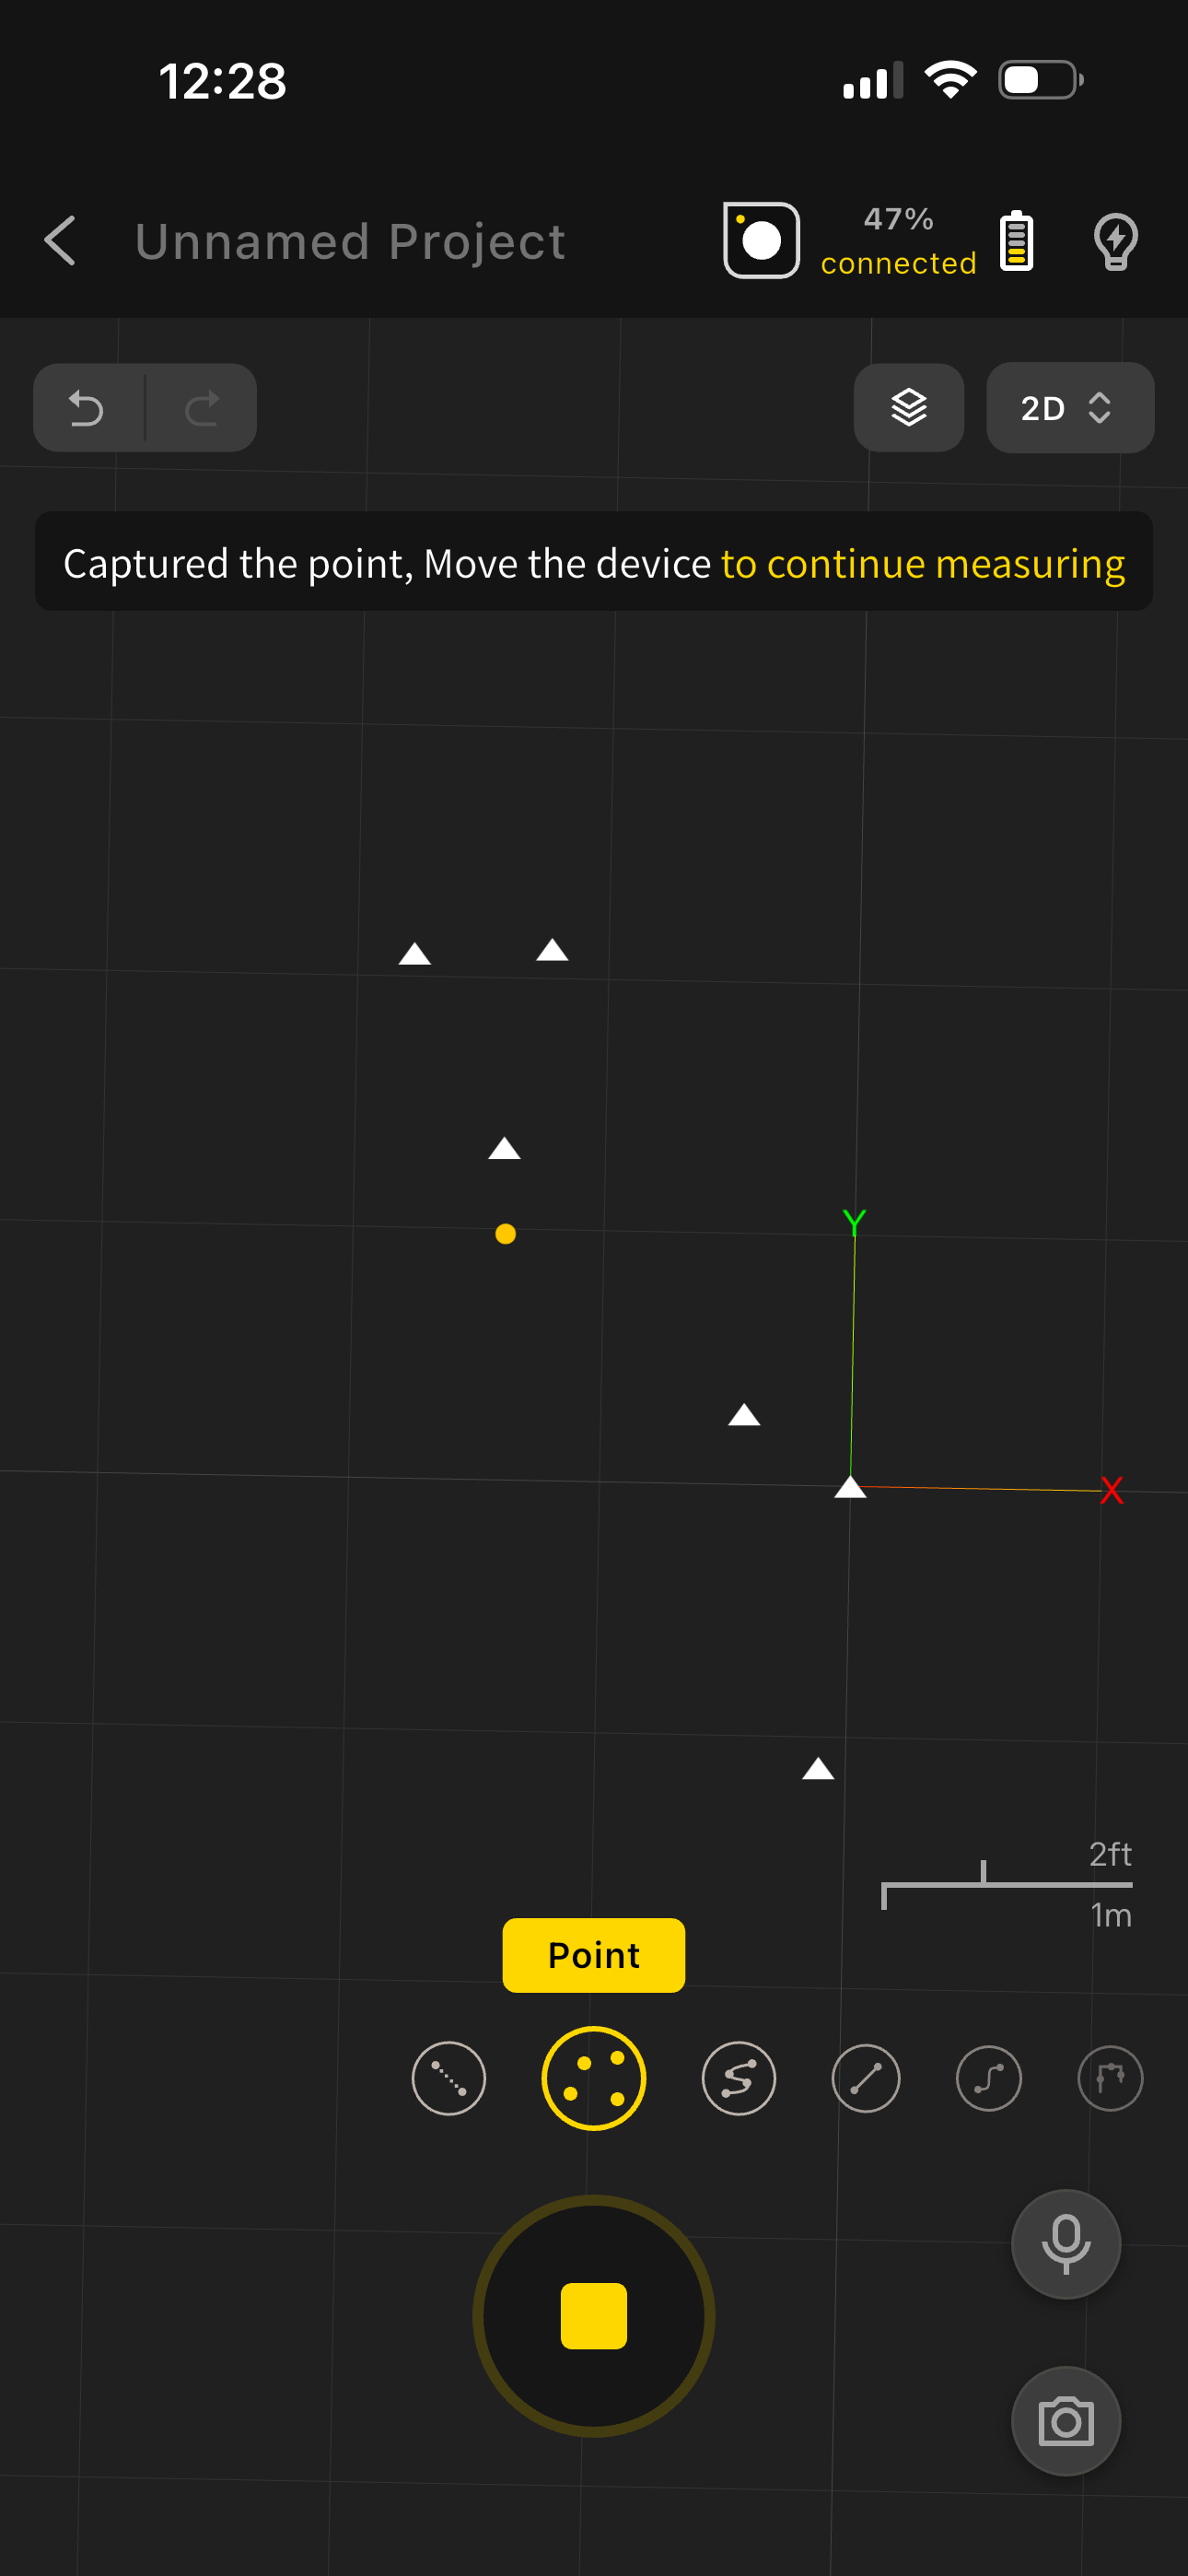
- Select "Point Mode"
- Place the device at the starting position and wait for the app to show "Starting Point Captured"
- Move the device to the next key position and place it; wait for the app to show "Point Captured"
- Continue placing the device at each measurement point until finished
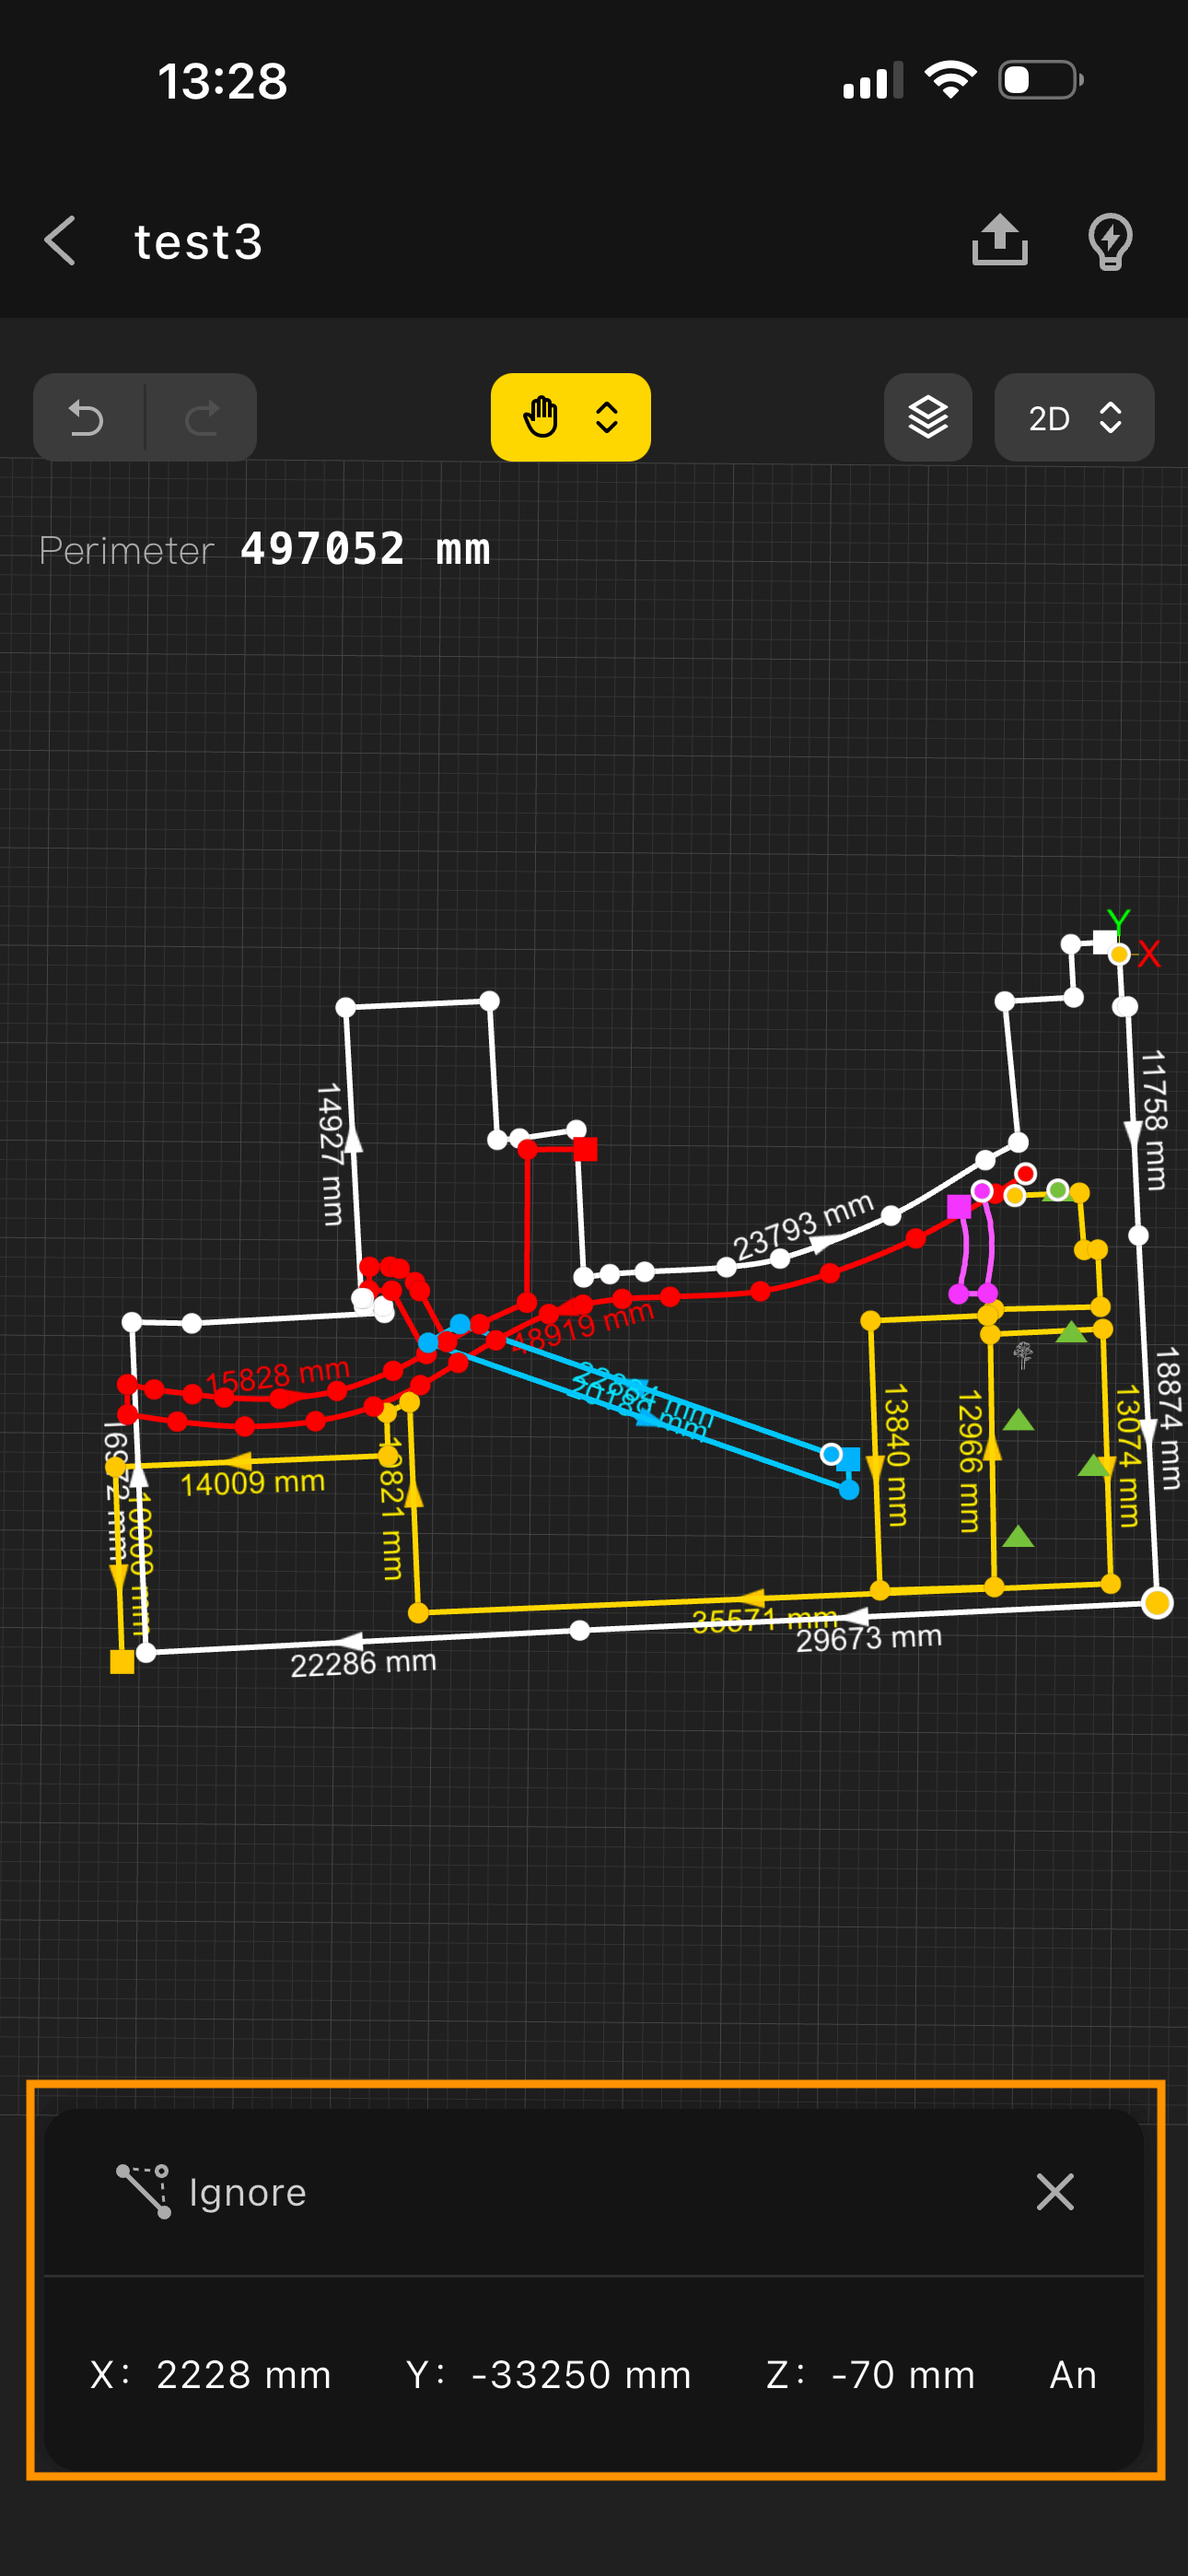
6.4 Ignore Segment
Use Case: When you want to skip a section during measurement, switch to "Ignore Segment" mode.
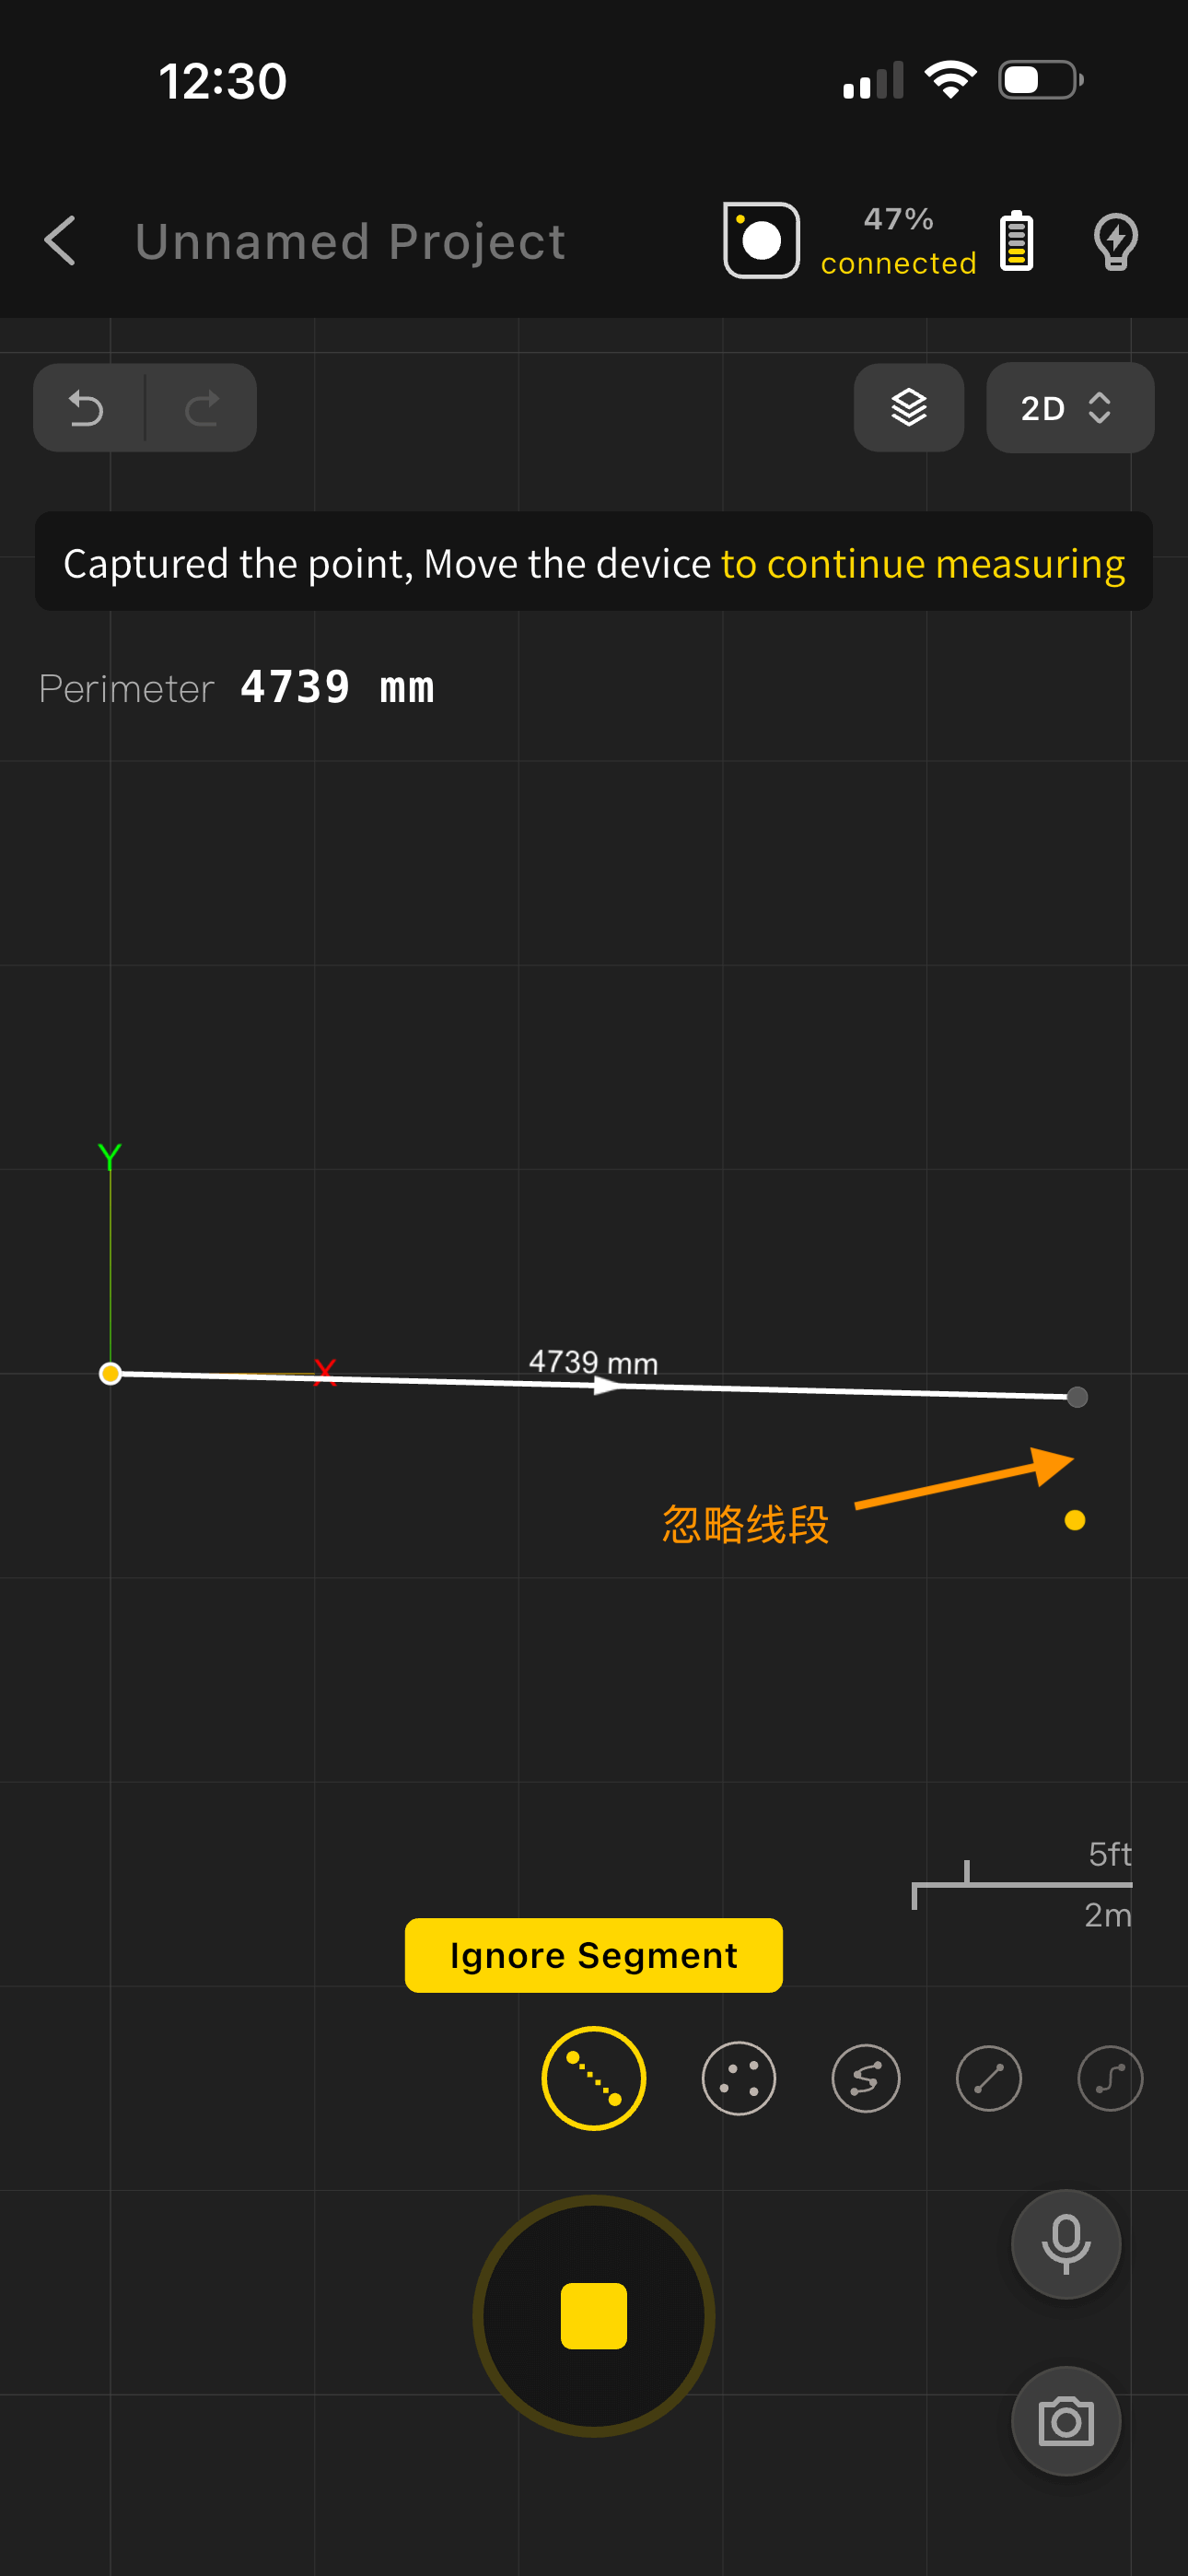
- Select "Ignore Segment Mode"
- Move the device to the measurement position
- The app marks the ignored segment with a dashed line; all measurement data during this segment is automatically excluded
6.5 Wall Mode
- Use Cases
Designed for continuous wall path measurement — e.g., measuring the total wall perimeter of an entire residence, corridor total wall length, continuous office partition walls, or shopfront window wall dimensions. Capture the complete path of multiple connected walls in a single pass to efficiently obtain total length or perimeter data.
- Steps
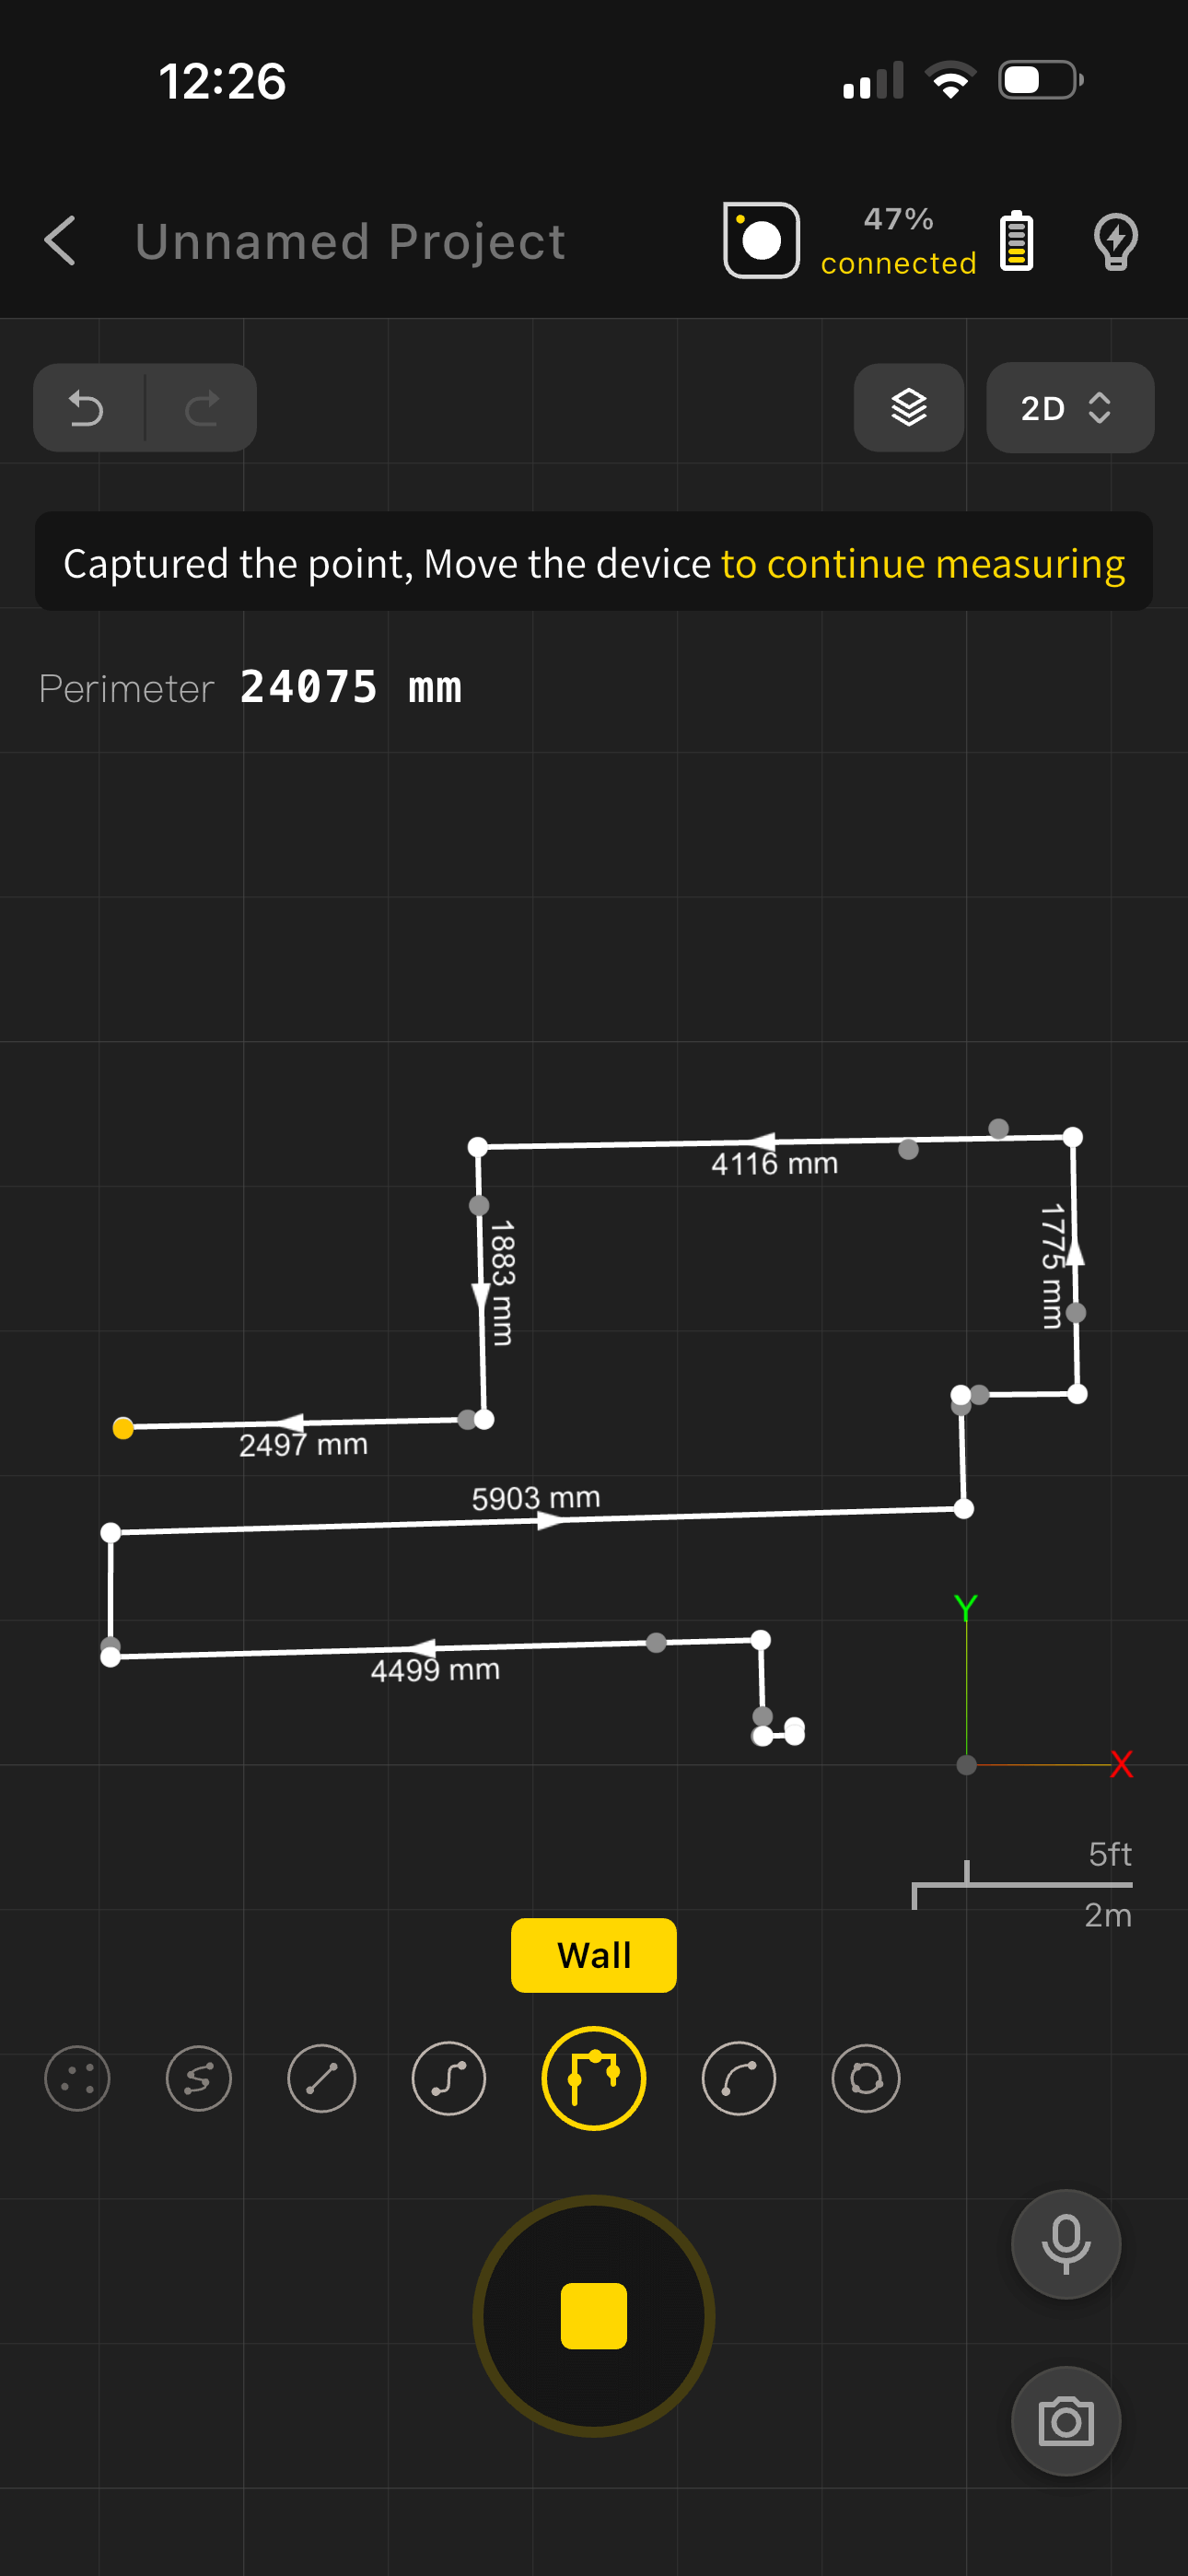
- Tap "Start Measuring" → switch to "Wall Mode".
- Place the device flush against the starting point of the first wall and wait for the app to show "Starting Point Captured".
- Move the device steadily to the next wall. Place it flush against the wall surface and wait for the app to show "Point Captured".
- Continue moving to each subsequent wall, repeating the "place → wait for capture" steps.
- Once all walls are measured, tap "End Measurement" to get the complete wall perimeter, area, and other data.
6.6 Curve Mode
- Use Cases
Designed for non-standard irregular curve measurement — e.g., garden arc fence length, balcony curved edge dimensions, riverside segment measurement, irregular terrain boundaries (shaped lawns, curved walkways), industrial component arc profiles. Multi-point capture lets the system automatically fit a precise curve — no manual arc calculation needed.
- Steps
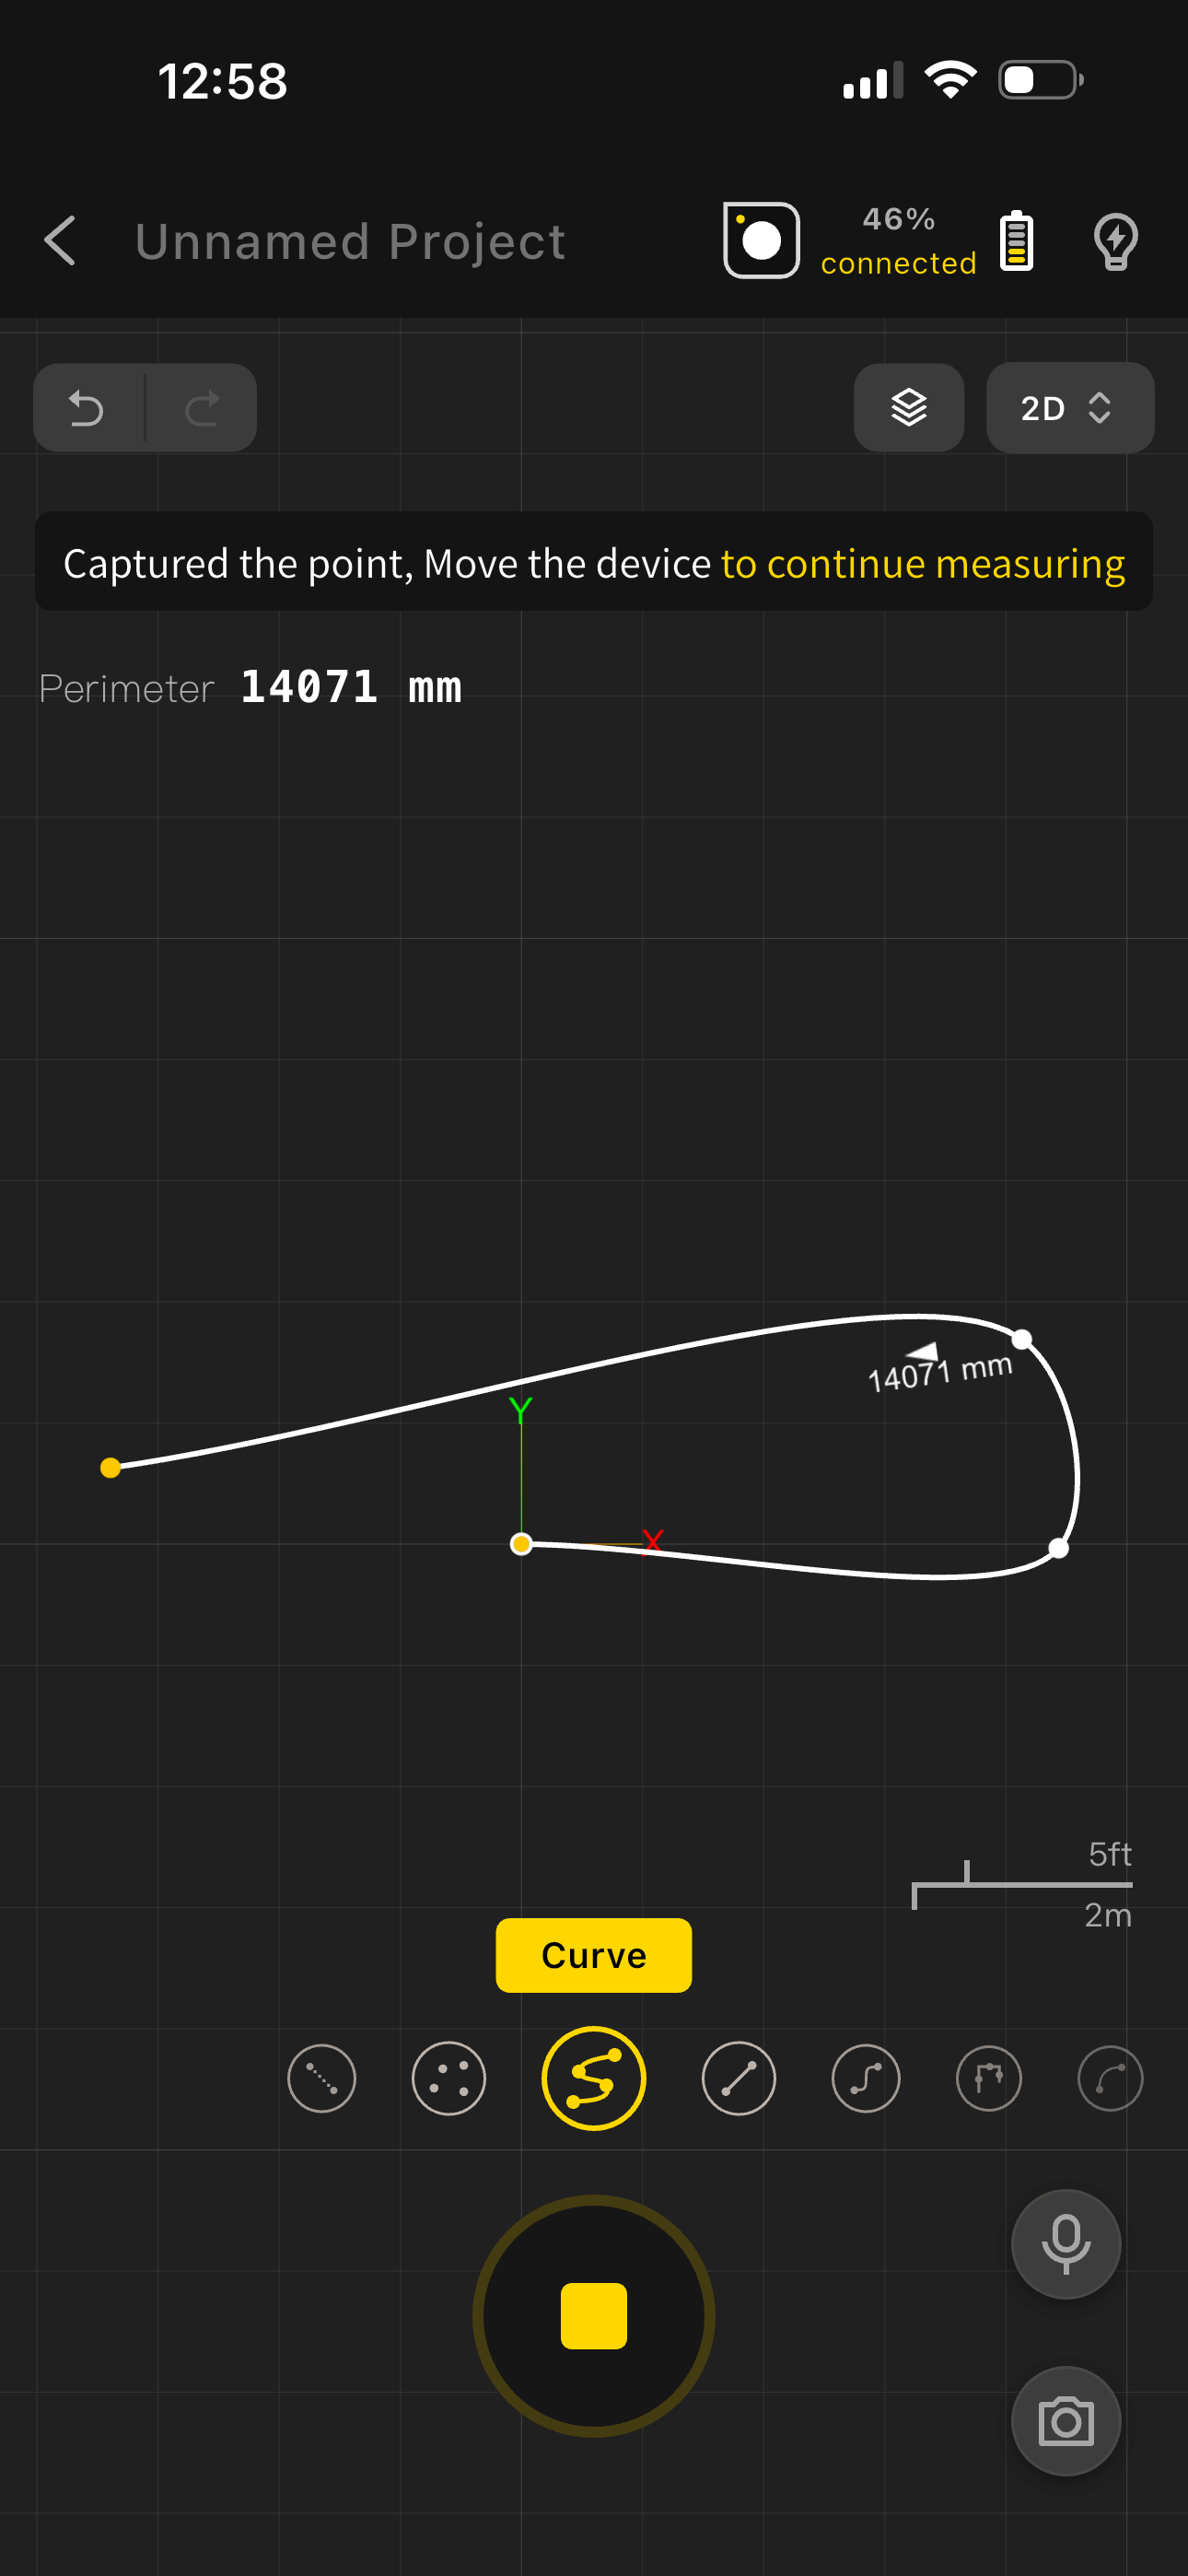
Tap "Start Measuring" → switch to "Curve Mode".
Place the device at the starting point of the curve with the indicator corner aligned; wait for the app to capture the starting point.
Evenly select intermediate measurement points along the curve (recommended: 1 point every 0.5–1 m, minimum 3 points — more points yield higher accuracy). After each placement, wait for the app to confirm "Capture Successful".
Move the device to the curve endpoint. Align the indicator corner with the precise endpoint and hold still to complete capture.
Tap "End Measurement" — the system automatically fits and generates the curve measurement result.
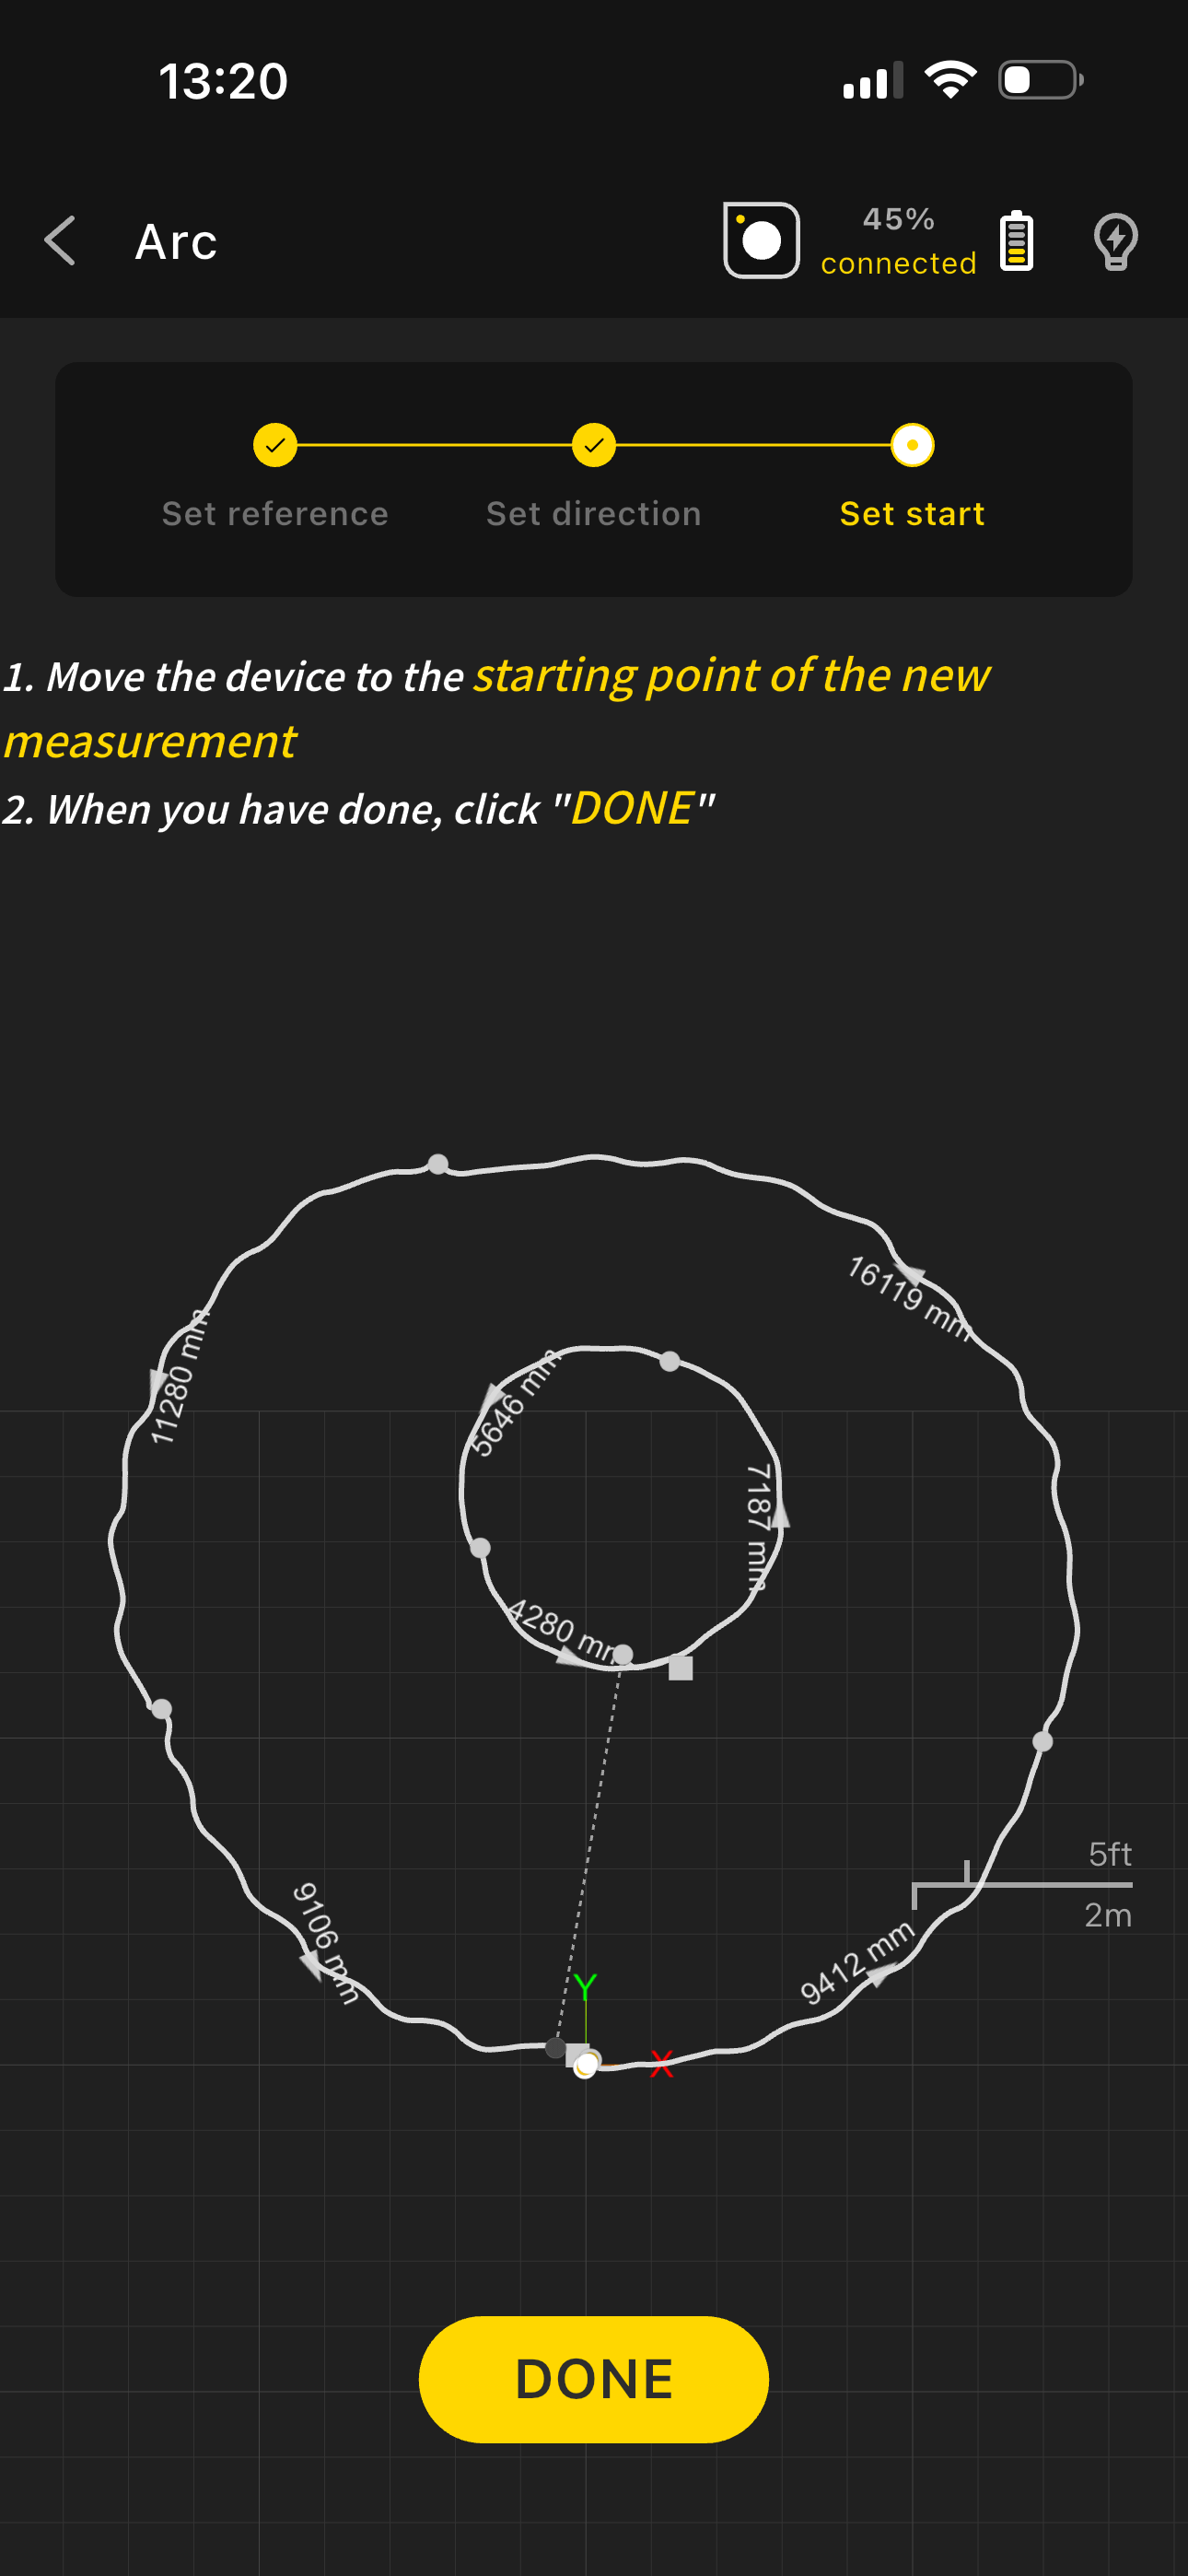
6.7 Arc Mode
- Use Cases
Designed for standard arc shape measurement — e.g., arc length and radius of circular flower beds, semicircular stage edges, industrial arc components (pipes, curved panels). Uses three points (start, midpoint, end) to quickly generate core arc data (arc length, radius, central angle).
- Steps

- Tap "Start Measuring" → switch to "Arc Mode".
- Place the device at the arc starting point with the indicator corner aligned; wait for the app to show "Starting Point Captured".
- Move the device to the midpoint of the arc and hold still; wait for the app to show "Point Captured".
- Move the device to the arc endpoint and hold still; wait for the app to show "Point Captured".
- Tap "End Measurement" — the app automatically generates the arc's radius, arc length, and other data.
6.8 Circle Mode
- Use Cases
Suitable for measuring complete circular objects or areas — e.g., circumference and diameter of circular flower beds, circular table dimensions, circular areas (basketball center circle, circular plaza), industrial circular component inspection. Quickly obtains circumference, diameter, radius, and other key data.
- Steps
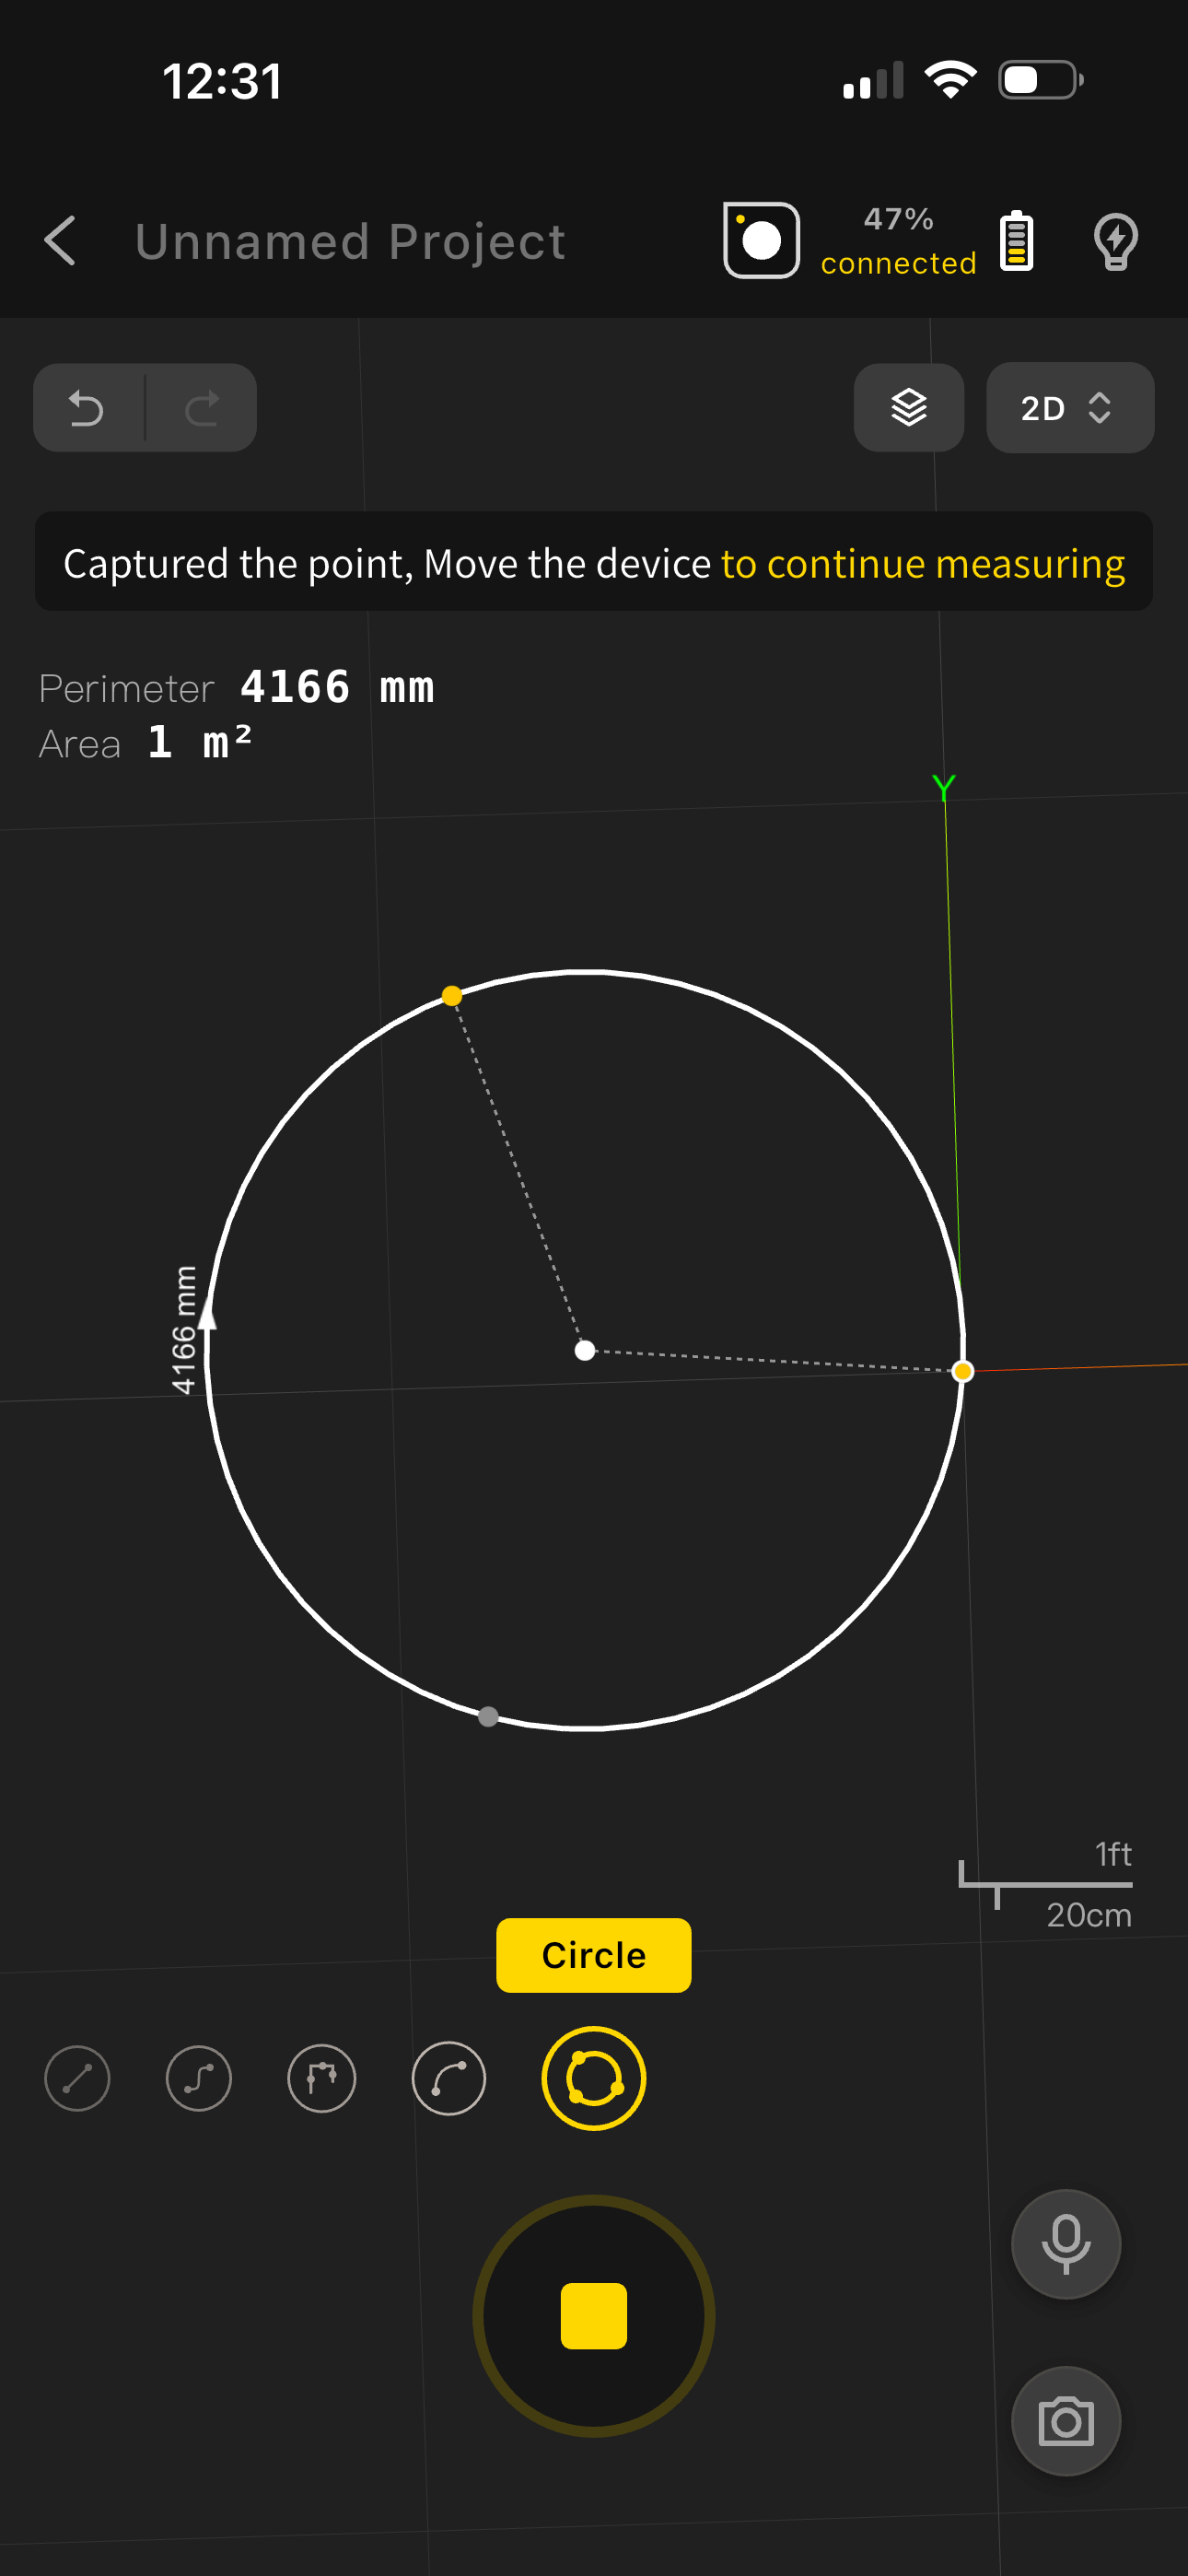
- Select "Circle Mode"
- Place the device at the starting position; wait for the app to show "Starting Point Captured"
- After capturing the starting point, move to the next measurement position; wait for the app to show "Point Captured"
- After capture, continue moving to the next measurement position
- The app will automatically generate the complete circle
- Continue moving to measure; new circles will be generated until you end the session
6.9 Slope Measurement
- Use Cases
For measuring the incline angle of a surface — e.g., hillside/ramp slope, rooftop pitch, road gradient (ramps, bridge approaches), construction site ground slope inspection, staircase gradient. Precisely obtains incline angle, slope percentage, and related data.
- Steps
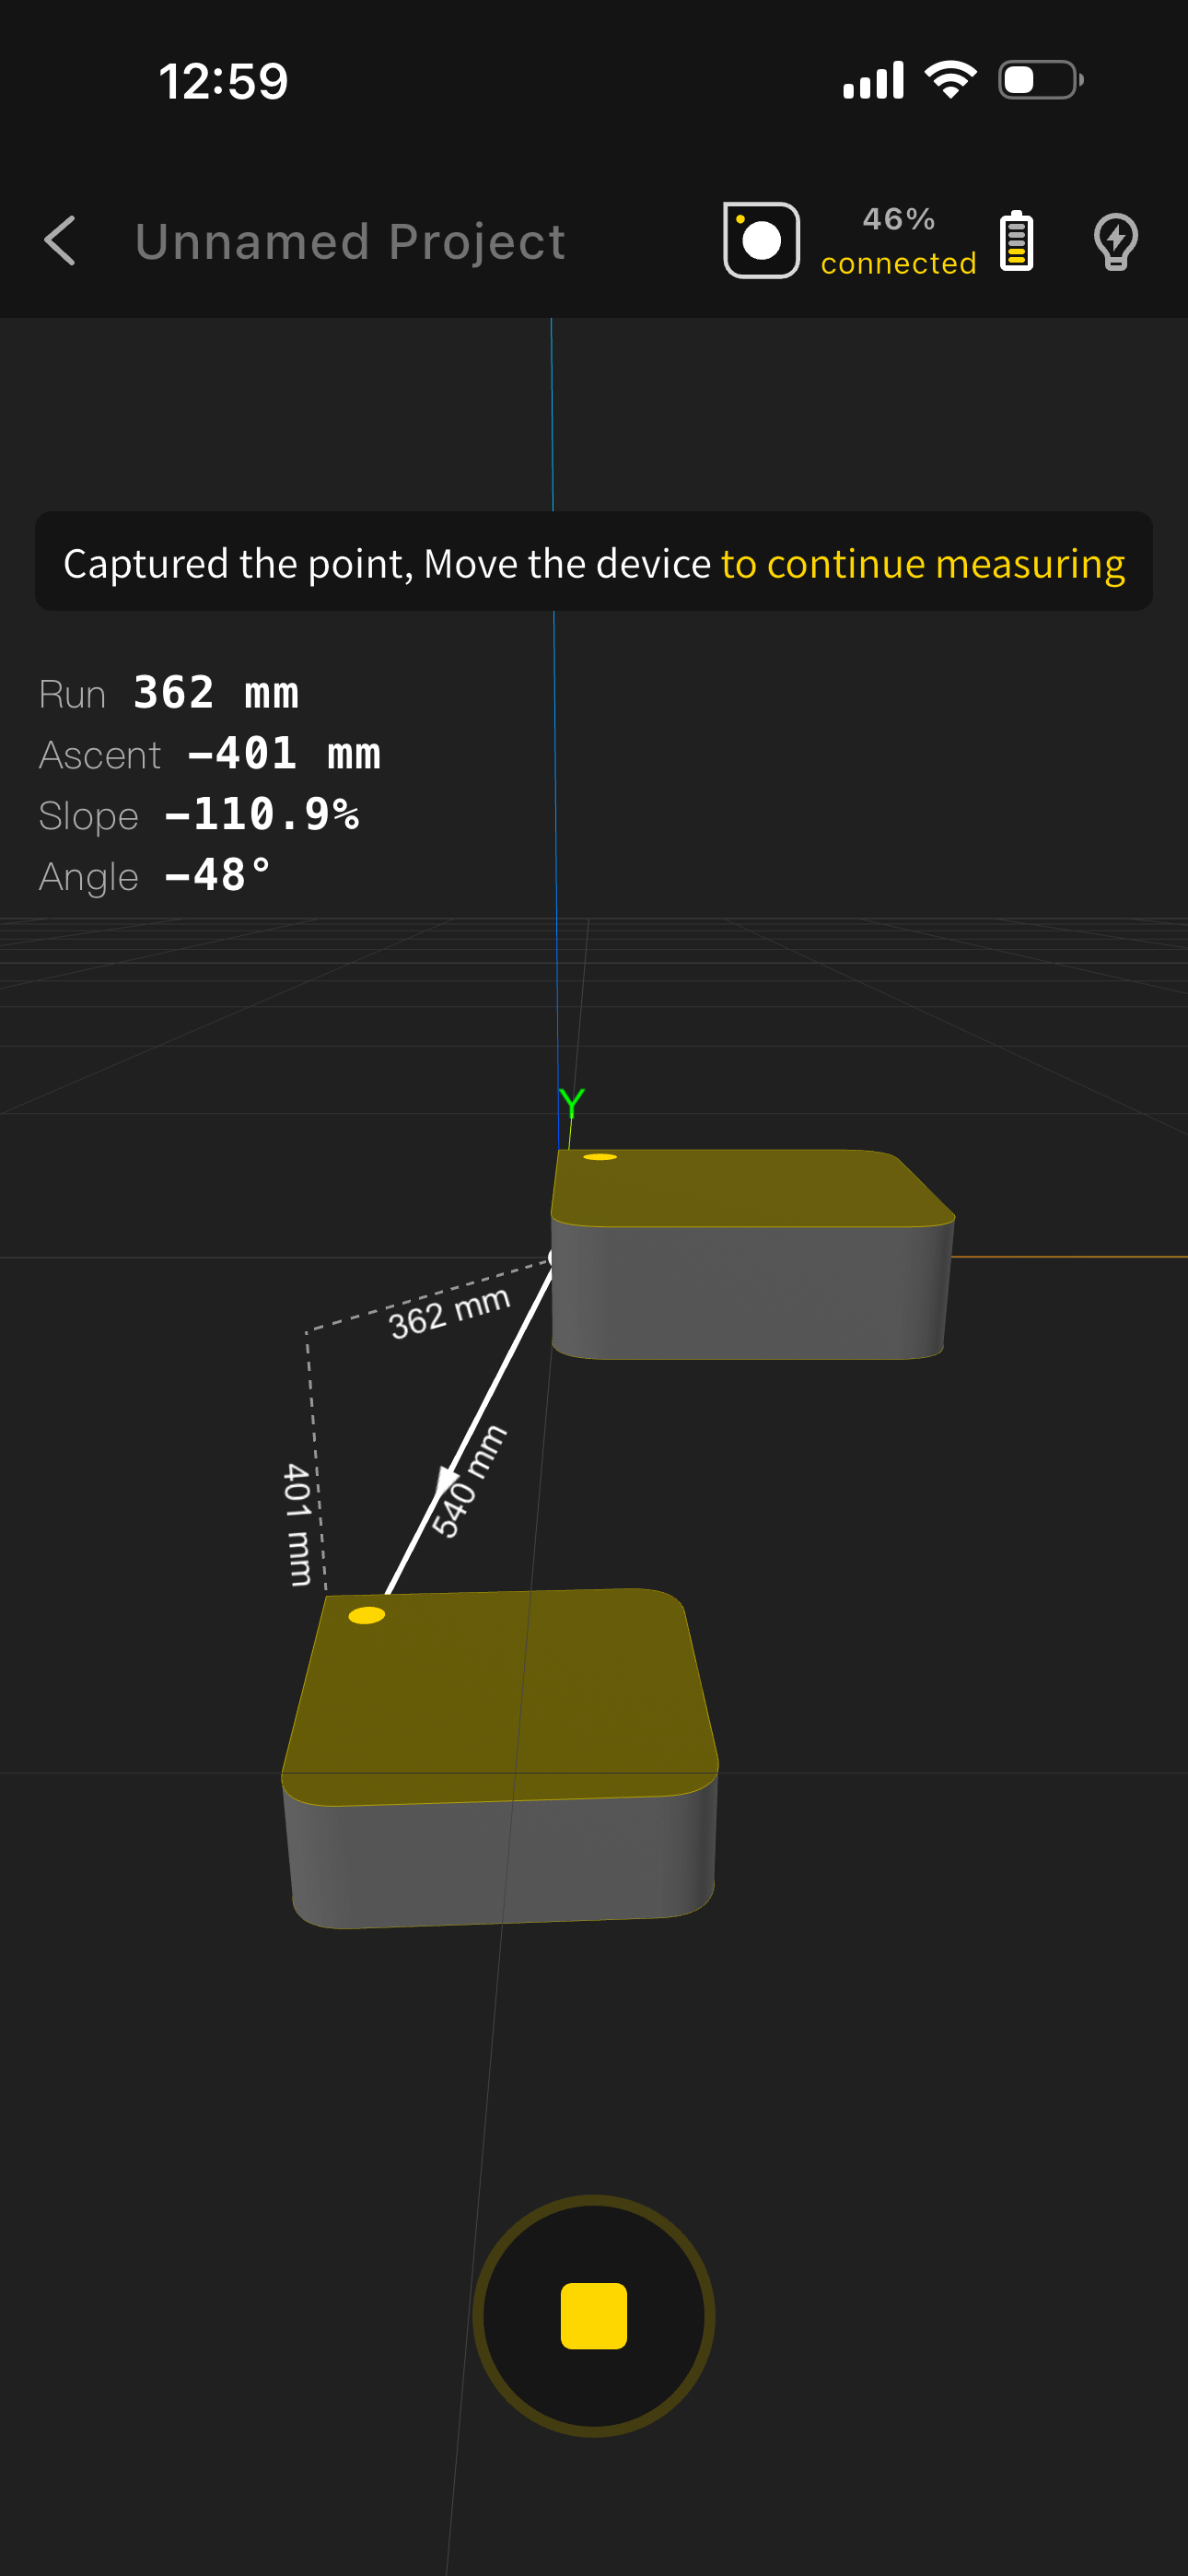
- Tap "Start Measuring" → select "Slope Measurement"
- Place the device flat at the lower end of the measurement surface, ensuring it is flush with the surface, with the indicator corner pointing toward the slope start. Wait for the app to capture the starting point slope.
- Move the device to the top of the slope, again flush with the surface, with the indicator corner pointing toward the slope end. Wait for the app to capture the endpoint slope.
- The system automatically calculates and displays the slope angle and slope percentage between the two points. Tap "Save" to complete.
6.10 Planar Angle Measurement
- Use Cases
For precise measurement of angles between two planes — e.g., wall corner angle (right/obtuse/acute) inspection, furniture placement angle positioning, door/window frame-to-wall angle verification, custom cabinet installation angle calibration, site boundary intersection angle recording, building component (brackets, steel structures) angle inspection, road turn angle measurement, mechanical part angle verification. Quickly captures the intersecting angle of two planes without complex tools — suitable for renovation, construction, and industrial inspection.
- Steps
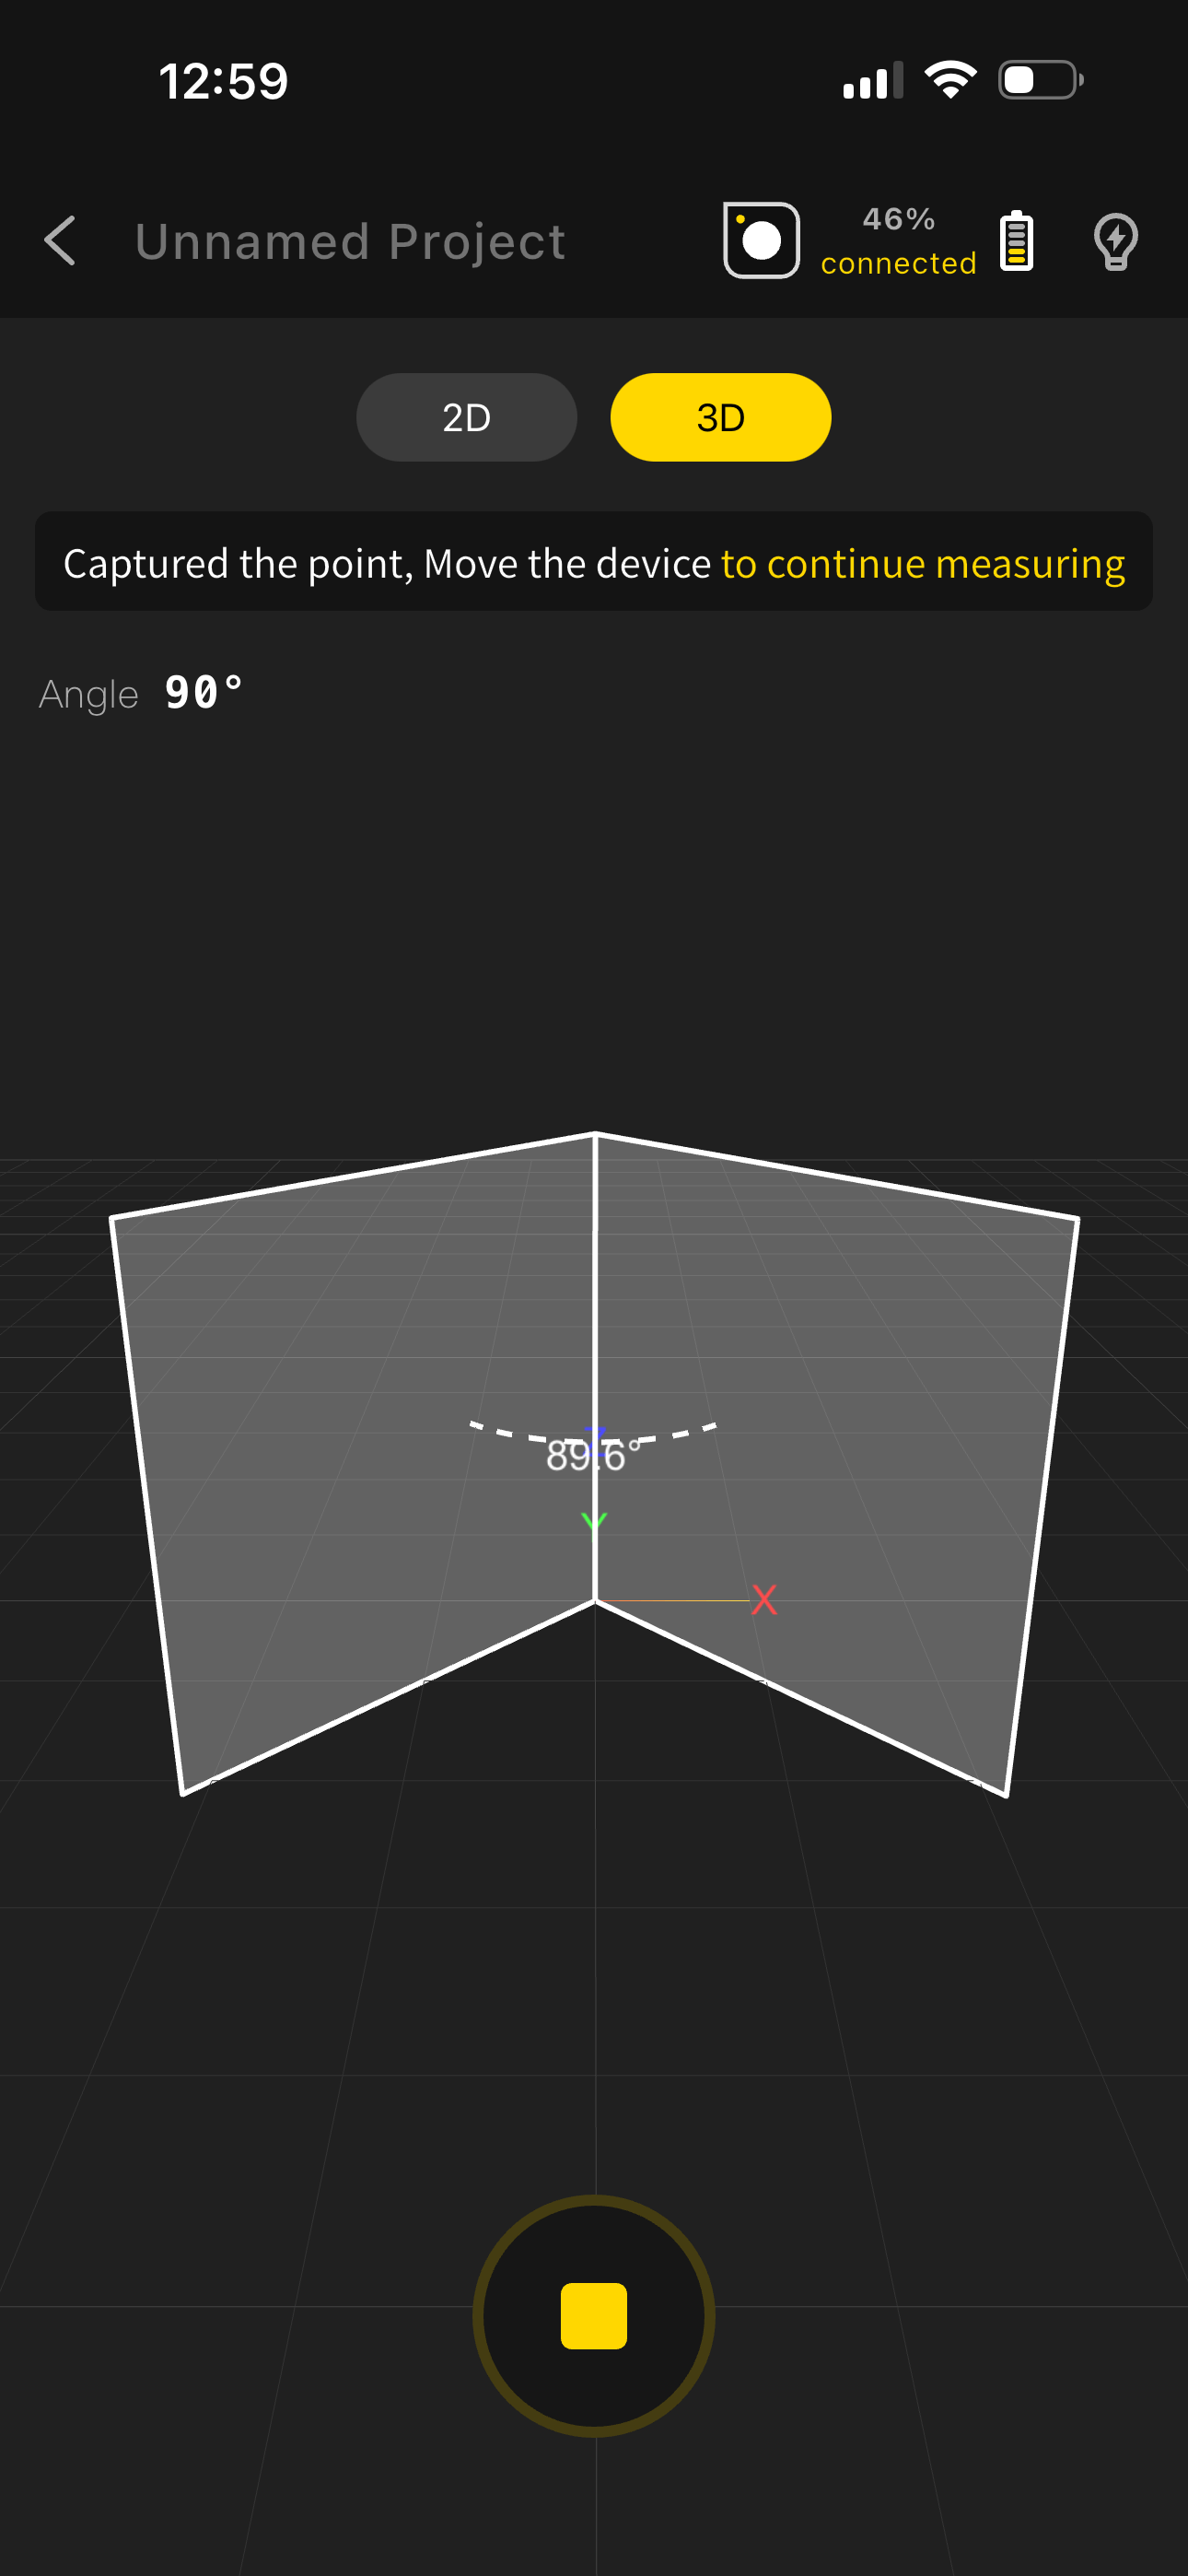
- Tap "Start Measuring" → select "Planar Angle Measurement"
- Place the device flat on the reference surface with the device bottom flush against it; wait for the app to show "Starting Point Captured".
- Ensure the measurement area is unobstructed, then move the device to the second surface with the device bottom flush against it; wait for the app to capture the measurement surface.
- The system automatically extends both planes to form an intersection and displays the angle value.
- To measure additional angles, move the device to the new position and repeat steps 3–4 without exiting the mode.
- When all angle measurements are complete, tap "End Measurement".
6.11 Rotation Angle Measurement
- Use Cases
For measuring rotation angles between a device and line segments — indoors for furniture placement angle positioning, custom cabinet installation calibration, appliance (AC, TV) installation angle adjustment, interior fixture rotation inspection; outdoors for construction component rotation positioning, road layout rotation angle measurement, mechanical part rotation angle verification, site planning path turn angle recording. Uses a reference line versus measurement line comparison to quickly obtain rotation angle data — suitable for renovation, construction, and industrial inspection.
- Steps
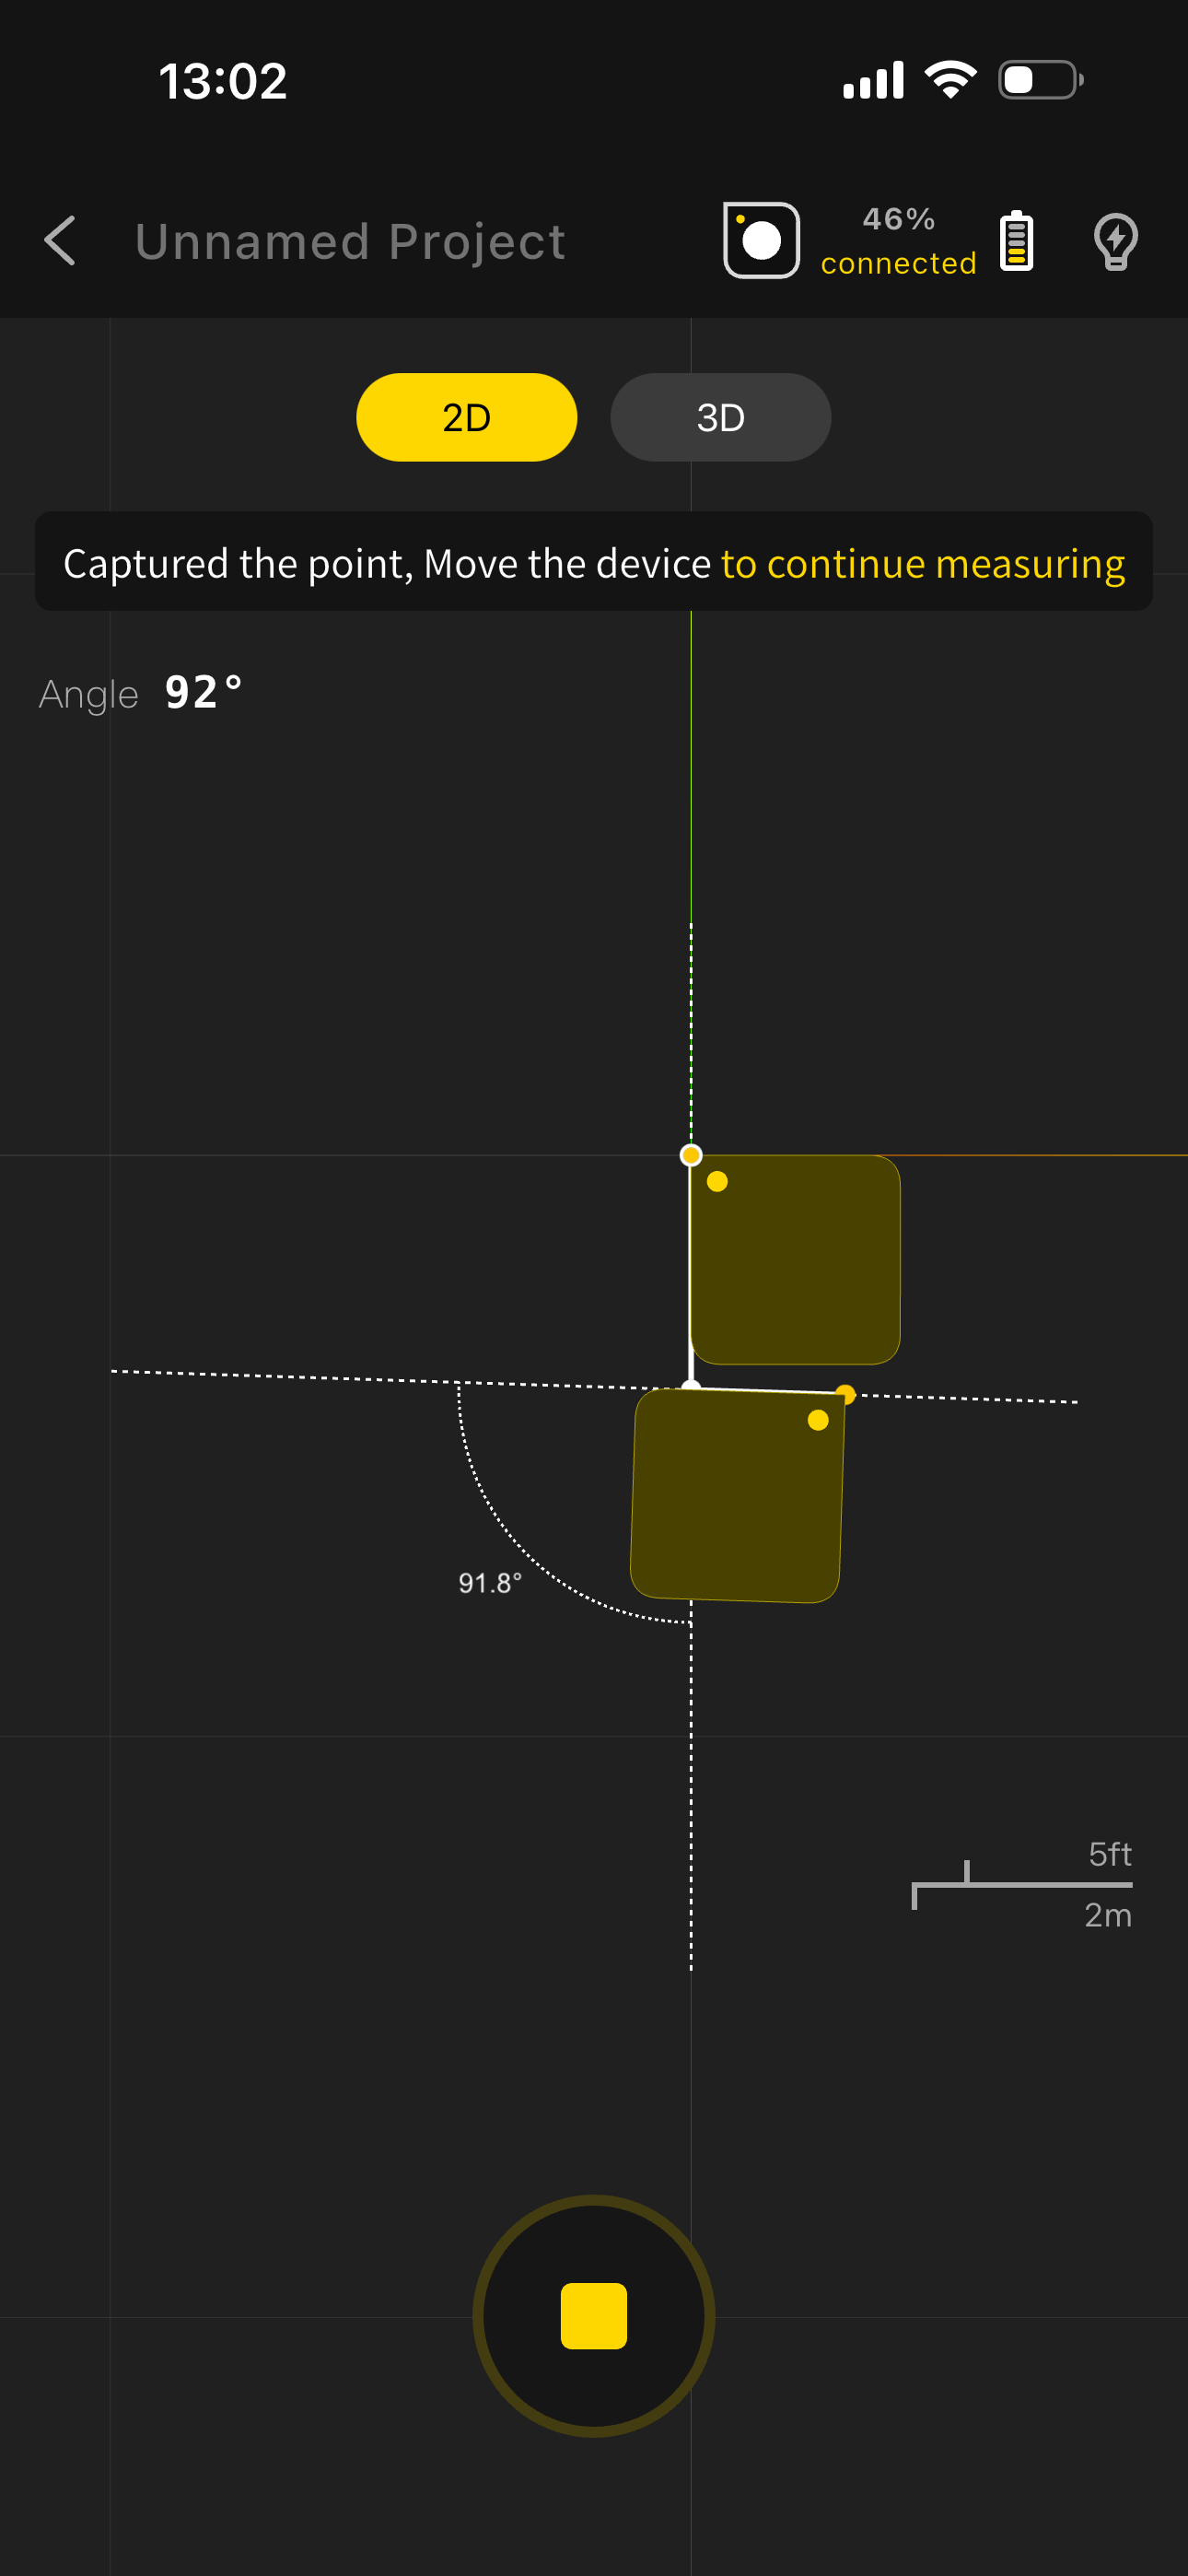
- Tap "Start Measuring" → select "Planar Angle Measurement"
- Place the device flat on the reference line, with the precise measurement corner and side aligned to the reference line. Follow the app prompt to position correctly and wait for "Starting Point Captured" with a beep.
- Ensure the measurement area is unobstructed. Rotate the device to the target position and place it on the measurement line, again aligned by the precise measurement corner and side. Wait for the app to capture the measurement line.
- The system automatically extends the reference point into a reference line and forms an angle with the extended measurement line.
- For multiple rotation angle measurements, move to the new position and repeat steps 3–4 without exiting the mode.
- When all rotation angles are measured, tap "End Measurement" at the bottom.
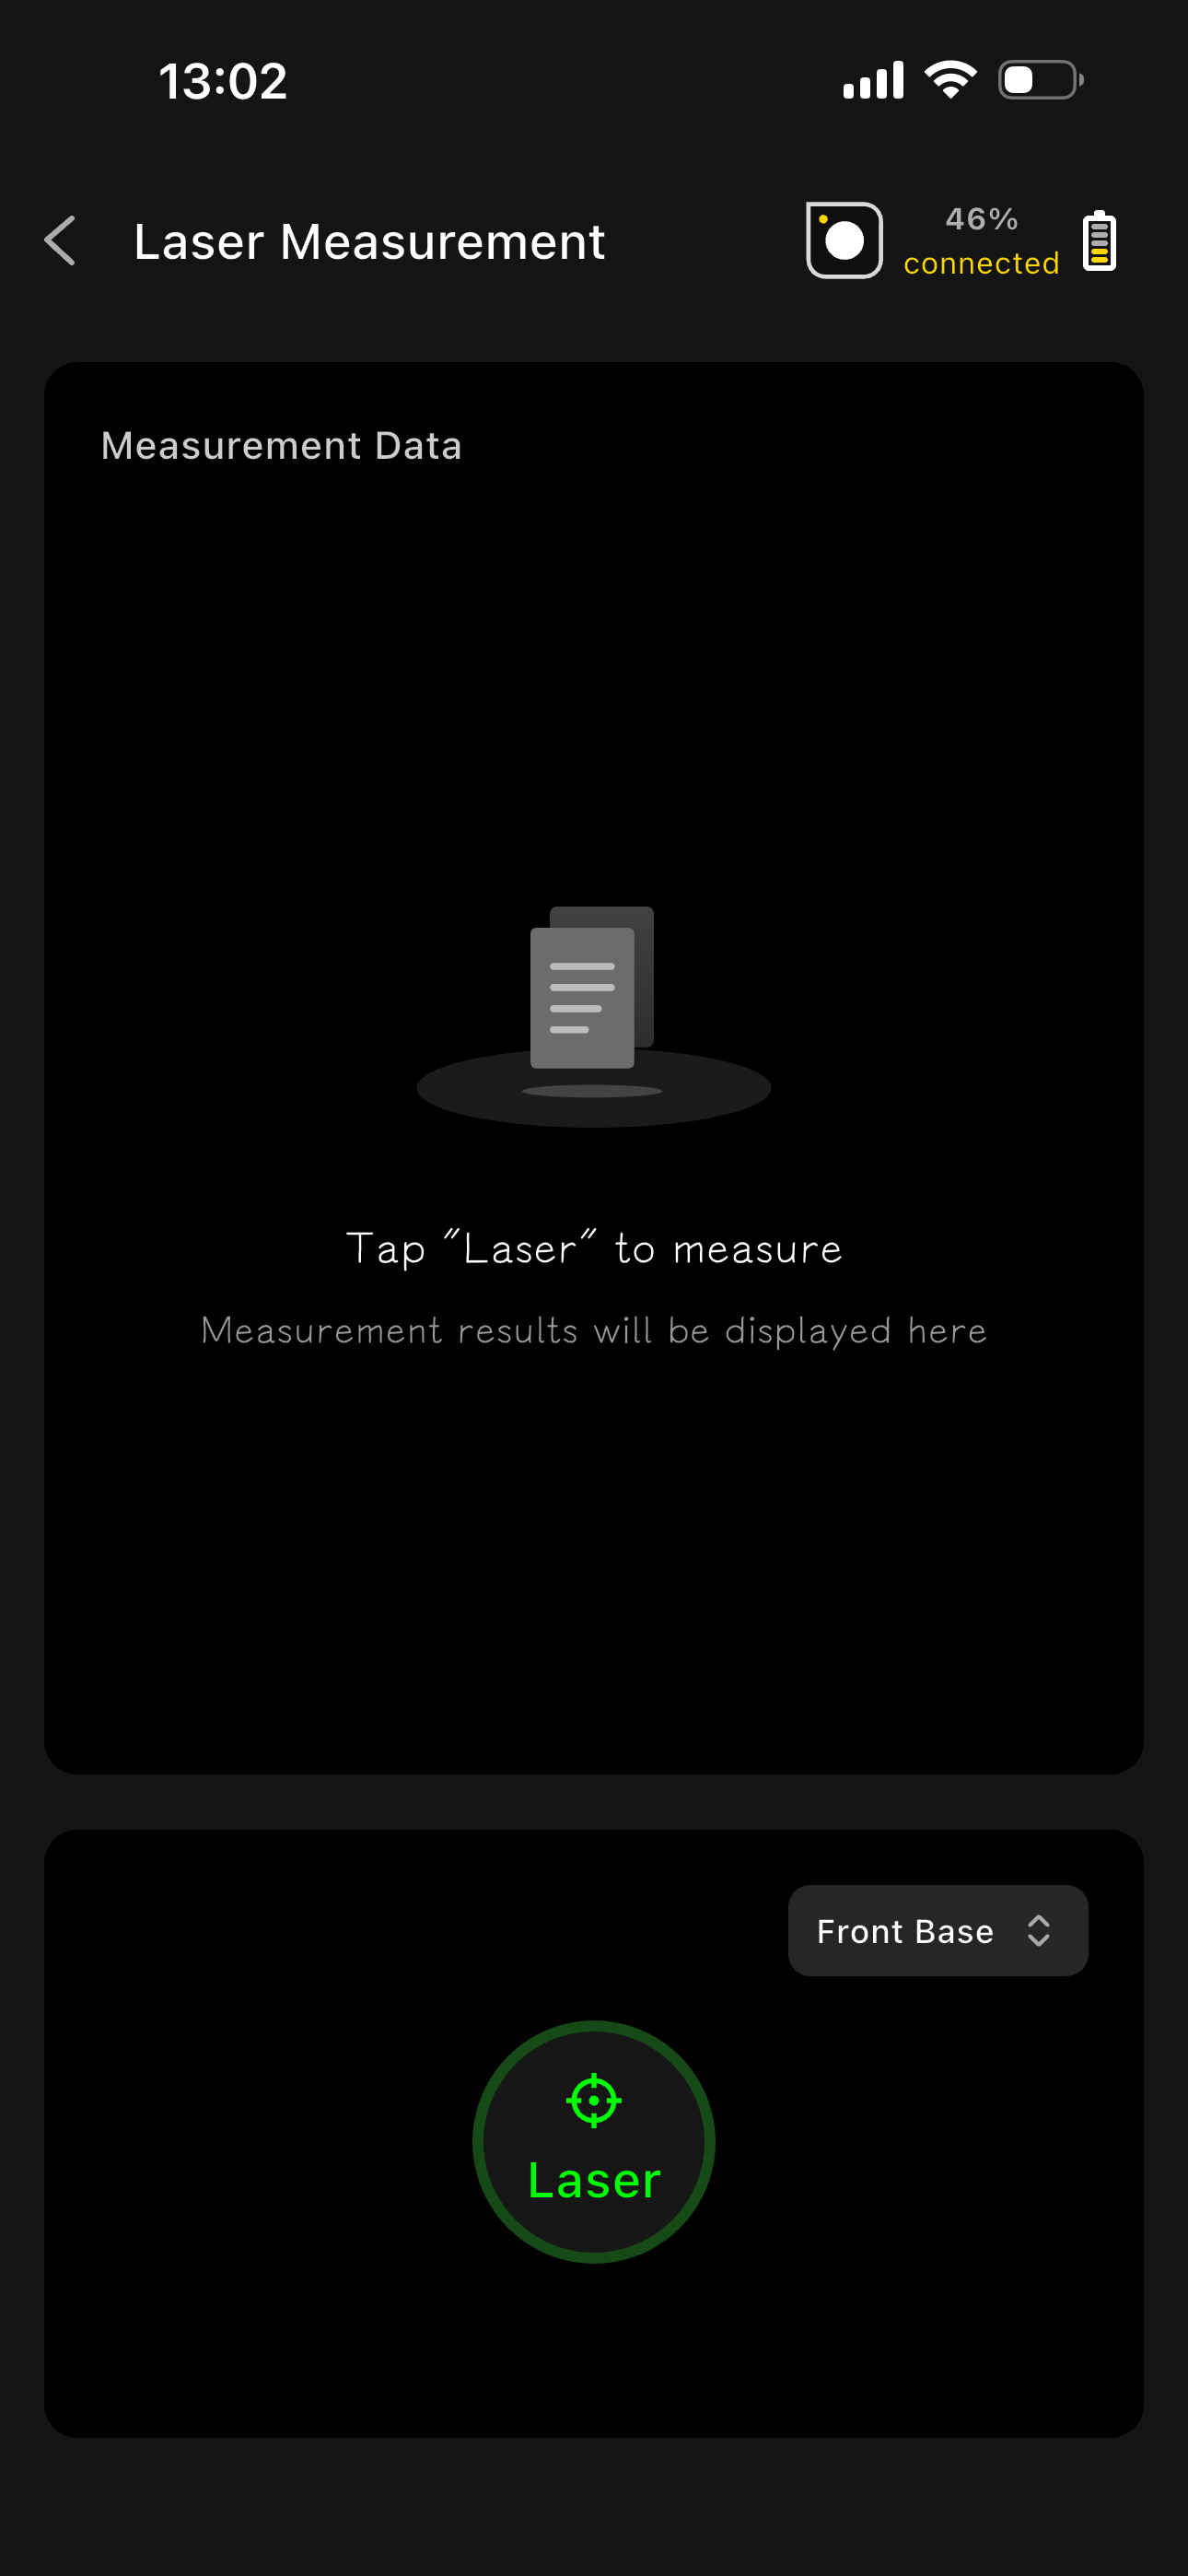
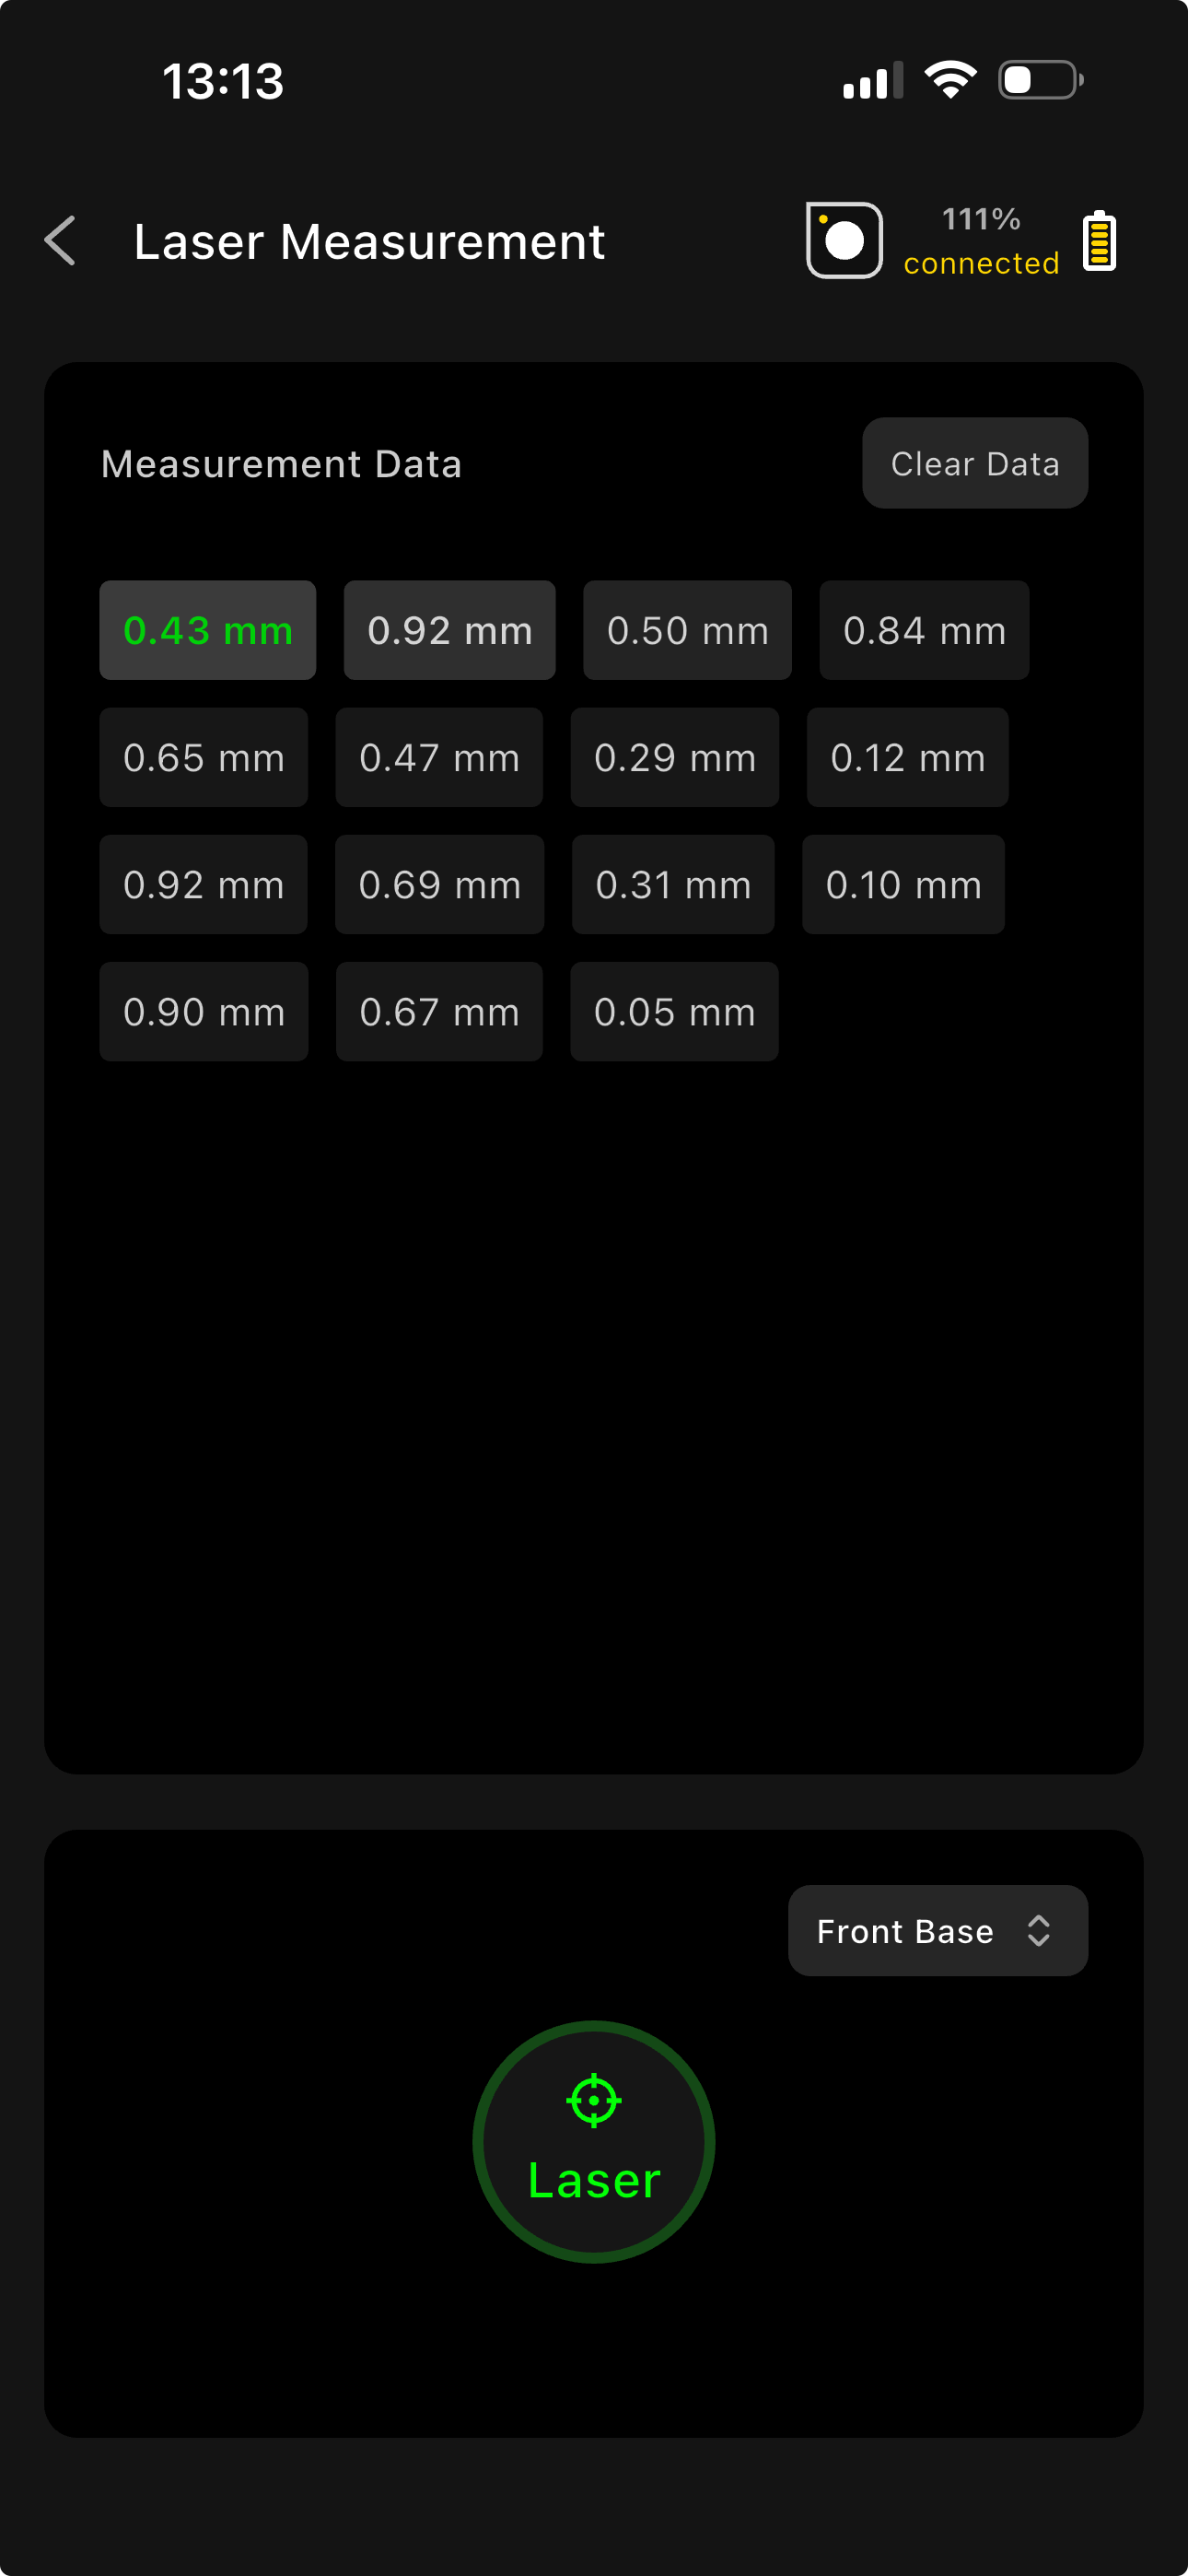
6.12 Laser Measurement
- Use Cases
Ideal for quick measurements in home renovation — room area, custom furniture dimensions, as well as horizontal and vertical positioning for tile laying and ceiling installation.
- Steps
 |
 |
|---|
- Tap "Start Measuring" → select "Laser Measurement"
- Tap the "Laser" button at the bottom of the screen to start measuring
6.13 Continue Measurement (Seamless Segmented Measurement)
- Use Cases
Designed for long-distance paths (roads, riversides) or complex sites (large gardens, factories) and large indoor spaces (malls, office buildings, workshops) where a single measurement pass cannot cover the entire area. Measure in sections across different areas or time periods, then use the Continue Measurement feature to seamlessly connect segments — no need to re-measure completed sections. Ensures complete site or path data and improves overall measurement efficiency.
Steps
- After each measurement segment, the app automatically saves the data to "Project Management" — no manual save needed.
- To continue measuring, open the app's home screen, find the saved project in "Project Management", and tap "Continue Measurement".
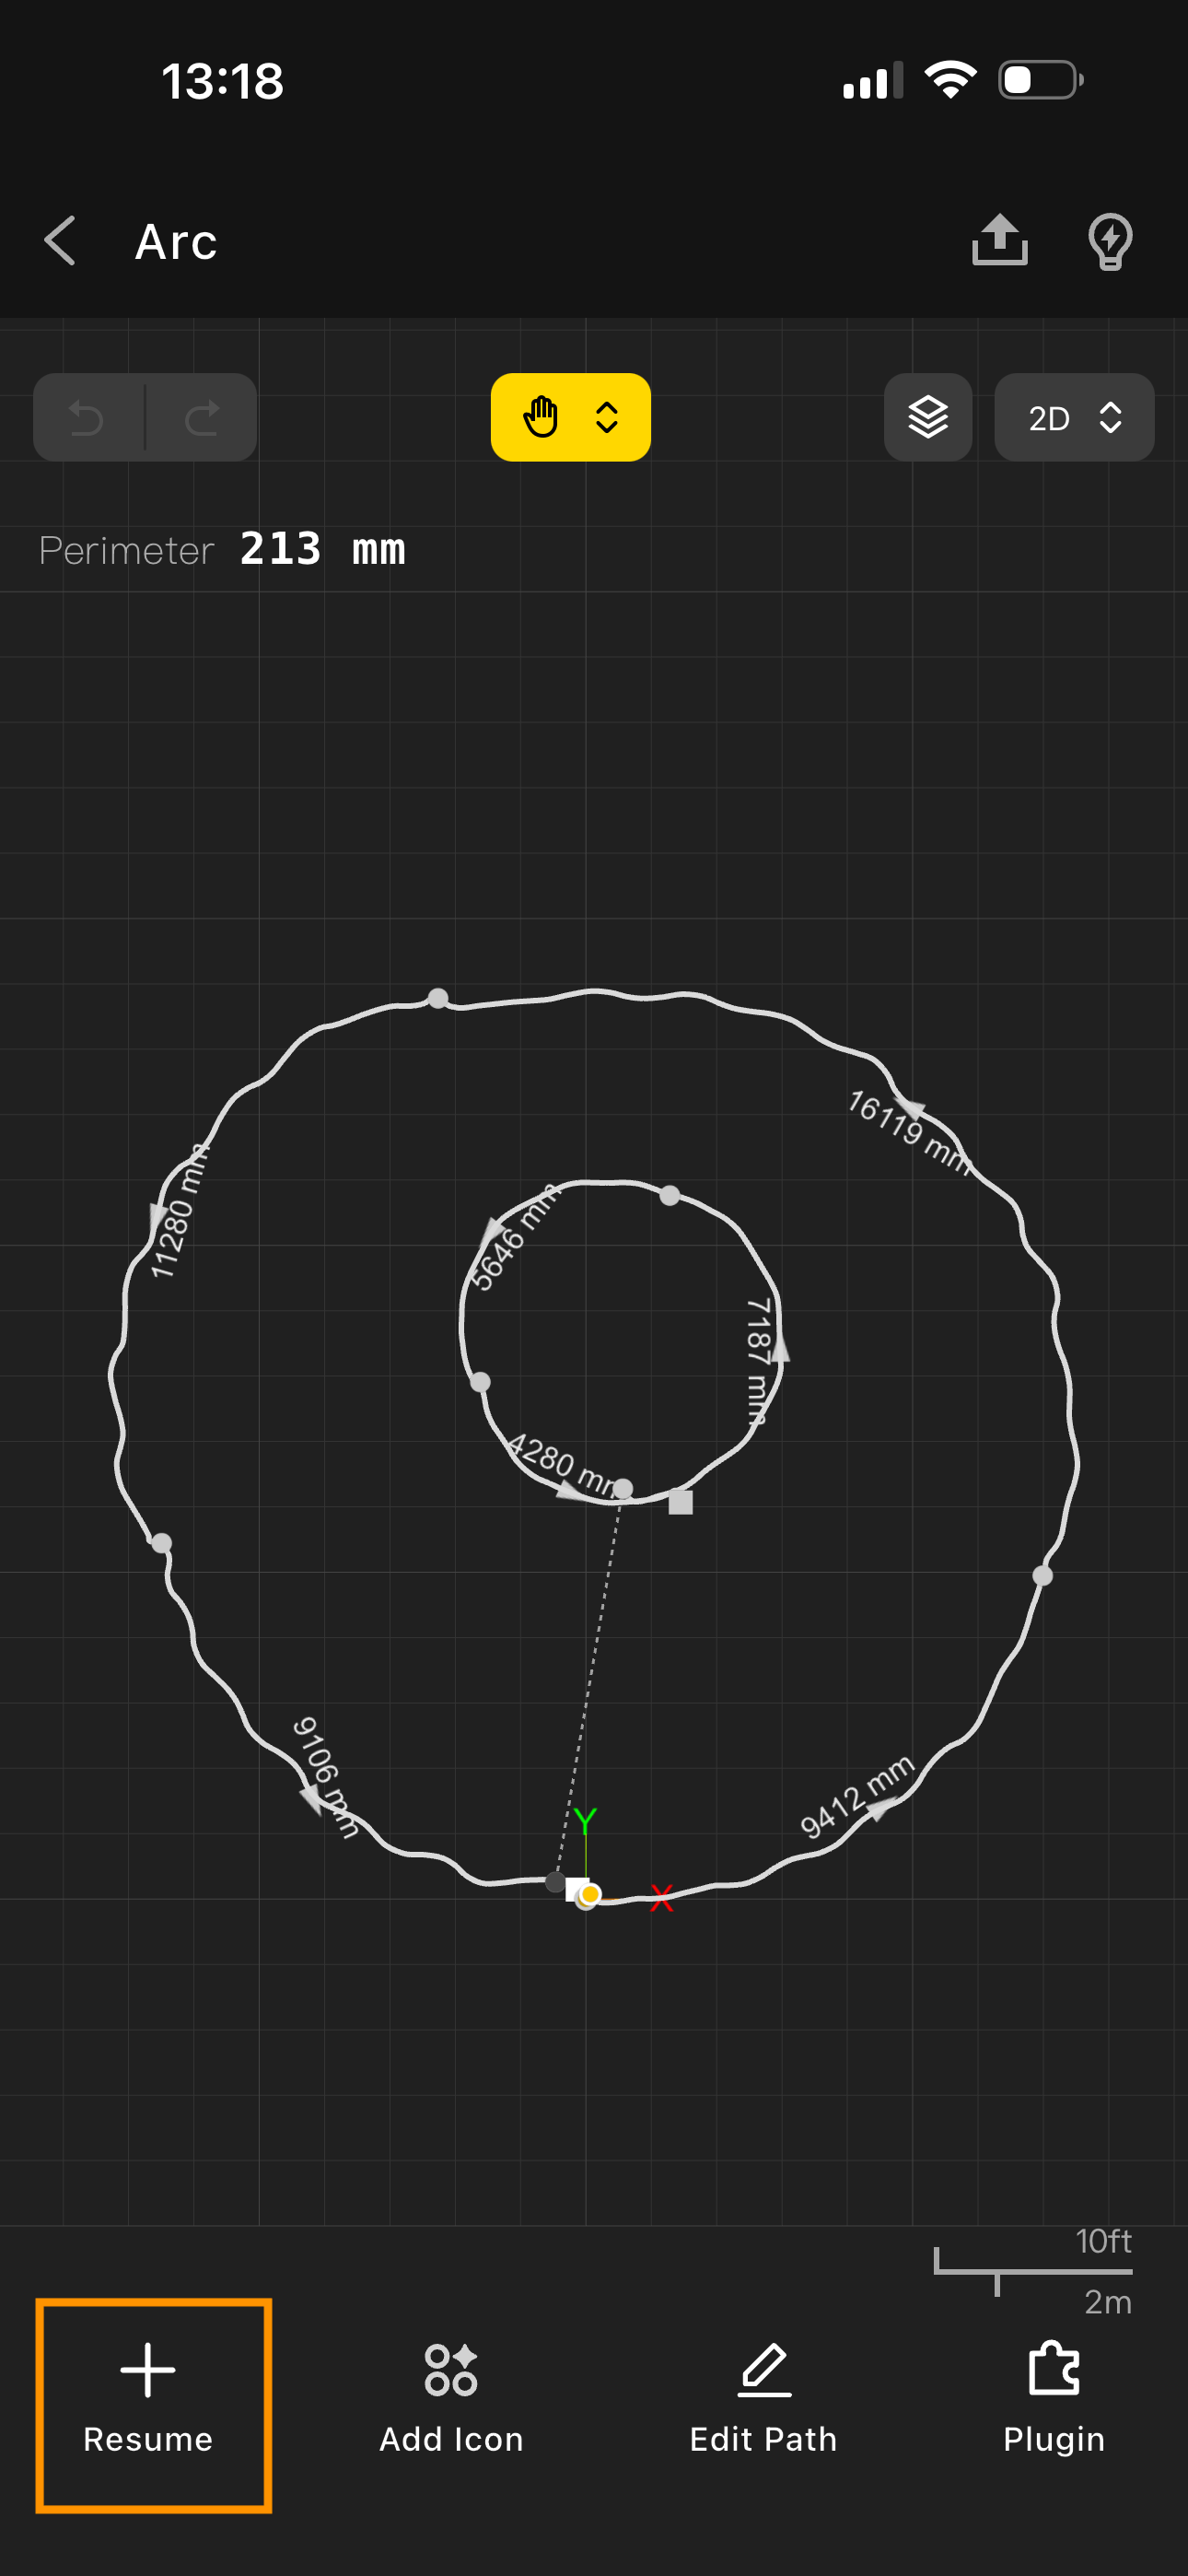
- As prompted by the app, align the device's indicator corner with the yellow dot shown on screen (the first or last reference point of the previous segment — use the toggle to switch). Once positioned steadily, tap "Done".
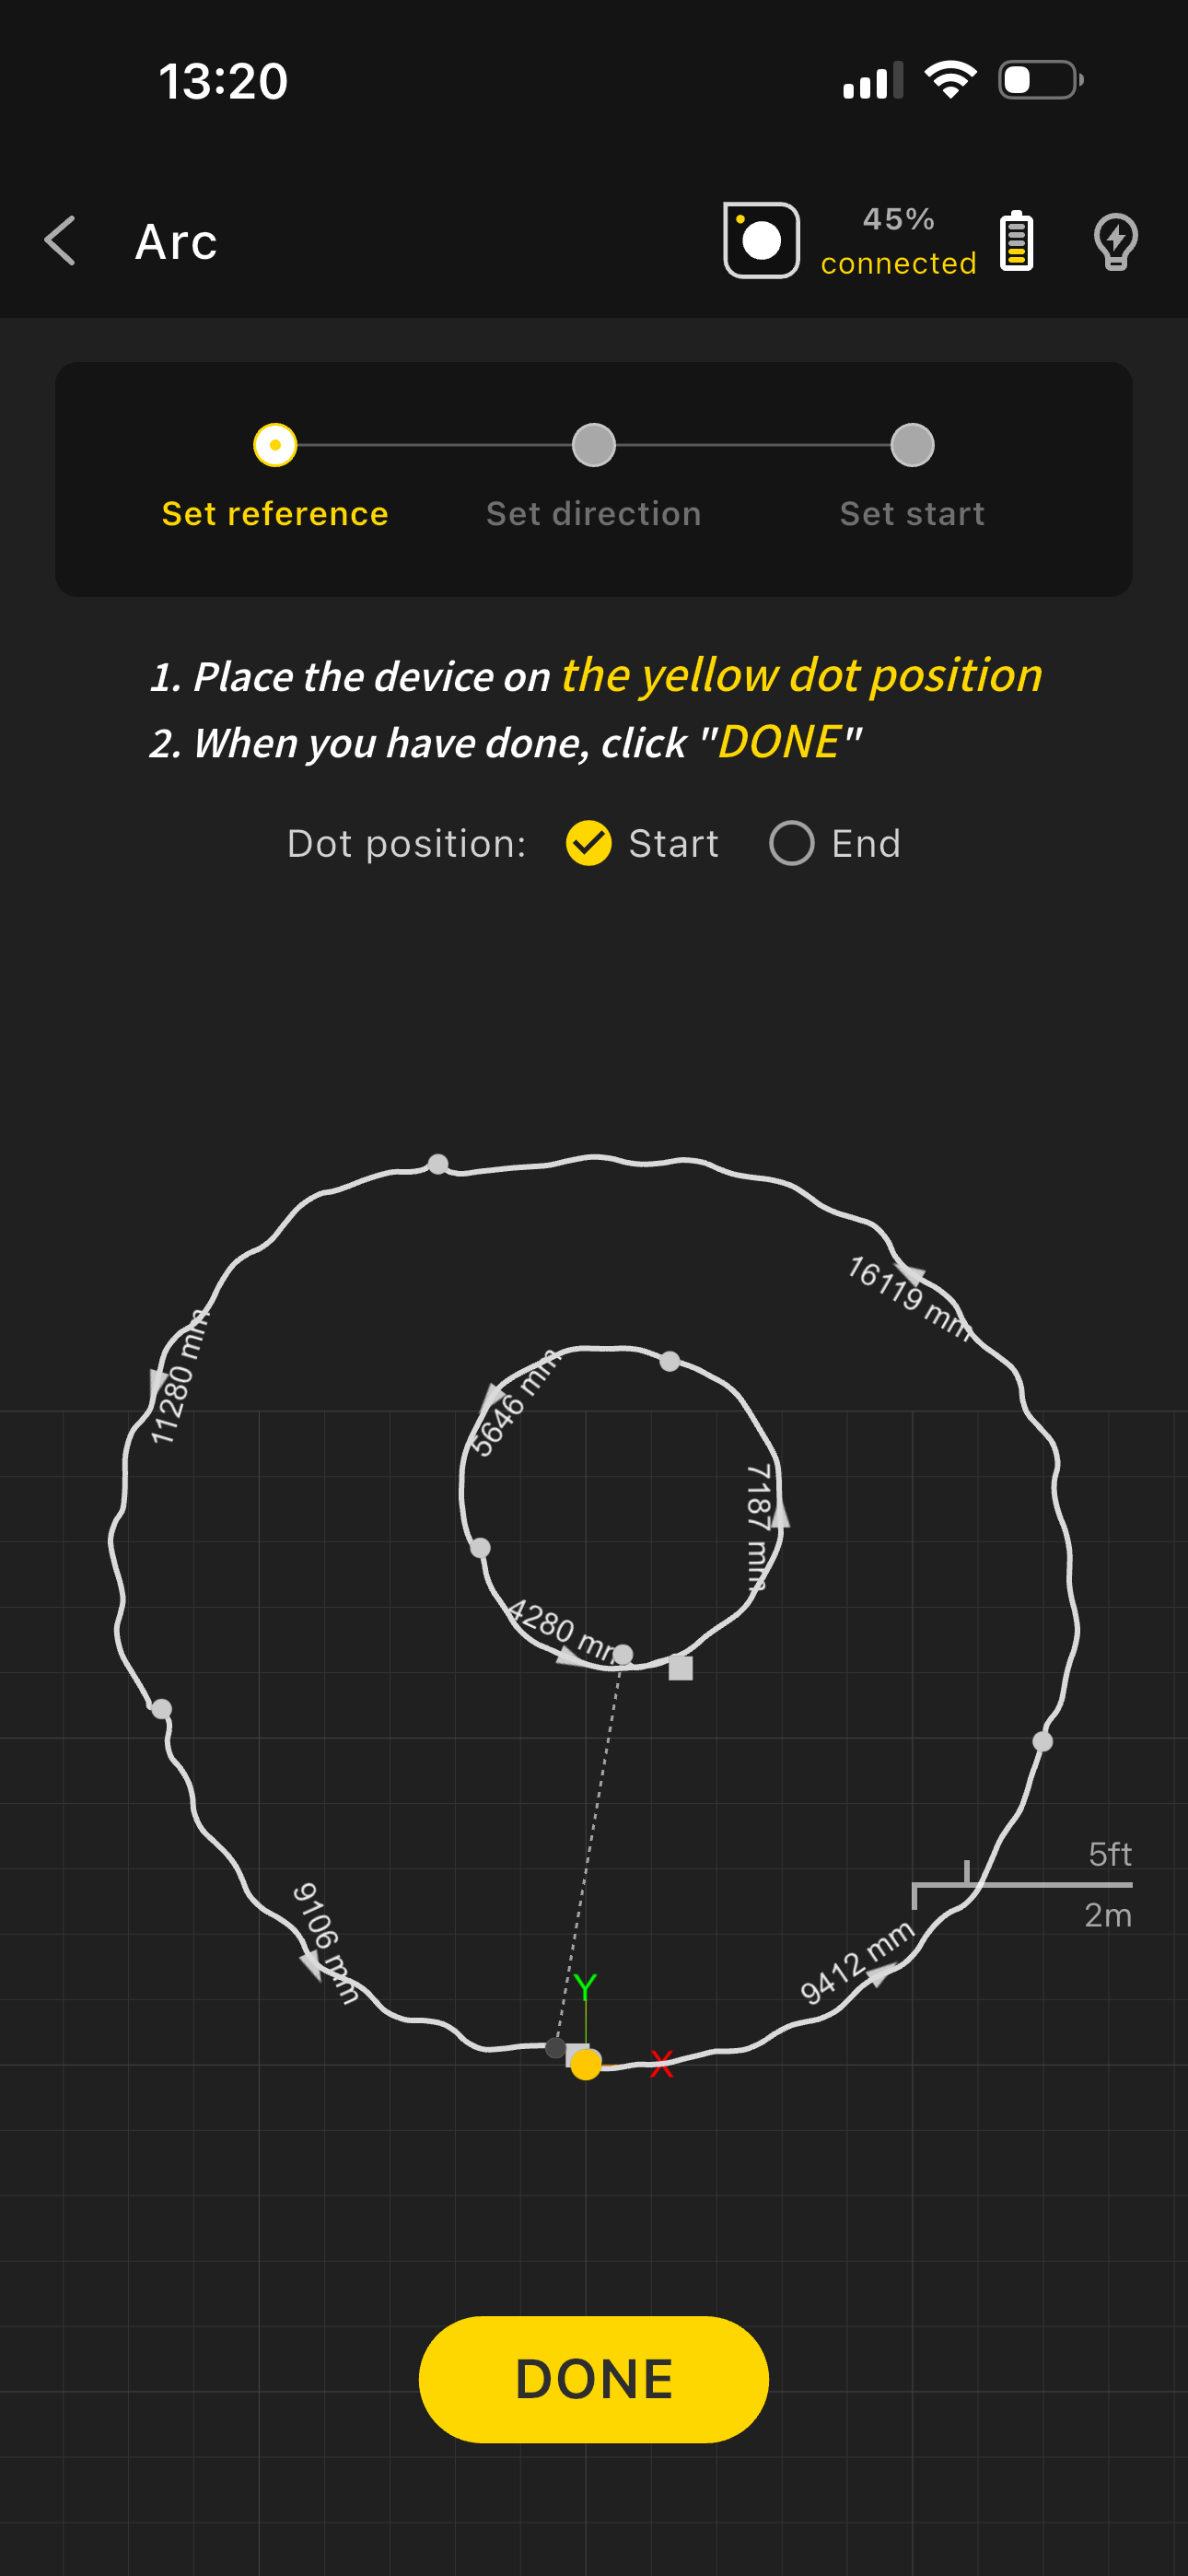
- Place the device at any position along the yellow segment displayed in the app to complete directional alignment, then tap "Done".
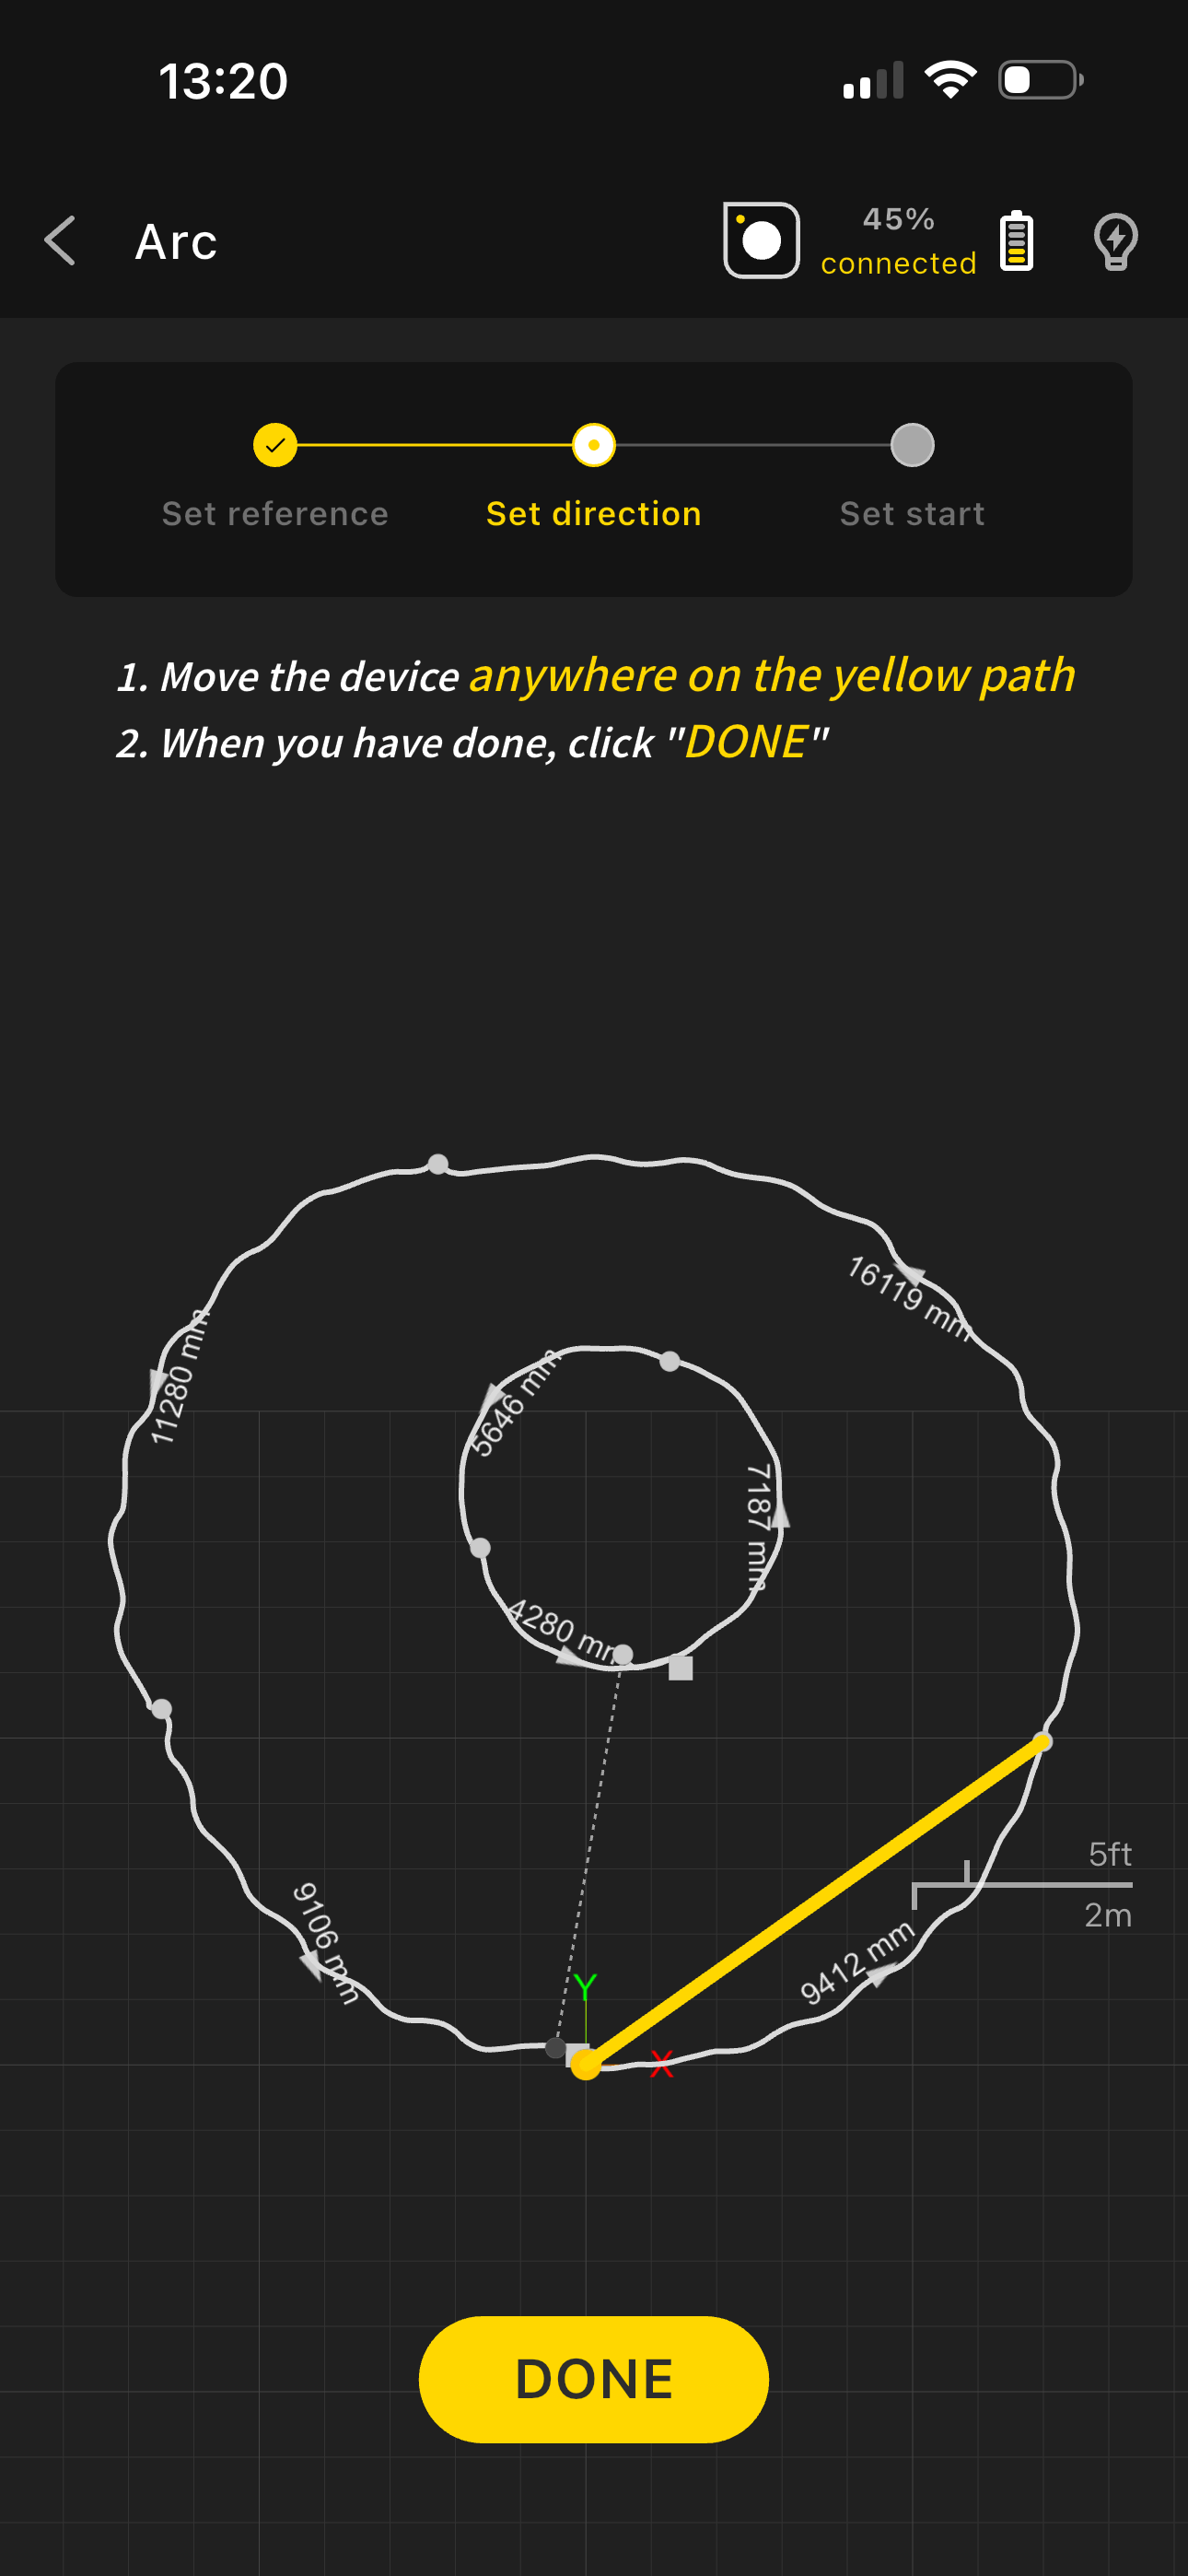
- Once positioned, select a new starting point and continue measuring in any of the above modes. New data is automatically synced to the original project file.
6.14 Measurement Tips and Best Practices
Before Measuring:
- Ensure sufficient device battery
- Clear the measurement environment
- Plan the measurement path
- Set the appropriate precision
During Measurement:
- Maintain a steady, consistent pace
- Avoid sharp turns and sudden device movement
- Monitor real-time feedback
- Adjust strategy as needed
After Measurement:
- Review measurement results
- Make necessary edits
- Add markers and annotations
- Save, export, or share the data
7. Data Viewing and Editing
7.1 Viewing Measurement Results
Top-left summary panel:
- Total length / area
Select a measurement line or point to view detailed data:
 |
 |
|---|
- Segment lengths
- Angle information
- Coordinate data
- Height information
7.2 Path Editing
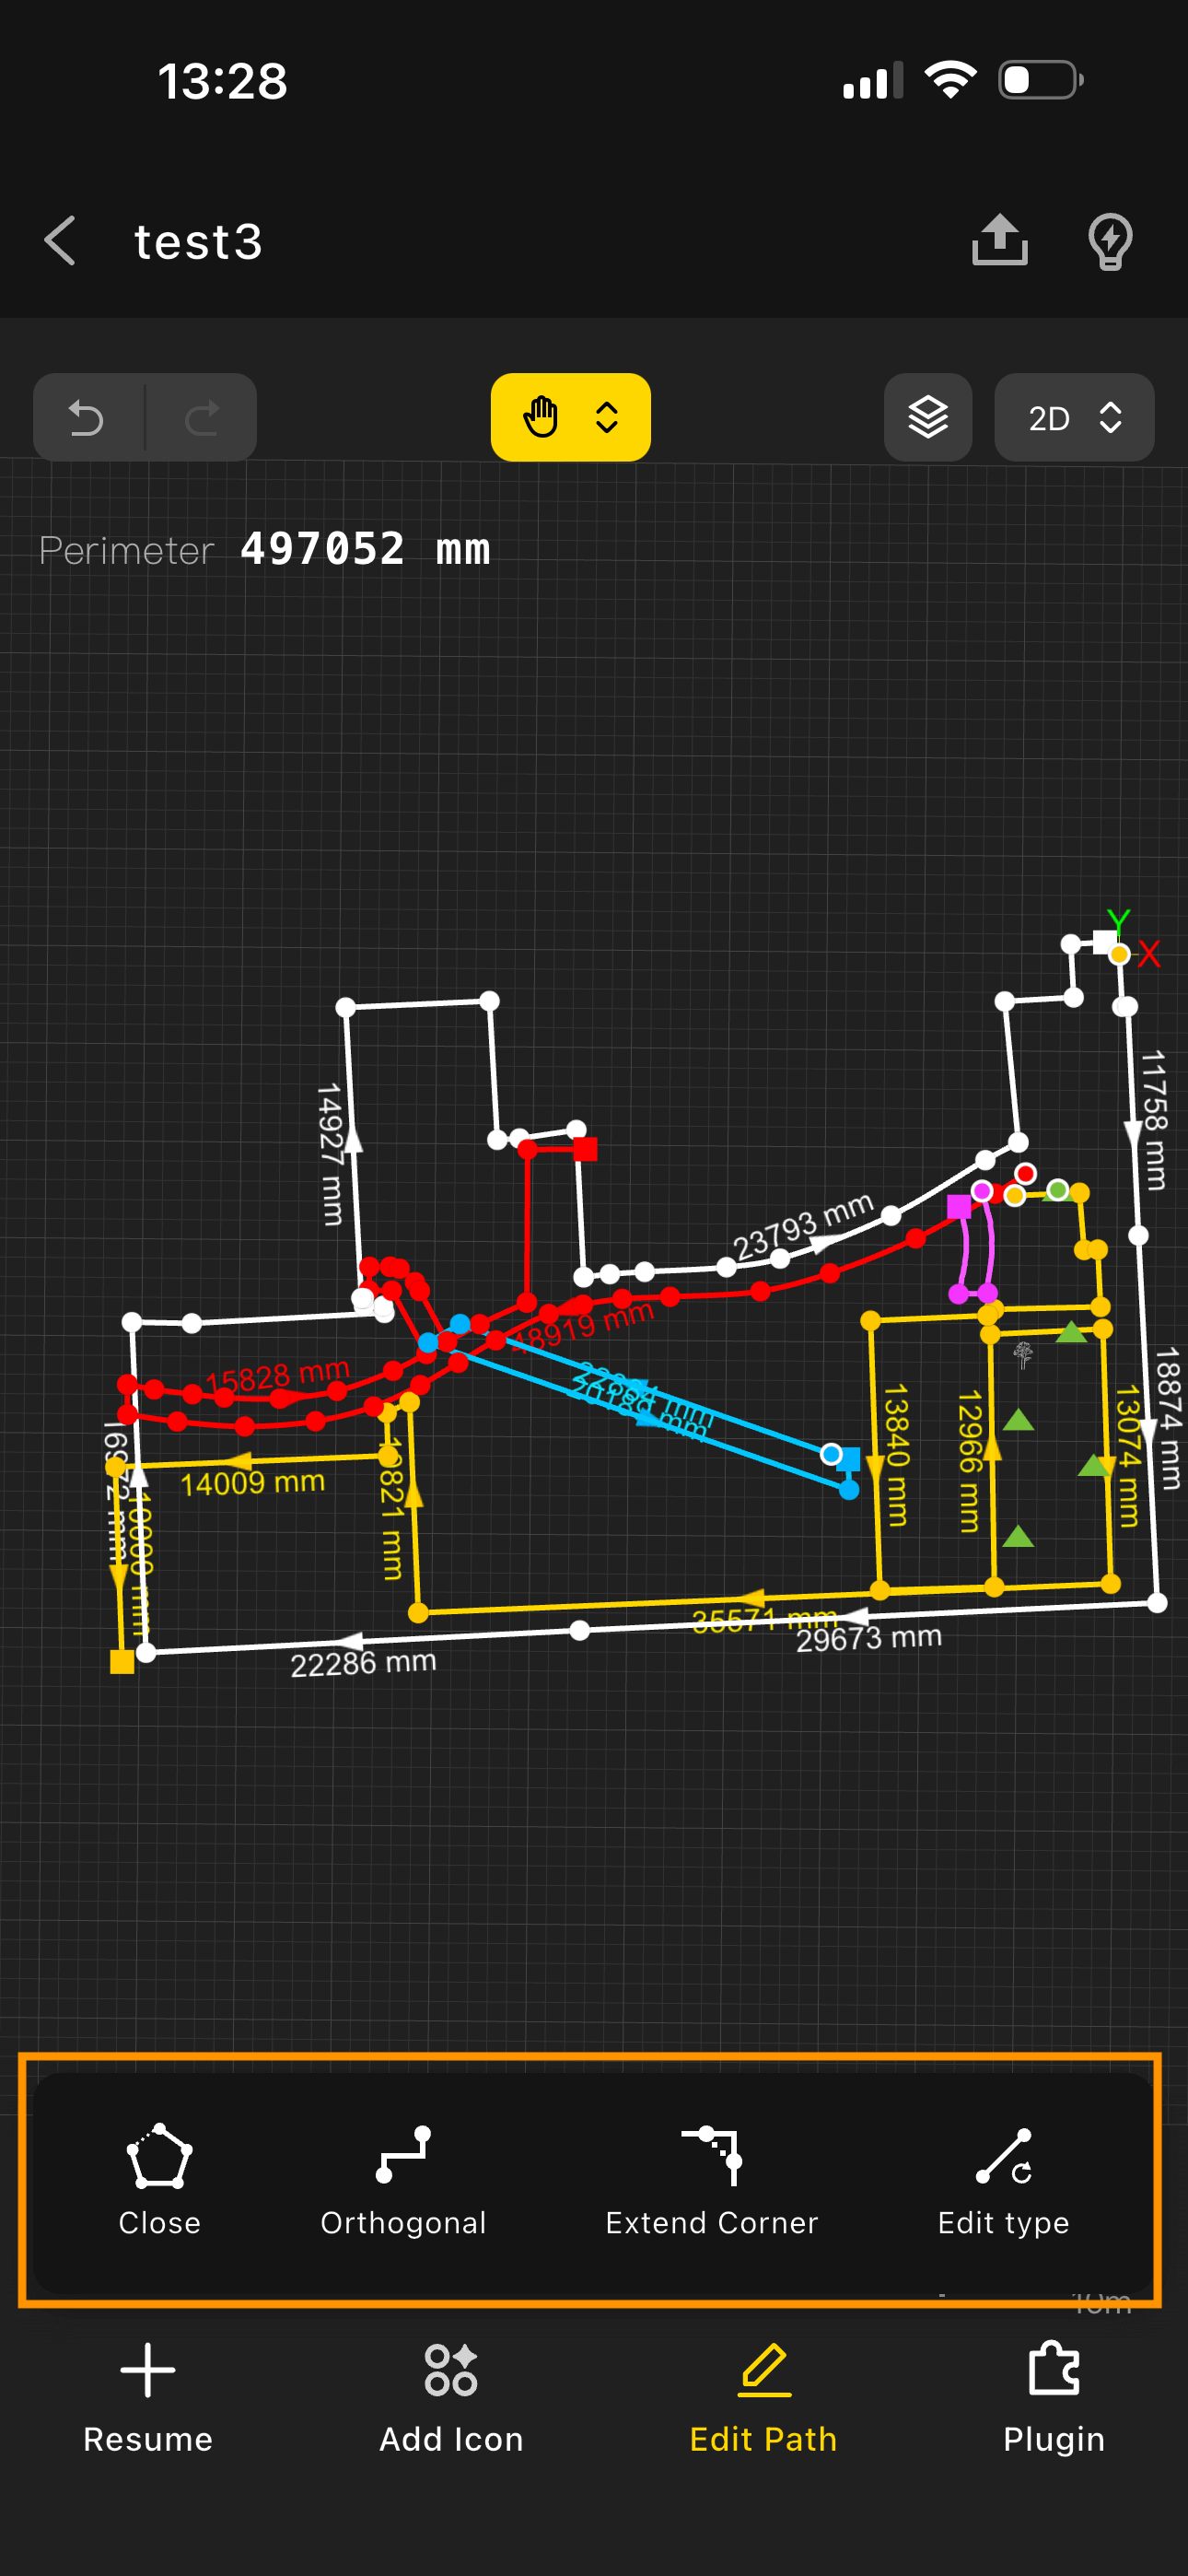
Edit Operations
- Tap "Open" to open all closed paths;
- Tap "Close", select the path to close, tap Confirm — the path closes;
- Tap "Orthogonal" — all paths are automatically aligned to 90°;
- Tap "Smart Corner Fill", select two paths, preview the intersection angle, tap Confirm — corner fill is applied;
- Tap "Change Type", select a path, switch the path type above, preview the result, tap Done — path type is updated
7.3 View Switching and Navigation
View Modes:
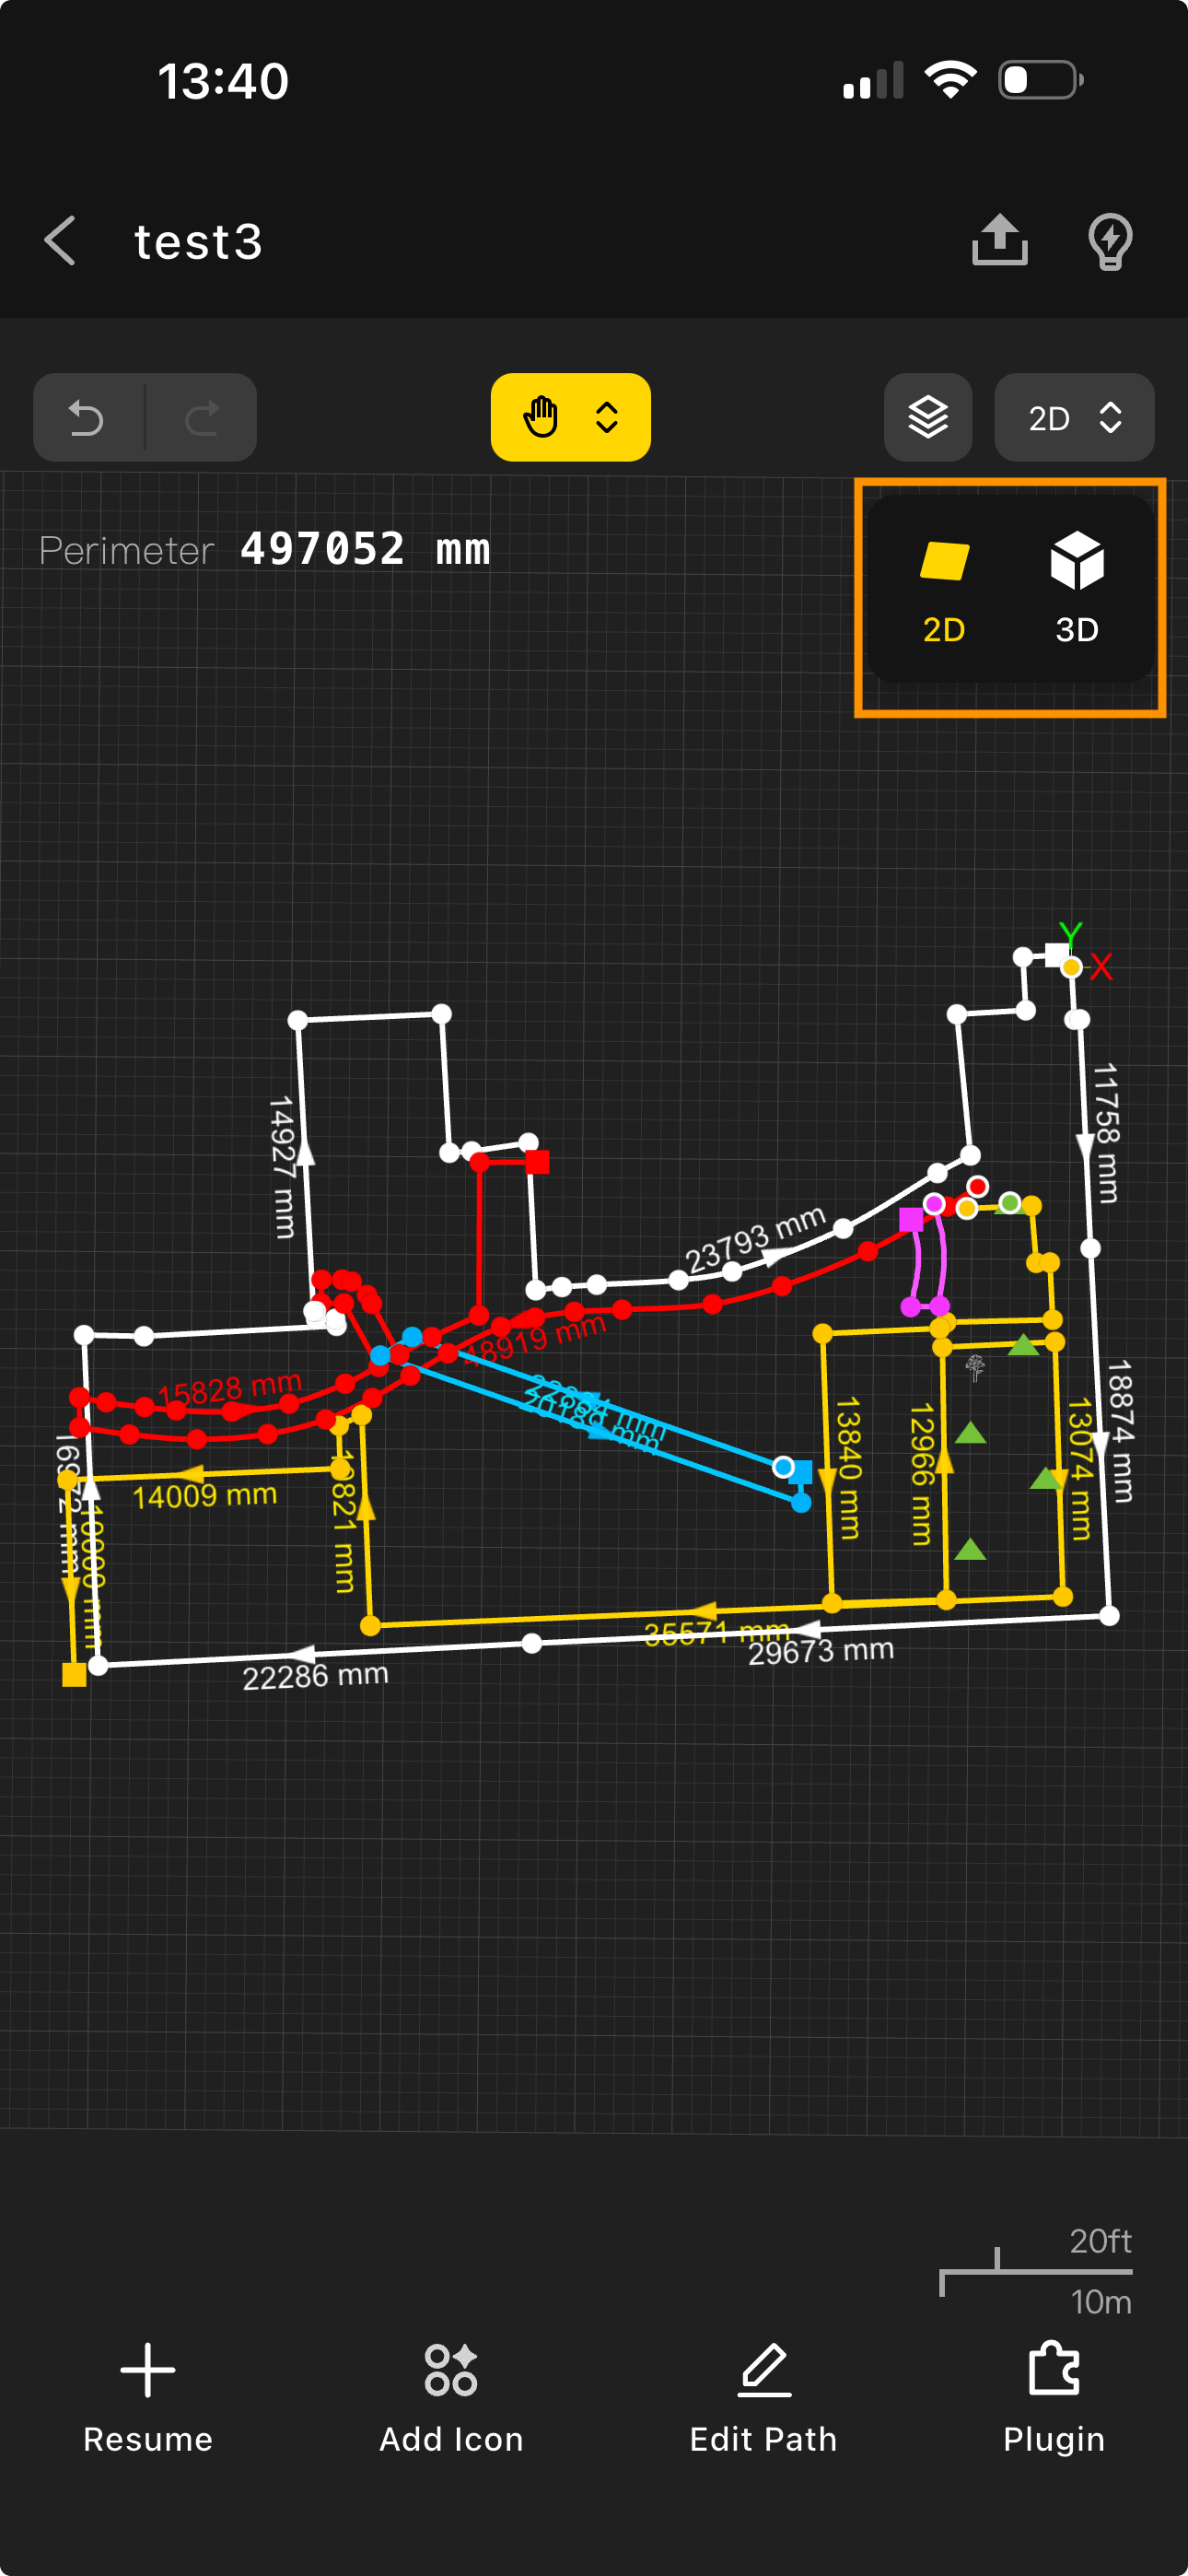
- Top-right corner: toggle between 2D and 3D view
Controls:
- Pinch to zoom in/out
- Drag to pan
- Single finger to rotate 360°
8. Markers and Notes
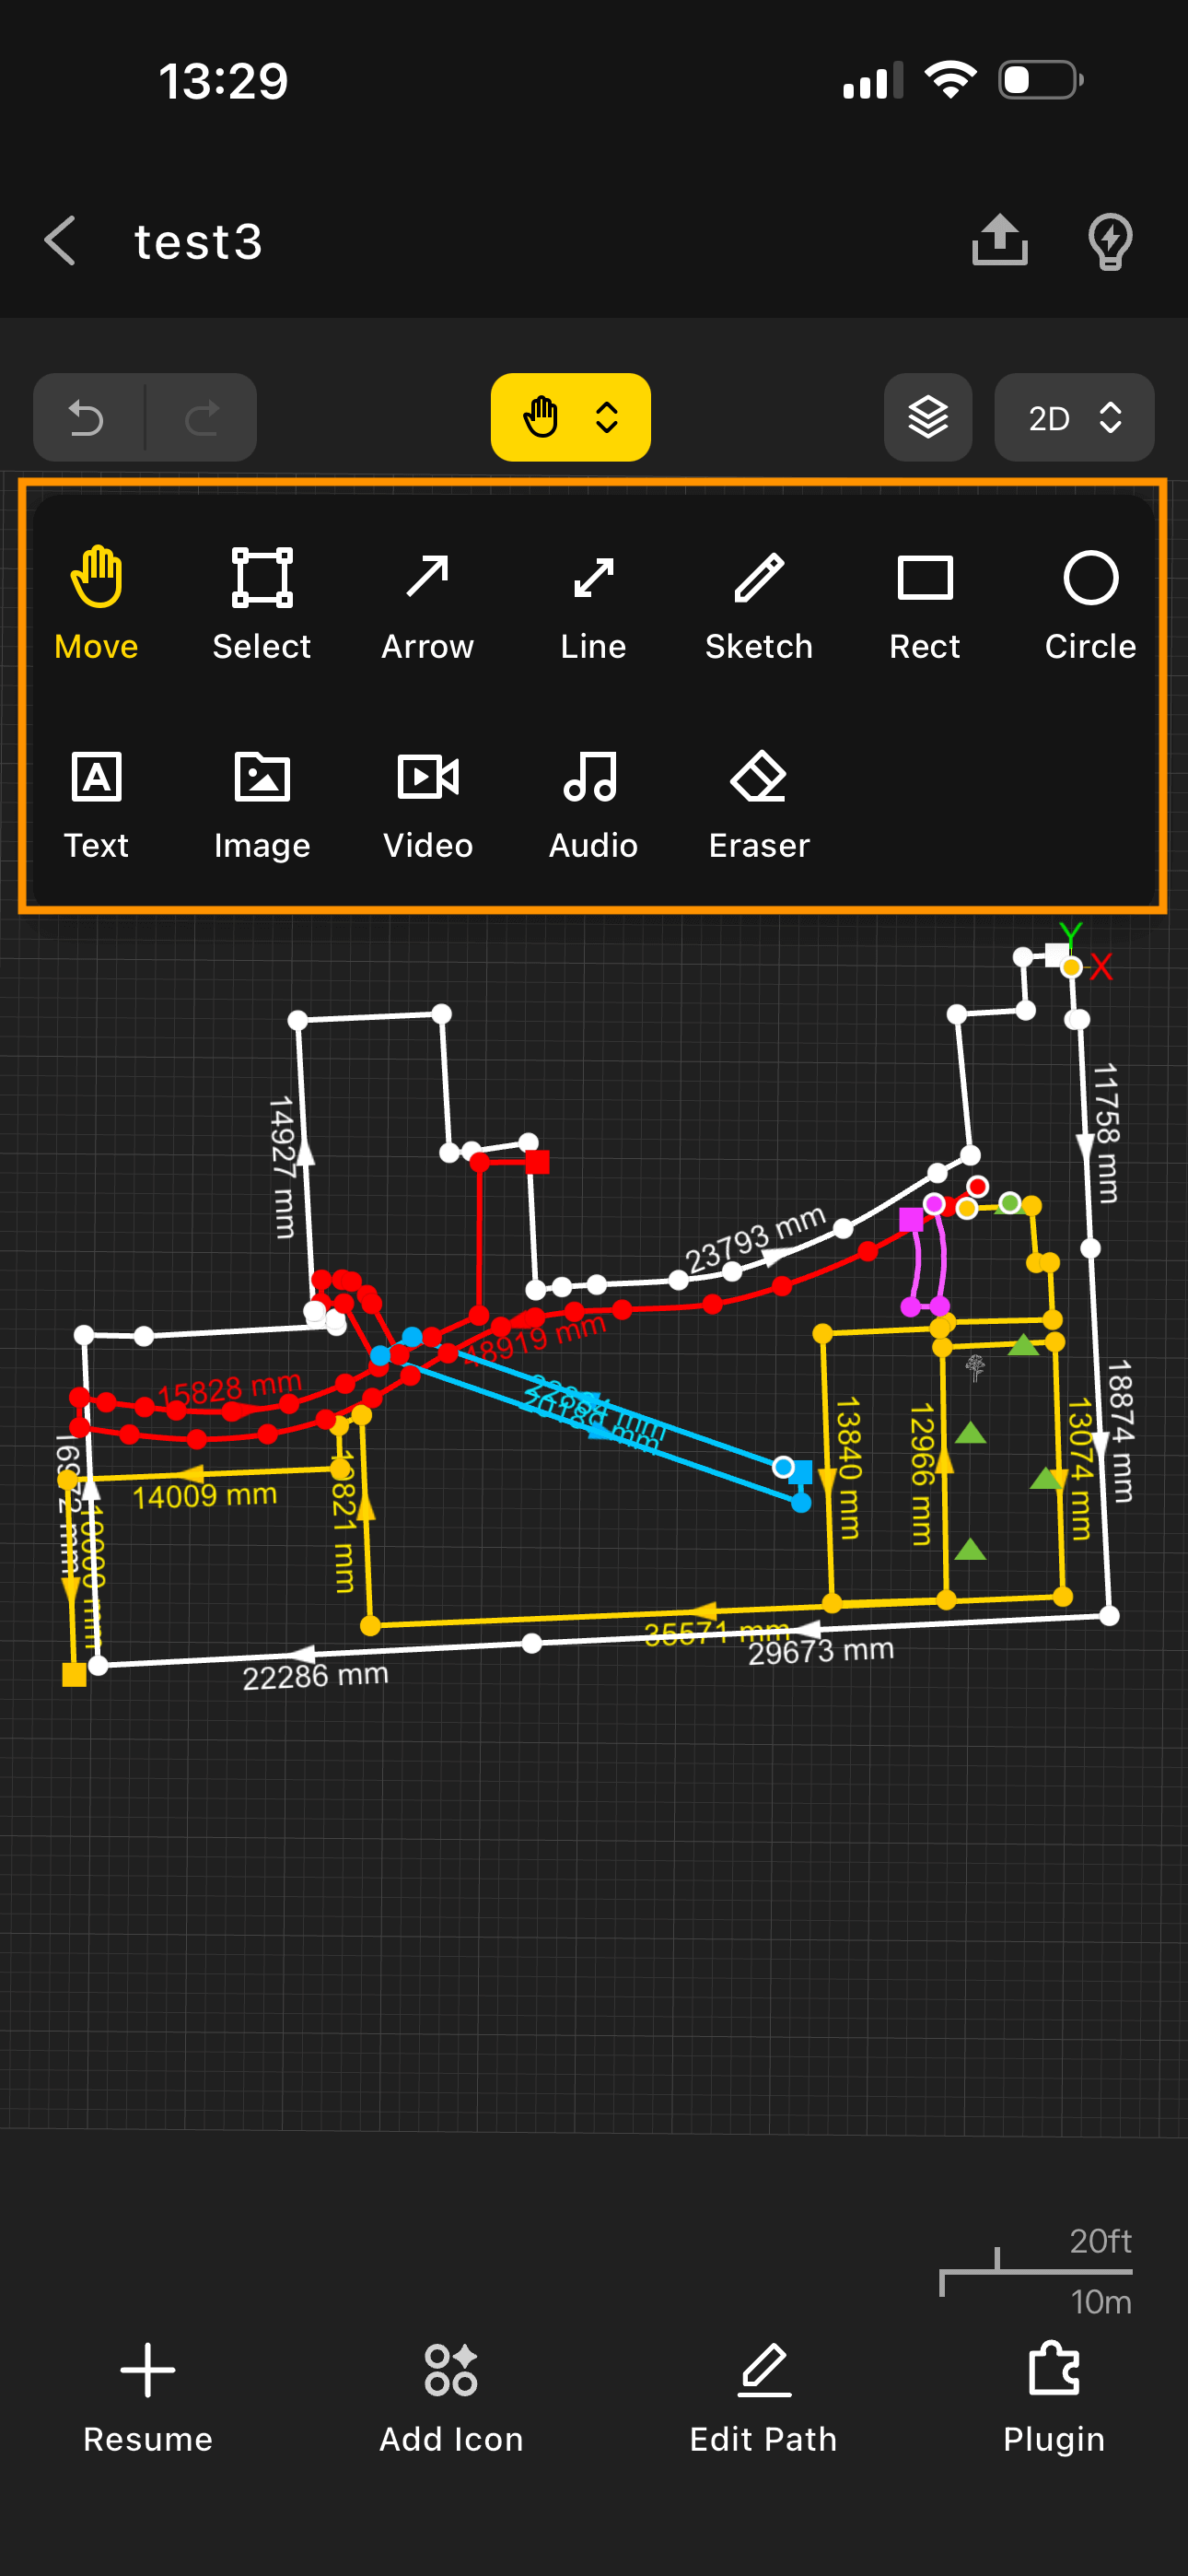
8.1 Supported Markers
- Tap the "Hand" icon in the center of the canvas and expand the dropdown to add arrows, lines, freehand drawings, rectangles, circles, text, images, videos, and audio;
- Select the desired marker type, add it, then tap "Done";
- Select an inserted marker; use the properties panel that appears below to modify color and other attributes.
8.2 Eraser
- Tap the "Hand" icon in the center of the canvas and select the "Eraser" tool
- Tap each marker you want to erase
- Tap "Done Erasing"
8.3 Icon Library
- Tap "Add Icon" in the bottom toolbar
- Select an icon category: General, Renovation, Interior, Garden
- Tap an icon to add it to the canvas
- Adjust the icon's color and size as needed
9. Industry Applications
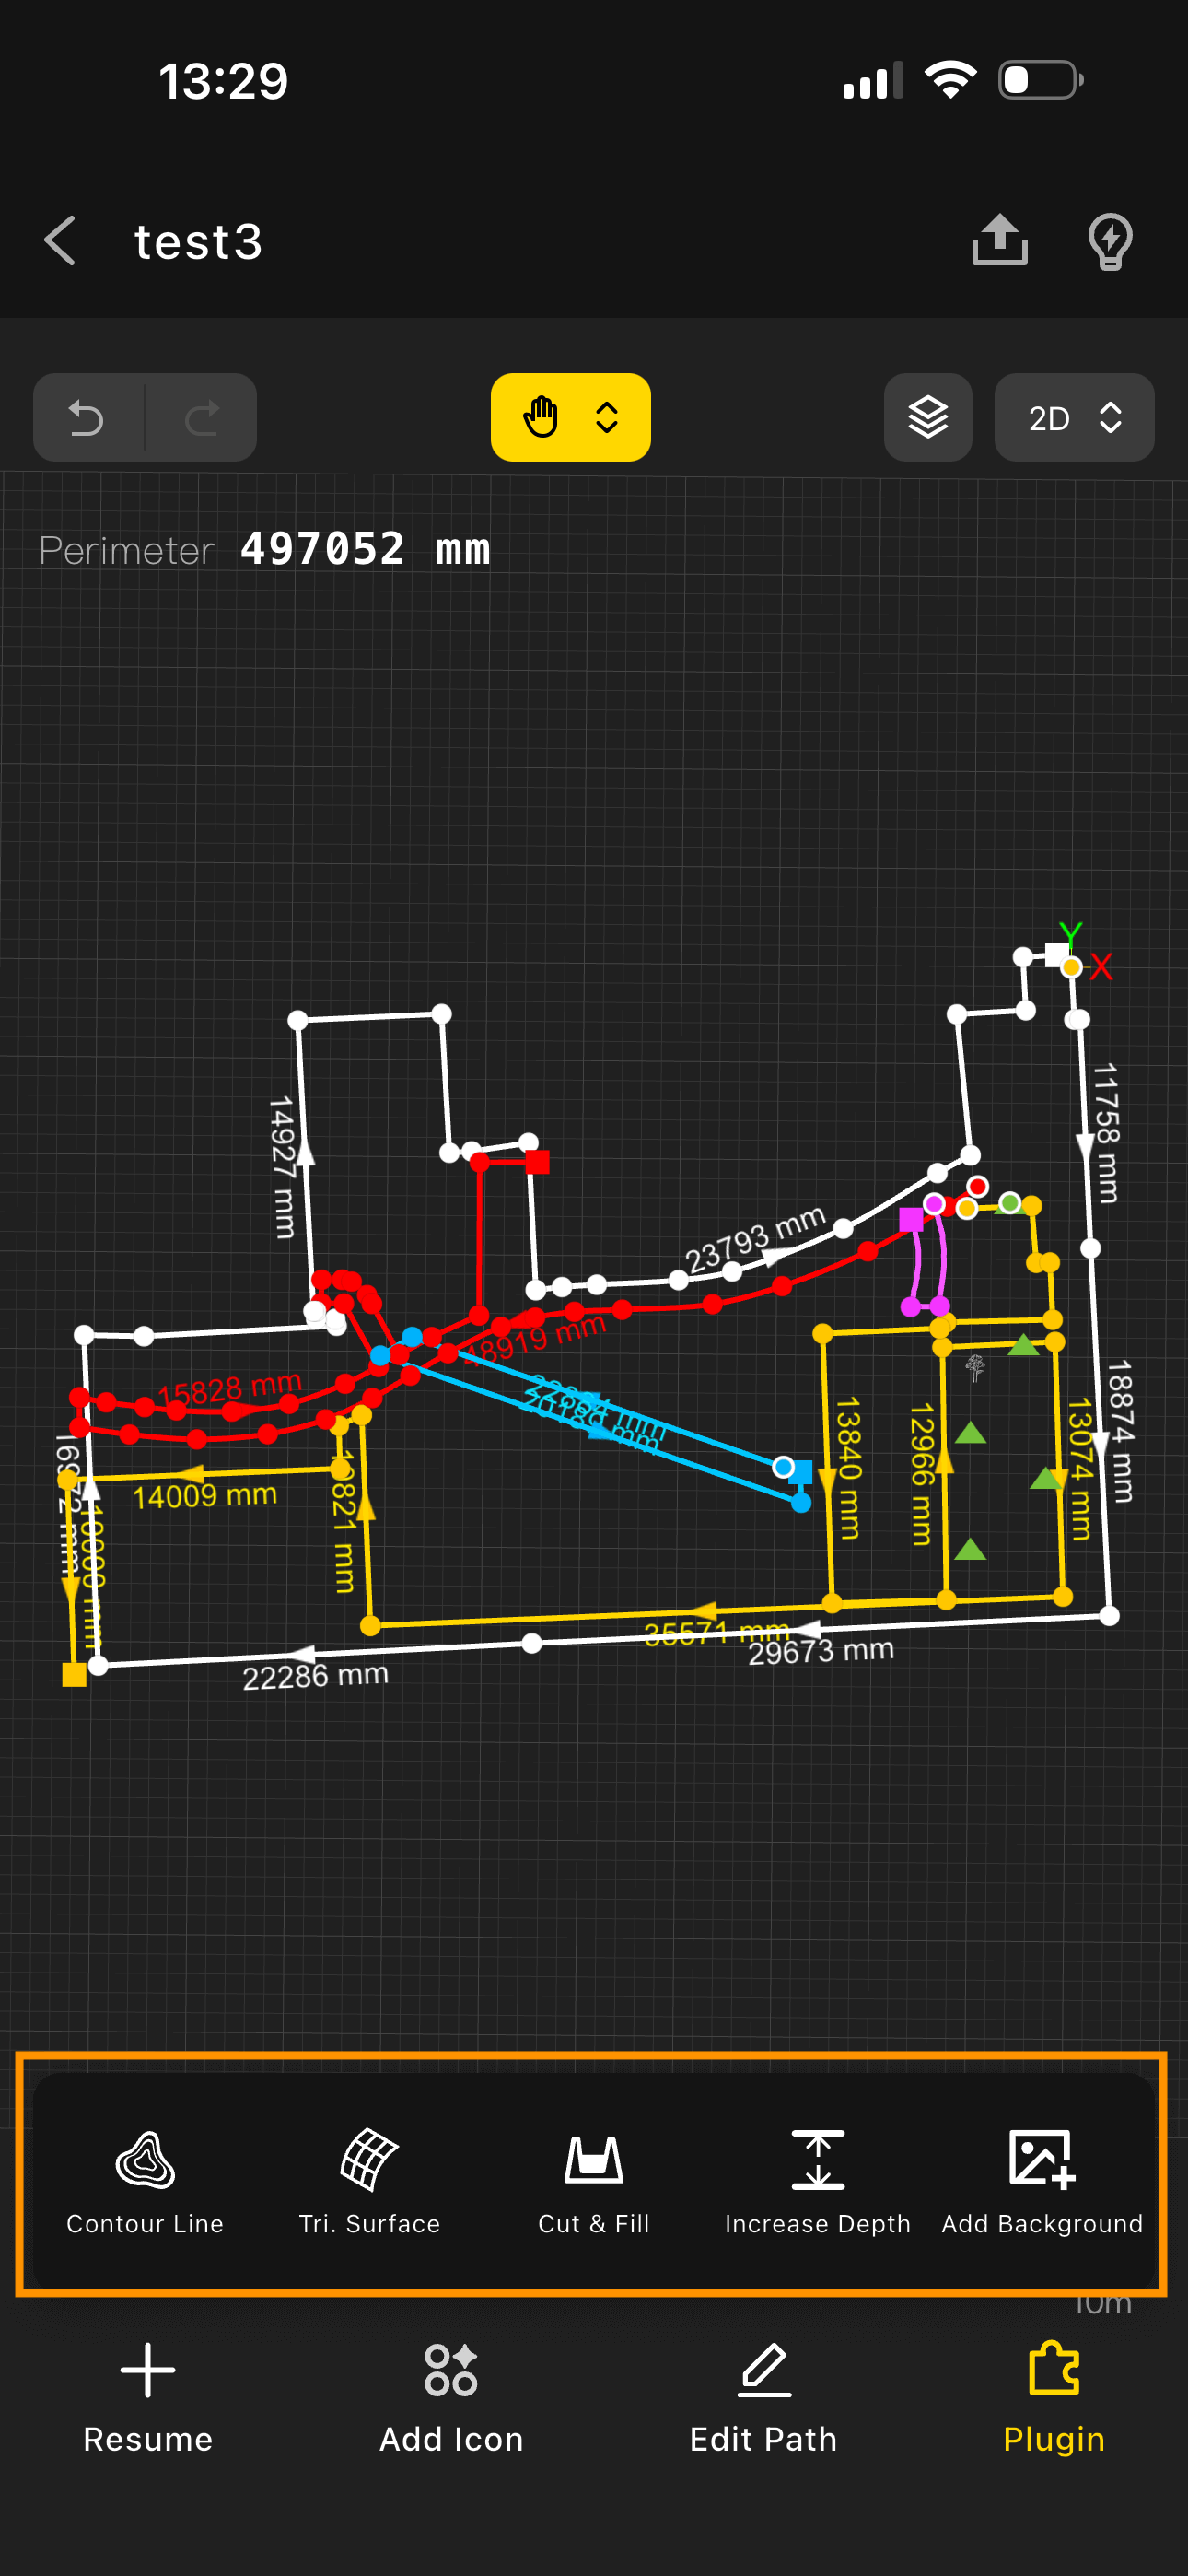
9.1 Contour Lines
- Bottom toolbar → tap "Industry Applications — Contour Lines";
- View the contour shape, surface area, and volume of the measured terrain;
- Use the top buttons to switch between 2D and 3D view
9.2 Surface
- Bottom toolbar → tap "Industry Applications — Surface";
- View the surface shape, surface area, and volume of the measured terrain;
- Use the top buttons to switch between the lowest-point plane view and the perimeter plane view
9.3 Cut & Fill
- Bottom toolbar → tap "Industry Applications — Cut & Fill"
- Adjust the horizontal plane position using the slider;
- View the required cut or fill volume
9.4 Add Depth
- Bottom toolbar → tap "Industry Applications — Add Depth"
- Adjust the depth of the measured shape using the slider to view the required volume
9.5 Add Background
- Bottom toolbar → tap "Industry Applications — Add Background";
- Select an image to insert; crop, adjust transparency, and rotate as needed
- Use the top buttons to select the measurement shape; pinch to zoom
- Tap "Done" to apply the background
10. Data Sharing and Export
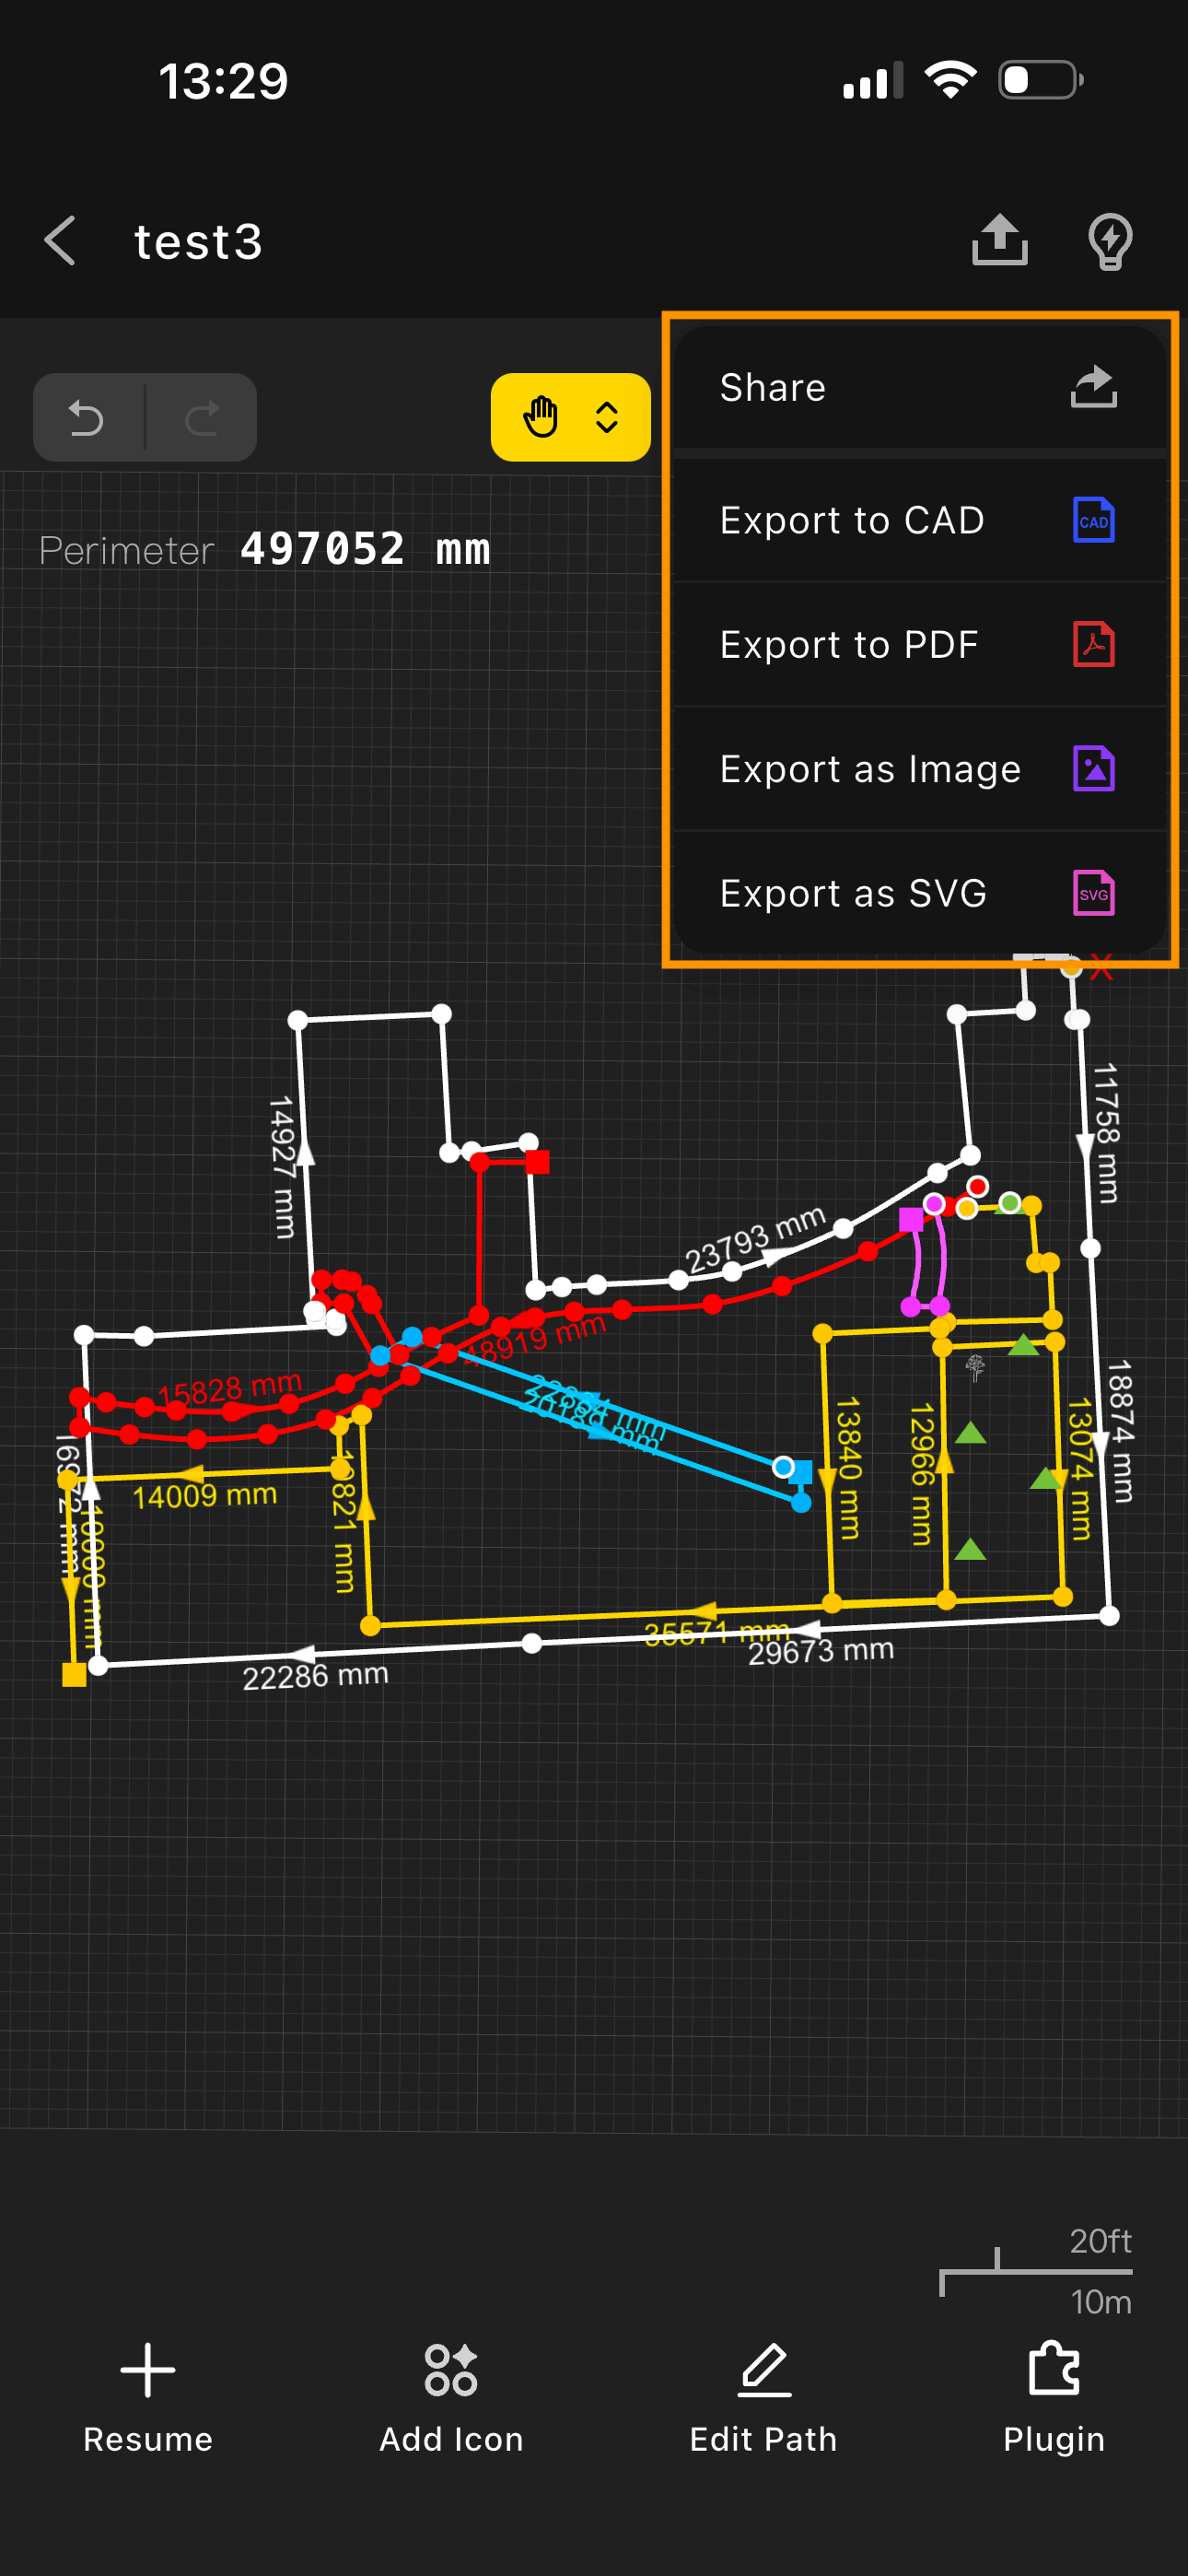
10.1 Project Sharing
- Tap the "Share" button
- Set the "Link Expiration"
- Share via your preferred method
- Recipients can view the project by tapping the shared link
10.2 Data Export
Export CAD:
- Select DXF or DWG format
- Configure export settings
- Tap "Export"
- Save to device or forward
Export PDF:
- Select "Export as PDF"
- Configure export settings
- Tap Preview
- Confirm and tap "Export"
- Save to device or forward
Export CSV:
- Select "Export as CSV"
- Configure export settings
- Tap "Export"
- Save to device or forward
Export Image:
- Select JPG, PNG, or SVG
- Configure other export settings
- Tap Preview
- Confirm and tap "Export"
- Save as image or forward
11. Troubleshooting
12.1 Frequently Asked Questions
Q: Device won't power on? A: Check the battery level. Charge with the original charger for 30 minutes and try again.
Q: Measurement accuracy is off? A: Ensure the device is calibrated, check for interference in the environment, and re-measure.
Q: Bluetooth connection is unstable? A: Check device proximity and re-pair the device.
Q: App crashes or freezes? A: Update to the latest version, clear phone memory, and restart the app.
Q: Data was lost? A: Check the cloud backup and contact support to recover data.
Q: Exported file won't open? A: Verify the file format is supported, check file integrity, and try opening with another application.
12.2 Connection Issues
Bluetooth Connection Problems:
- Confirm Bluetooth is enabled on the device
- Check whether the device is in pairing mode
- Restart both the device and phone
12.3 Measurement Accuracy Issues
Accuracy Calibration:
Operational Tips
- Move at a steady pace
- Avoid sharp turns and sudden jolts during measurement
- Select the appropriate measurement mode
- Take multiple measurements and average the results
Accuracy Verification:
- Test with an object of known dimensions
- Compare against traditional measurement tools
- Record measurement deviations
- Adjust measurement parameters
12. Tips and Best Practices
12.1 Measurement Strategies for Different Scenarios
Indoor Measurement Strategies:
- Small rooms: Use Wall Mode, measure along the walls
- Large spaces: Measure different areas using separate layers
- Complex layouts: Use Trajectory Mode for detailed paths; use markers to record additional information
- Irregular spaces: Combine Line Mode and Curve Mode
Outdoor Measurement Strategies:
- Landscape design: Use path-based modes to plan routes
- Building exteriors: Combine Wall Mode with other modes
- Terrain measurement: Pay attention to elevation changes
- Large-scale measurement: Plan measurement points in advance
12.2 Improving Measurement Accuracy
Operational Tips:
- Steady Movement
- Maintain a consistent speed
- Avoid sudden stops
- Minimize shaking
- Use a comfortable grip
- Device Maintenance
- Clean the lens regularly
- Keep firmware up to date
- Calibrate as needed
- Avoid extreme environments
12.3 Workflow Optimization
Before Measuring:
- Develop a measurement plan
- Prepare necessary tools
- Check device status
- Configure measurement parameters
During Measurement:
- Follow the plan
- Check results in real time
- Record key infoomation
- Adjust strategy as needed
Post-Processing:
- Verify measurement results
- Make necessary edits
- Add markers and annotations
- Save and back up
12.4 Team Collaboration
Collaboration Workflow:
- Project Planning
- Define roles and responsibilities
- Set a schedule
- Establish quality standards
- Set up communication channels
- Collaborative Measurement
- Standardize measurement protocols
- Share data in real time
- Report progress regularly
- Cross-check quality
- Results Integration
- Standardize data formats
- Validate results
- Generate reports
- Confirm deliverables
13. Updates and Maintenance
13.1 Software Updates
App Update:
- Auto-update is enabled by default
- Manual update: tap Avatar in the top-left corner → About Wiichee → Version Update
Firmware Update:
- Connect the device to the app
- Tap Avatar in the top-left corner → Firmware Update to check the firmware version
- Download the update package
- Follow the on-screen prompts to update
- Restart the device
13.2 Device Maintenance
Routine Care:
- Clean the device regularly
- Inspect the charging port
- Protect the screen from damage
- Store the device properly
14. Technical Support
Contact Support
Contact Information:
- Email Support: wiichee@bampony.com
- Official Website: www.wiichee.com
When submitting an issue, please provide:
- Device model and serial number
- App version
- Detailed description of the problem
- Screenshots or video of the error
- Steps to reproduce the issue